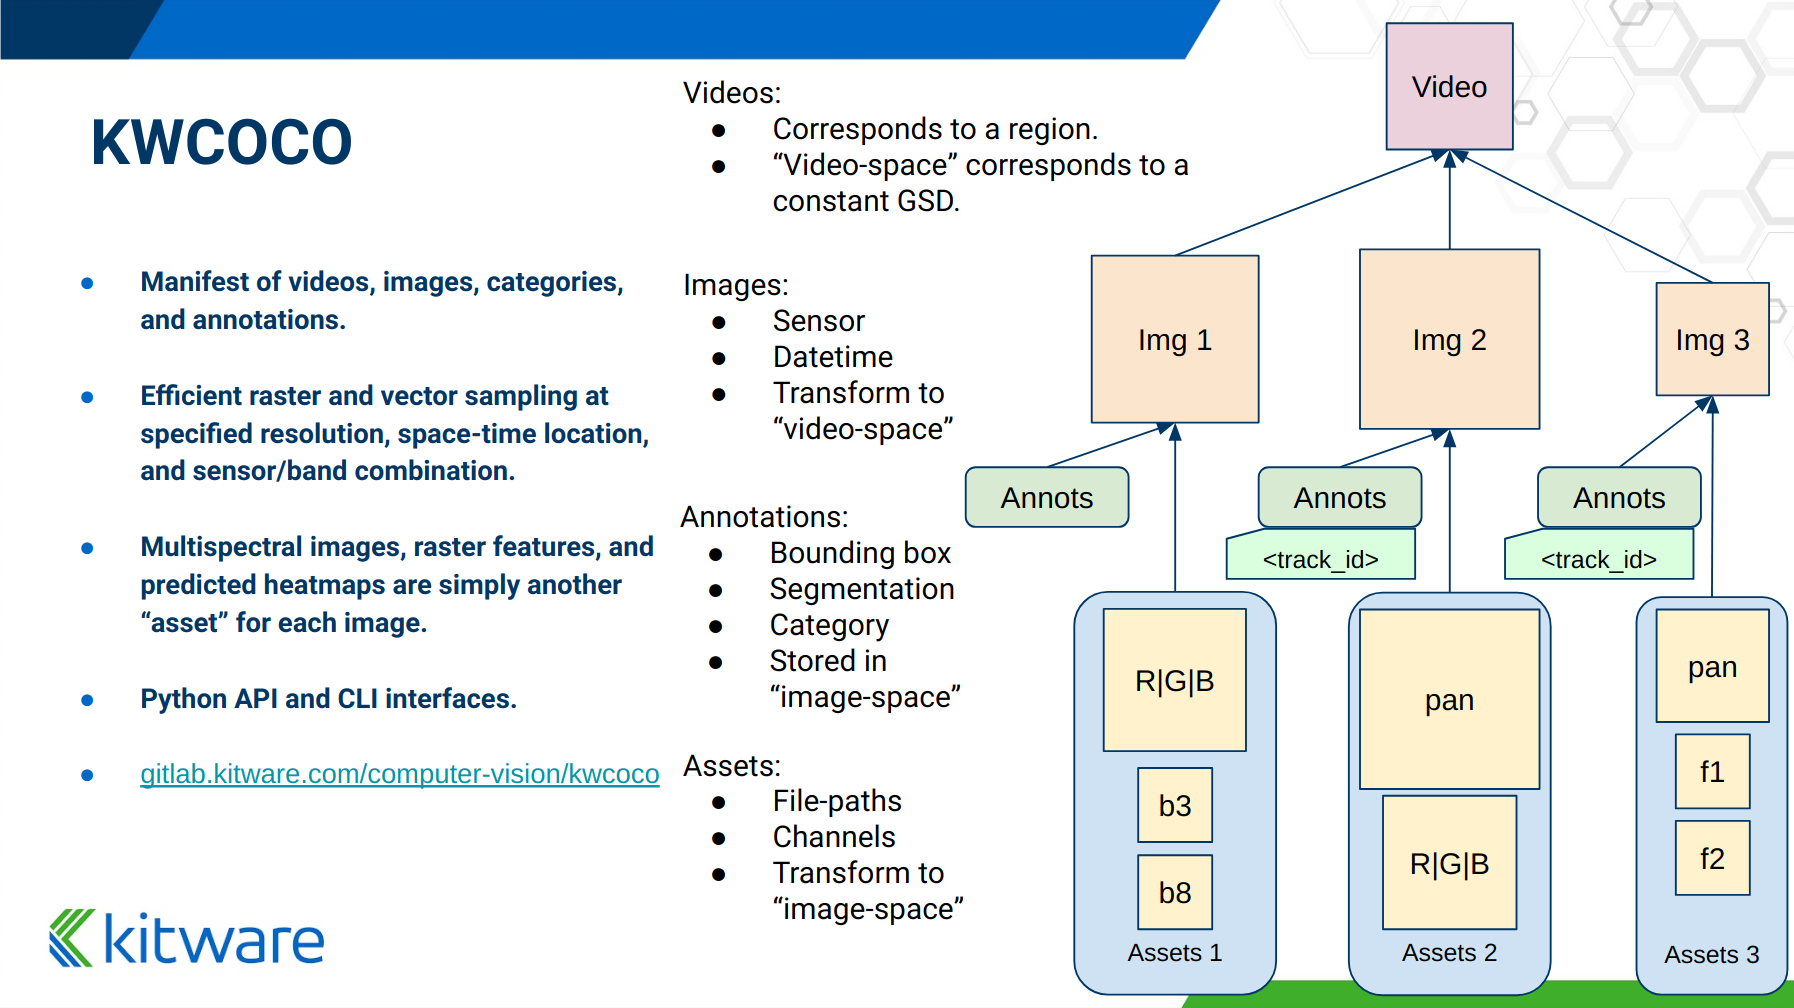
图像数据集的模块和命令行界面


项目描述


阅读文档 |
|
Gitlab (主) |
|
Github (镜像) |
|
Pypi |
|
幻灯片 |
https://docs.google.com/presentation/d/1OqljzzaZdjzmMg9876J4wFOmdFlJsH2Lc8_7tcqAPUE/edit |
博客 |
此项目的首页为: https://gitlab.kitware.com/computer-vision/kwcoco
kwcoco 包是一个 Python 模块和命令行工具,用于读取、写入、修改和与计算机视觉数据集(即带有栅格或矢量标注的图像或视频)进行交互。数据集使用 json 文件或 SQL 数据库定义,这些文件指向磁盘或云上存在的资产。Python API 提供了一种高效加载图像数据和关联元数据(例如,用于写入 torch 数据集)的方法。命令行应用程序提供了一种快速汇总、可视化和对数据进行常见修改(例如,子集、并集)的方法。
Kitware COCO 模块定义了微软 COCO 格式的变体,最初是为“收集图像中的上下文”目标检测挑战开发的。我们与原始模块向后兼容,但在多个地方(包括分割、关键点、标注轨迹、多光谱图像和视频)进行了改进(表示通用的图像序列)。
KWCOCO 文件是一个“清单”,作为指向计算机视觉数据集中所有图像、类别和标注的单一引用。因此,在将算法应用于数据集时,只需算法接受一个数据集参数:KWCOCO 文件的路径即可。通常,KWCOCO 文件将与所引用的数据一起位于“捆绑”目录中,并且 KWCOCO 文件中的路径将与 KWCOCO 文件本身的位置相关。
此模型中的主要数据结构主要基于 https://github.com/cocodataset/cocoapi 中的实现。它使用相同的效率核心索引数据结构,但在我们的实现中,索引可以可选地关闭,函数默认为静默(除长运行过程外,默认情况下可选地显示进度)。我们支持添加和删除图像、类别和标注的辅助函数。
我们已在 kwcoco.metrics 子模块中重新实现了目标检测评分代码。
原始的 pycocoutils API 通过 kwcoco.compat_dataset.COCO 类公开,以便与使用 pycocoutils 的现有工具进行替换。
kwcoco.kw18 模块中提供了一些对 kw18 文件的支持。
安装
可以通过 pip 安装 kwcoco 包。
# From pypi
pip install kwcoco
功能概述
kwcoco 的核心目标是使组织、查询、操作和分发图像和视频数据集变得容易。为了实现这一目标,它提供了几个功能。
一个基于内存的字典后端数据结构,具有随机访问和索引查找。
支持 sqlite3 或 postgresql(目前为只读)的 sqlalchemy 后端。
使用 delayed_image 进行高效图像子区域的随机抽样。
使用 scriptconfig 的命令行界面 (CLI),用于操作/检查 coco 文件。
透明的 coco 文件压缩(例如,从/写入 zipfile)。
支持将视频作为图像帧列表。
通过图像资产支持多光谱图像。
支持分类和边界框目标检测的指标(分割和多边形目标检测即将推出)。
生成 toydata 以方便 CI 测试和演示。
与原始 cocoapi 的向后兼容性。
KWCOCO CLI
安装 KWCOCO 后,您还将获得 kwcoco 命令行工具。该工具使用 scriptconfig / argparse 命令行界面。运行 kwcoco --help 应该是一个很好的起点。
usage: kwcoco [-h] [--version] {stats,union,split,show,toydata,eval,conform,modify_categories,reroot,move,validate,subset,grab,info,visual_stats,find_unregistered_images} ...

The Kitware COCO CLI

options:
  -h, --help            show this help message and exit
  --version             show version number and exit (default: False)

commands:
  {stats,union,split,show,toydata,eval,conform,modify_categories,reroot,move,validate,subset,grab,info,visual_stats,find_unregistered_images}
                        specify a command to run
    stats               Compute summary statistics about a COCO dataset
    union               Combine multiple COCO datasets into a single merged dataset.
    split               Split a single COCO dataset into two sub-datasets.
    show                Visualize a COCO image using matplotlib or opencv, optionally writing
    toydata (demodata)  Create COCO toydata for demo and testing purposes.
    eval (eval_detections)
                        Evaluate and score predicted versus truth detections / classifications in a
    conform             Infer properties to make the COCO file conform to different specs.
    modify_categories   Rename or remove categories
    reroot              Reroot image paths onto a new image root.
    move (mv)           Move a kwcoco file to a new location while maintaining relative paths.
    validate            Validates that a coco file satisfies expected properties.
    subset              Take a subset of this dataset and write it to a new file
    grab                Grab standard datasets.
    info (tables)       Print the first few rows from specified tables. Tries to avoid reading the
    visual_stats (plot_stats)
                        Inspect properties of dataset and write raw data tables and visual plots.
    find_unregistered_images
                        Find images in a kwcoco bundle that are not registered in a kwcoco file.
这可以帮助您通过命令行检查(通过统计和显示)、组合(通过并集)以及进行训练分割(通过分割)。它还包含 toydata,该数据可以生成用于测试的 COCO 文件。kwcoco CLI 具有自动补全功能,但需要 启用 argcomplete。
玩具数据
没有数据集,但您仍然想测试您的算法?尝试 KWCOCO 形状演示数据集,并生成任意大小的数据集。
toydata 子模块在嘈杂的背景上渲染简单的对象——可选地带有辅助通道——并提供边界框、分割和关键点注释。以下示例显示了带有和不带叠加注释的生成玩具图像。
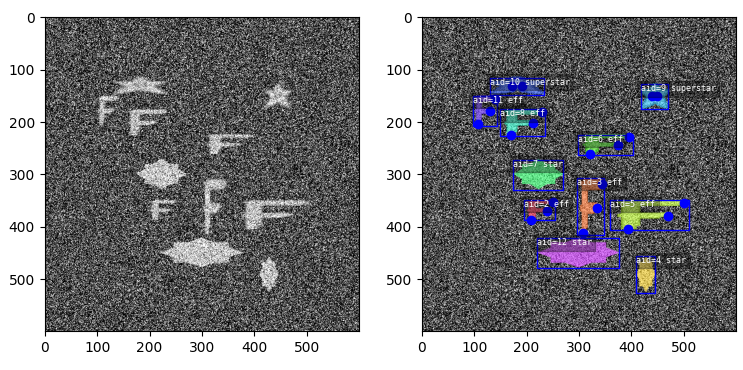
支持视频数据、多光谱和多传感器演示数据。
CocoDataset 对象
kwcoco.CocoDataset 类能够动态添加和删除类别、图像和注释。比原始 COCO 格式有更好的关键点和分割格式支持。尽管是用 Python 编写的,但这种数据结构效率相当高。
>>> import kwcoco
>>> import json
>>> # Create demo data
>>> demo = kwcoco.CocoDataset.demo()
>>> # Modify it such that all paths are absolute wrt to your machine
>>> demo.reroot(absolute=True)
>>> # could also use demo.dump / demo.dumps, but this is more explicit
>>> text = json.dumps(demo.dataset)
>>> with open('demo.json', 'w') as file:
>>>    file.write(text)

>>> # Read from disk
>>> self = kwcoco.CocoDataset('demo.json')

>>> # Add data
>>> cid = self.add_category('Cat')
>>> gid = self.add_image('new-img.jpg')
>>> aid = self.add_annotation(image_id=gid, category_id=cid, bbox=[0, 0, 100, 100])

>>> # Remove data
>>> self.remove_annotations([aid])
>>> self.remove_images([gid])
>>> self.remove_categories([cid])

>>> # Look at data
>>> print(ub.urepr(self.basic_stats(), nl=1))
>>> print(ub.urepr(self.extended_stats(), nl=2))
>>> print(ub.urepr(self.boxsize_stats(), nl=3))
>>> print(ub.urepr(self.category_annotation_frequency()))


>>> # Inspect data
>>> import kwplot
>>> kwplot.autompl()
>>> self.show_image(gid=1)

>>> # Access single-item data via imgs, cats, anns
>>> cid = 1
>>> self.cats[cid]
{'id': 1, 'name': 'astronaut', 'supercategory': 'human'}

>>> gid = 1
>>> self.imgs[gid]
{'id': 1, 'file_name': 'astro.png', 'url': 'https://i.imgur.com/KXhKM72.png'}

>>> aid = 3
>>> self.anns[aid]
{'id': 3, 'image_id': 1, 'category_id': 3, 'line': [326, 369, 500, 500]}

# Access multi-item data via the annots and images helper objects
>>> aids = self.index.gid_to_aids[2]
>>> annots = self.annots(aids)

>>> print('annots = {}'.format(ub.urepr(annots, nl=1, sv=1)))
annots = <Annots(num=2)>

>>> annots.lookup('category_id')
[6, 4]

>>> annots.lookup('bbox')
[[37, 6, 230, 240], [124, 96, 45, 18]]

>>> # built in conversions to efficient kwimage array DataStructures
>>> print(ub.urepr(annots.detections.data))
{
    'boxes': <Boxes(xywh,
                 array([[ 37.,   6., 230., 240.],
                        [124.,  96.,  45.,  18.]], dtype=float32))>,
    'class_idxs': np.array([5, 3], dtype=np.int64),
    'keypoints': <PointsList(n=2) at 0x7f07eda33220>,
    'segmentations': <PolygonList(n=2) at 0x7f086365aa60>,
}

>>> gids = list(self.imgs.keys())
>>> images = self.images(gids)
>>> print('images = {}'.format(ub.urepr(images, nl=1, sv=1)))
images = <Images(num=3)>

>>> images.lookup('file_name')
['astro.png', 'carl.png', 'stars.png']

>>> print('images.annots = {}'.format(images.annots))
images.annots = <AnnotGroups(n=3, m=3.7, s=3.9)>

>>> print('images.annots.cids = {!r}'.format(images.annots.cids))
images.annots.cids = [[1, 2, 3, 4, 5, 5, 5, 5, 5], [6, 4], []]
JSON 规范
COCO 文件是一个遵循特定规范的 json 文件。用于存储计算机视觉数据集:即图像、类别和注释。图像有一个 id 和一个文件名,它包含一个指向图像数据的相对或绝对路径。图像还可以有辅助文件(例如,用于深度掩码、红外或运动)。类别有一个 id、一个名称和一个可选的超类别。注释总是有一个 id、一个 image-id 和一个边界框。通常它们还包含一个 category-id。有时它们还包含关键点和分割。数据集还可以存储视频,在这种情况下,图像应该有一个 video_id 字段,注释应该有一个 track_id 字段。
原始 MS-COCO API 的实现和扩展 [1]。
数据集规范
在 kwcoco/coco_schema_informal.rst 中给出的规范的非正式描述。
关于规范的正式描述,请参阅 kwcoco/coco_schema.json。
有关“warp”变换的更多信息,请参阅 warping_and_spaces。
以下概述幻灯片显示了结构的高级概述 - 实体及其关系
按功能分组 CocoDatset API
以下列出了 kwcoco.CocoDataset 的分组属性/方法名称。有关其他详细信息,请参阅代码中的文档。
{
    'classmethod': [
        'coerce',
        'demo',
        'from_coco_paths',
        'from_data',
        'from_image_paths',
        'random',
    ],
    'slots': [
        'index',
        'hashid',
        'hashid_parts',
        'tag',
        'dataset',
        'bundle_dpath',
        'assets_dpath',
        'cache_dpath',
    ],
    'property': [
        'anns',
        'cats',
        'cid_to_aids',
        'data_fpath',
        'data_root',
        'fpath',
        'gid_to_aids',
        'img_root',
        'imgs',
        'n_annots',
        'n_cats',
        'n_images',
        'n_videos',
        'name_to_cat',
    ],
    'method(via MixinCocoAddRemove)': [
        'add_annotation',
        'add_annotations',
        'add_category',
        'add_image',
        'add_images',
        'add_video',
        'clear_annotations',
        'clear_images',
        'ensure_category',
        'ensure_image',
        'remove_annotation',
        'remove_annotation_keypoints',
        'remove_annotations',
        'remove_categories',
        'remove_images',
        'remove_keypoint_categories',
        'remove_videos',
        'set_annotation_category',
    ],
    'method(via MixinCocoObjects)': [
        'annots',
        'categories',
        'images',
        'videos',
    ],
    'method(via MixinCocoStats)': [
        'basic_stats',
        'boxsize_stats',
        'category_annotation_frequency',
        'category_annotation_type_frequency',
        'conform',
        'extended_stats',
        'find_representative_images',
        'keypoint_annotation_frequency',
        'stats',
        'validate',
    ],
    'method(via MixinCocoAccessors)': [
        'category_graph',
        'delayed_load',
        'get_auxiliary_fpath',
        'get_image_fpath',
        'keypoint_categories',
        'load_annot_sample',
        'load_image',
        'object_categories',
    ],
    'method(via CocoDataset)': [
        'copy',
        'dump',
        'dumps',
        'subset',
        'union',
        'view_sql',
    ],
    'method(via MixinCocoExtras)': [
        'corrupted_images',
        'missing_images',
        'rename_categories',
        'reroot',
    ],
    'method(via MixinCocoDraw)': [
        'draw_image',
        'imread',
        'show_image',
    ],
}
将您的 RGB 数据转换为 KWCOCO
假设您可以通过编程方式访问您的数据集,您可以使用类似以下代码的过程轻松地将数据转换为 COCO 文件
# ASSUME INPUTS
# my_classes: a list of category names
# my_annots: a list of annotation objects with bounding boxes, images, and categories
# my_images: a list of image files.

my_images = [
    'image1.png',
    'image2.png',
    'image3.png',
]

my_classes = [
    'spam', 'eggs', 'ham', 'jam'
]

my_annots = [
    {'image': 'image1.png', 'box': {'tl_x':  2, 'tl_y':  3, 'br_x':  5, 'br_y':  7}, 'category': 'spam'},
    {'image': 'image1.png', 'box': {'tl_x': 11, 'tl_y': 13, 'br_x': 17, 'br_y': 19}, 'category': 'spam'},
    {'image': 'image3.png', 'box': {'tl_x': 23, 'tl_y': 29, 'br_x': 31, 'br_y': 37}, 'category': 'eggs'},
    {'image': 'image3.png', 'box': {'tl_x': 41, 'tl_y': 43, 'br_x': 47, 'br_y': 53}, 'category': 'spam'},
    {'image': 'image3.png', 'box': {'tl_x': 59, 'tl_y': 61, 'br_x': 67, 'br_y': 71}, 'category': 'jam'},
    {'image': 'image3.png', 'box': {'tl_x': 73, 'tl_y': 79, 'br_x': 83, 'br_y': 89}, 'category': 'spam'},
]

# The above is just an example input, it is left as an exercise for the
# reader to translate that to your own dataset.

import kwcoco
import kwimage

# A kwcoco.CocoDataset is simply an object that manages an underlying
# `dataset` json object. It contains methods to dynamically, add, remove,
# and modify these data structures, efficient lookup tables, and many more
# conveniences when working and playing with vision datasets.
my_dset = kwcoco.CocoDataset()

for catname in my_classes:
    my_dset.add_category(name=catname)

for image_path in my_images:
    my_dset.add_image(file_name=image_path)

for annot in my_annots:
    # The index property provides fast lookups into the json data structure
    cat = my_dset.index.name_to_cat[annot['category']]
    img = my_dset.index.file_name_to_img[annot['image']]
    # One quirk of the coco format is you need to be aware that
    # boxes are in <top-left-x, top-left-y, width-w, height-h> format.
    box = annot['box']
    # Use kwimage.Box to preform quick, reliable, and readable
    # conversions between common bounding box formats.
    ltrb = [box['tl_x'], box['tl_y'], box['br_x'], box['br_y']]
    xywh = kwimage.Box.coerce(ltrb, format='ltrb').to_coco()
    my_dset.add_annotation(bbox=xywh, image_id=img['id'], category_id=cat['id'])

# Dump the underlying json `dataset` object to a file
my_dset.fpath = 'my-converted-dataset.mscoco.json'
my_dset.dump(my_dset.fpath, newlines=True)

# Dump the underlying json `dataset` object to a string
print(my_dset.dumps(newlines=True))
KWCOCO 空间
根据他们的数据集,kwcoco 的用户可能需要关注以下 3 个空间:1)视频空间,2)图像空间,3)资产/辅助空间。
视频可以包含多个图像,图像可以包含多个资产/辅助项目,kwcoco 需要知道任何与该层次结构中不同级别相关联的转换。
视频空间 - 在一系列图像中,每个单独的图像可能具有不同的分辨率,或者与其他图像序列中的图像对齐不当。当与“视频”序列中的图像一起工作时,此空间才重要。
图像空间 - 如果一个图像包含多个辅助/资产项,这个空间是指它们在“图像级别”上重新采样的空间。按照惯例,图像上的所有注释都应始终在图像空间中给出。
辅助/资产空间 - 这是KWCOCO指向的磁盘上矢量图像数据的原生空间/分辨率。当图像只包含单个资产时,这个空间仅在图像包含多个不同分辨率的文件时才有意义。
当一项在某个空间注册时。(例如,您注册一个视频、图像或辅助/资产项),kwcoco将从知道(1)对象在其自己的空间中的宽度和高度,以及从该对象到其父空间的任何变换中受益——即辅助/资产项需要知道如何变换到图像空间,图像需要知道如何变换到视频空间(如果适用)。这种扭曲可以简单到只是一个缩放因子,也可以复杂到是一个完整的单应性矩阵(我们可能还会进一步推广),并通过TransformSpec指定。当此变换未指定时,假定它是恒等变换,因此对于预对齐的数据集,用户不需要担心空间之间的区别,只需在“图像空间”中工作即可。
将您的多光谱多分辨率数据转换为KWCOCO
KWCOCO能够处理多光谱图像。更一般地说,一个KWCOCO图像可以包含任意数量的“矢量资产”。推动这个案例使用的是多光谱图像,但它也包含更通用的用例,其中矢量可以表示深度传感器的元数据,或立体图像等。
简单来说,一个KWCOCO图像可以由多个图像文件组成,并且每个图像文件都可以有任意数量的通道。此外,这些图像文件不需要具有相同的分辨率。但是,单个图像中的通道目前必须是唯一的。
由于图像可以有不同的分辨率,我们需要提出“KWCOCO空间”的话题。有关详细信息,请参阅“KWCOCO空间”的讨论,但简要地说,kwcoco的用户需要关注以下三个空间:(1)视频空间,(2)图像空间,(3)资产/辅助空间,并且KWCOCO将需要了解它们。
作为一个简单的例子,让我们假设您有一个包含RGB图像序列、相应红外图像、深度估计和光流估计的数据集。红外图像存储在RGB图像的一半分辨率,但深度和流数据与RGB数据具有相同的分辨率。RGB图像有3个通道,流图像有2个通道,深度和红外有1个通道。
如果我们的磁盘上的图像看起来像
- video1/vid1_frame1_rgb.tif
- video1/vid1_frame1_ir.tif
- video1/vid1_frame1_depth.tif
- video1/vid1_frame1_flow.tif
- video1/vid1_frame2_rgb.tif
- video1/vid1_frame2_ir.tif
- video1/vid1_frame2_depth.tif
- video1/vid1_frame2_flow.tif
- video1/vid1_frame3_rgb.tif
- video1/vid1_frame3_ir.tif
- video1/vid1_frame3_depth.tif
- video1/vid1_frame3_flow.tif
我们可以使用以下代码将它们添加到自定义kwcoco文件中。
首先,让我们为磁盘上的这些图像创建一些虚拟数据。
import numpy as np
import kwimage
import ubelt as ub
num_frames = 3
num_videos = 1
width, height = 64, 64

bundle_dpath = ub.Path('demo_bundle').ensuredir()
for vidid in range(1, num_videos + 1):
    vid_dpath = (bundle_dpath / f'video{vidid}').ensuredir()
    for frame_num in range(1, num_frames + 1):
        kwimage.imwrite(vid_dpath / f'vid{vidid}_frame{frame_num}_rgb.tif', np.random.rand(height, width, 3))
        kwimage.imwrite(vid_dpath / f'vid{vidid}_frame{frame_num}_ir.tif', np.random.rand(height // 2, width // 2))
        kwimage.imwrite(vid_dpath / f'vid{vidid}_frame{frame_num}_depth.tif', np.random.rand(height, width, 1))
        kwimage.imwrite(vid_dpath / f'vid{vidid}_frame{frame_num}_flow.tif', np.random.rand(height, width, 2))
现在让我们创建一个kwcoco数据集来注册它们。我们使用通道规范来表示通道是什么。
import ubelt as ub
import os
bundle_dpath = ub.Path('demo_bundle')

import kwcoco
import kwimage
dset = kwcoco.CocoDataset()
dset.fpath = bundle_dpath / 'data.kwcoco.json'

# We will define a map from our suffix codes in the filename to
# kwcoco channel specs that indicate the number of channels
channel_spec_mapping = {
   'rgb': 'red|green|blue',  # rgb is 3 channels
   'flow': 'fx|fy',  # flow is 2 channels
   'ir': 'ir',
   'depth': 'depth',
}

for video_dpath in bundle_dpath.glob('video*'):
   # Add a video and give it a name.
   vidid = dset.add_video(name=video_dpath.name)

   # Parse out information that we need from the filenames.
   # Lots of different ways to do this depending on the use case.
   assets = []
   for fpath in video_dpath.glob('*.tif'):
       _, frame_part, chan_part = fpath.stem.split('_')
       frame_index = int(frame_part[5:])
       assets.append({
           'frame_num': frame_index,
           'channels': channel_spec_mapping[chan_part],
           'fpath': fpath,
       })

   # Group all data from the same frame together.
   frame_to_group = ub.group_items(assets, lambda x: x['frame_num'])
   for frame_index, group in frame_to_group.items():
       # Let us lookup data by channels
       chan_to_item = {item['channels']: item for item in group}
       # Grab the RGB data as it will be our "primary" asset
       rgbdata = chan_to_item['red|green|blue']

       # Use the prefix for the image name
       name = rgbdata['fpath'].stem.split('_rgb')[0]

       height, width = kwimage.load_image_shape(rgbdata['fpath'])[0:2]

       # First add the base image. We will add this image as
       # without a file_name because all of its data will be stored
       # in its auxiliary list. We will assume all images in the
       # video are aligned, so we set `warp_img_to_vid` to be the
       # identity matrix.
       gid = dset.add_image(
           name=name, width=width, height=height,
           warp_img_to_vid=kwimage.Affine.eye().concise())

       # We could have constructed the auxiliary item dictionaries
       # explicitly and added them in the previous step, but we
       # will use the CocoImage api to do this instead.
       coco_img = dset.coco_image(gid)

       for item in group:
           fpath = item['fpath']
           height, width = kwimage.load_image_shape(fpath)[0:2]
           file_name = os.fspath(fpath.relative_to(bundle_dpath))
           coco_img.add_auxiliary_item(
               file_name=file_name, channels=item['channels'], width=width,
               height=height)

# We can always double check we did not make errors using kwcoco validate
dset.validate()
现在我们有一个多光谱多分辨率数据集。您可以使用延迟加载接口加载特定子集的通道(如果您的数据存储在COG或RAW格式中,则是在特定子区域)。
# Get a coco image.
gid = 1
coco_img = dset.coco_image(gid)
# Tell delayed load what channels we want. We can
# also specify which "space" we want to load it in.
# Note: that when specifying channels from multiple asset items
# it is not possible to sample in the the auxiliary / asset space
# so only image and video are allowed there.
delayed_img = coco_img.imdelay('fx|depth|red', space='image')
# We finalize the data to load it
imdata = delayed_img.finalize()
# We can show it if we want, but it's just random data.
import kwplot
kwplot.autompl()
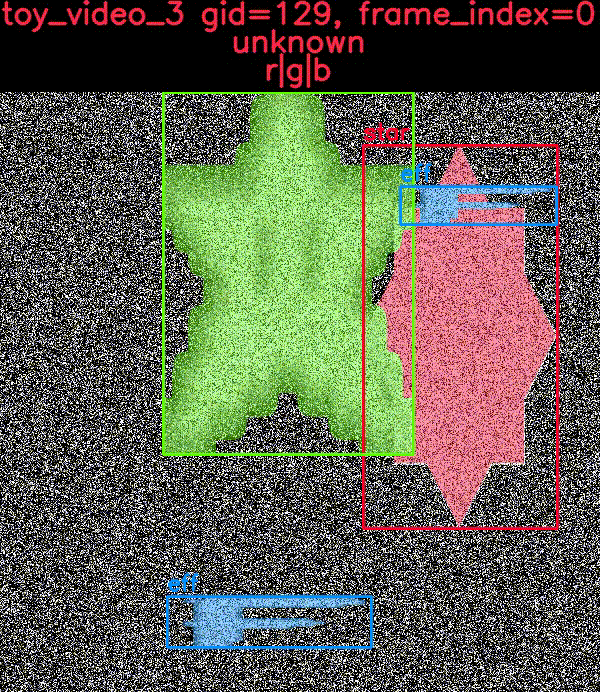
kwplot.imshow(imdata)更有趣的是使用KWCOCO demodata。我们可以看到这里视频可以包含不同分辨率的多个图像,每个图像可以包含不同数量的通道。
import kwcoco
import kwarray
import kwimage
dset = kwcoco.CocoDataset.demo('vidshapes8-msi-multisensor')

gid = 1
coco_img = dset.coco_image(gid)

# Randomly select 3 channels to use
avail_channels = coco_img.channels.fuse().as_list()
channels = '|'.join(kwarray.shuffle(avail_channels)[0:3])
print('channels = {!r}'.format(channels))

delayed_img = coco_img.imdelay(channels, space='video')

imdata = delayed_img.finalize()

# Depending on the sensor intensity might be out of standard ranges,
# we can use kwimage to robustly normalize for this. This lets
# us visualize data with false color.
canvas = kwimage.normalize_intensity(imdata, axis=2)
canvas = np.ascontiguousarray(canvas)

# We can draw the annotations on the image, but be cognizant of the spaces.
# Annotations are always in "image" space, so if we loaded in "video" space
# then we need to warp to that.
imgspace_dets = dset.annots(gid=gid).detections
vidspace_dets = imgspace_dets.warp(coco_img.warp_vid_from_img)

canvas = vidspace_dets.draw_on(canvas)

import kwplot
kwplot.autompl()
kwplot.imshow(canvas)
上述代码的结果是(请注意,数据是随机的,所以它可能在您的机器上有所不同)

要点总结
KWCOCO可以注册不同分辨率的多个资产,将描述同一场景的组注册到“图像”中,然后可以将图像组分组到“视频”中。
注释始终在图像空间中指定
单个图像内的通道代码不得重复。
KWCOCO 通道规范
总结来说,kwcoco.ChannelSpec 和 kwcoco.FusedChannelSpec 代表图像中一组通道或波段。FusedChannelSpec 可能非常简单,如 red|green|blue,或者更复杂,如:red|green|blue|nir|swir16|swir22,而 ChannelSpec 可以是由逗号分隔的一个或多个 FusedChannelSpec 组成的集合。
通道规范的家园已迁移至 delayed_image。有关更多详细信息,请参阅 延迟图像通道规范文档。


下载文件
下载您平台上的文件。如果您不确定选择哪个,请了解有关 安装包 的更多信息。
源代码分发
构建分发
kwcoco-0.8.4.tar.gz 的哈希值
| 算法 | 哈希摘要 | |
|---|---|---|
| SHA256 | 8dec4e6ce0cde8f6dd6af87ac8c1c05b6ccf3bbaf84e2d0c09b9ca7c248dac71 |
|
| MD5 | ca2f7464437de57114ced1623df4e760 |
|
| BLAKE2b-256 | 38f99653e4bba96e48e0799647642d075fbaa4a37e5be23d5fc90ef65e292a28 |
kwcoco-0.8.4-py3-none-any.whl 的哈希值
| 算法 | 哈希摘要 | |
|---|---|---|
| SHA256 | 7470b555ee9aacbdbb51c95c10ba343d6b4f3bbfec0b19bb8df0aecc26c1a177 |
|
| MD5 | a56731005e71b7dcafd08856ee37e0b9 |
|
| BLAKE2b-256 | a2992bcd49997ac336bc91ba905953d185d58aba60f3a140b7bf3f40edde4f3a |


