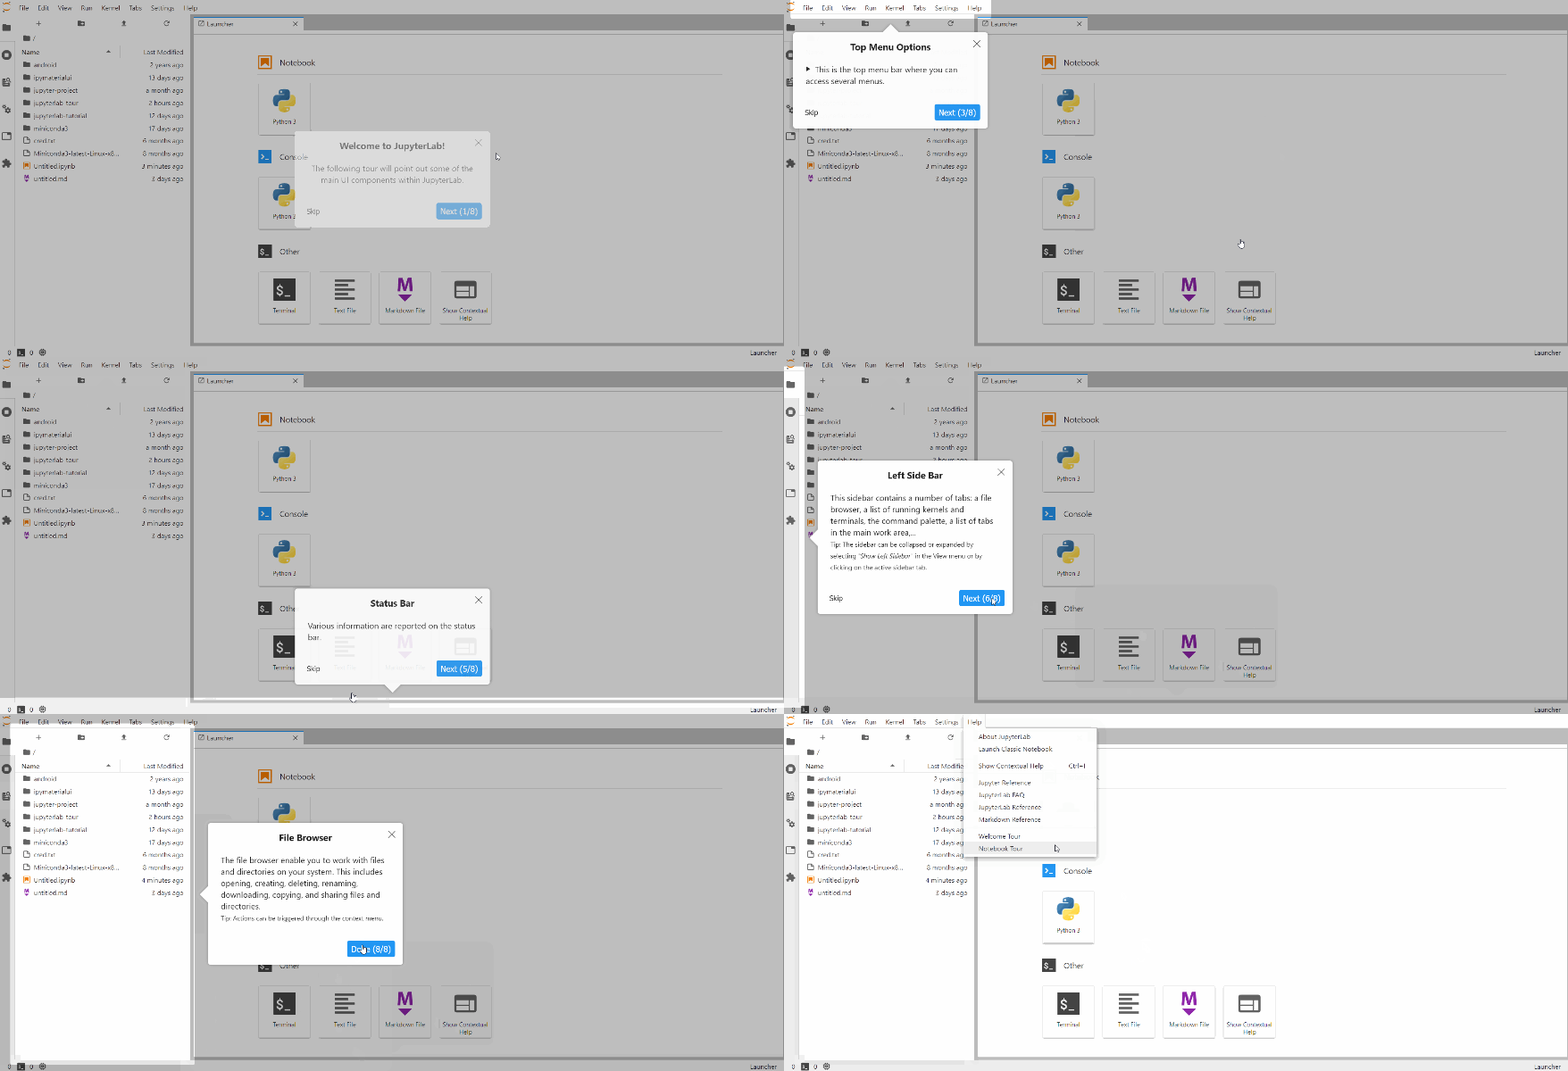
JupyterLab UI 导览。
项目描述
jupyterlab-tour
基于react-joyride的JupyterLab UI导览。
安装
要安装此扩展,请执行
pip install jupyterlab-tour
或
conda install -c conda-forge jupyterlab-tour
功能
此扩展具有以下功能
- 默认导览
- 欢迎导览
- 笔记本导览
- 在设置中定义的用户功能
- 吐司提示开始导览
- 如果用户已经查看过导览,则会在状态数据库中保存。因此,只有在用户未查看过的情况下,才可以通过事件启动导览;例如,除非用户已经查看过,否则在JupyterLab启动时将启动欢迎导览。
如果更新此扩展,则会清除状态
- 使用JupyterLab主题系统样式化工具提示
- 添加和启动导览的命令
- 通过导览管理器(
ITourManager扩展令牌),添加、修改或删除导览 - 通过信号连接到导览事件
- 分别覆盖导览的默认样式(和选项)
此扩展受@cdat/jupyterlab-tutorial的启发,该扩展受BSD 3-Clause许可证的许可,版权(c)2020,劳伦斯利弗莫尔国家实验室,LLC。
需求
- JupyterLab >= 3.6
对于JupyterLab 2.x,请参阅此处。
对于开发者,API在v3(用于JupyterLab 3)和v2(用于JupyterLab 2)之间已更改。
如何添加具有高级设置的导览
作为JupyterLab的用户,在安装jupyterlab-tour之后,您可以创建自己的导游作为数据。
- 打开JupyterLab的高级设置面板Ctrl+,
- 从设置组列表中选择导游
- 在编辑器中,创建与react-joyride数据模型兼容的JSON(5)
- 导游将可在帮助菜单以及命令面板中找到
一个简单的导游
例如,要在Jupyter标志上显示一个发光的按钮,当按下时会显示一个橙色的覆盖层
// json5 can have comments
{
  tours: [
    {
      id: 'my-tour',
      label: 'My First Tour',
      // steps are required, and have many, many options
      steps: [{ target: '#jp-MainLogo', content: 'Look at this!' }],
      // below here not required!
      options: {
        styles: {
          options: {
            // you can use jupyterlab theme variables
            backgroundColor: 'var(--jp-warn-color0)'
          }
        }
      }
    }
  ]
}
如何将导游添加到笔记本中
用于在高级设置中创建导游的相同JSON可以添加到笔记本中。
- 打开笔记本
- 打开属性检查器侧边栏(“齿轮”图标)
- 打开高级工具
- 在笔记本元数据中创建一个如下的键
{
  "jupyterlab-tour": {
    "tours": []
  }
}
现在,当打开笔记本时,在笔记本工具栏中将可见一个“图钉”图标,这将允许启动在笔记本中保存的(或所有)导游。
将导游发送到Binder
在Binder和其他地方,您可以将上述内容(不包括注释)存储在一个overrides.json文件中,并将其放置在正确的位置,例如{sys.prefix}/share/jupyter/lab/settings/overrides.json。当JupyterLab下次打开时,这些覆盖项将成为默认设置,并且您的导游将可用。
一个示例overrides.json可能如下所示
{
  "jupyterlab-tour:user-tours": {
    "tours": []
  }
}
如何为我自己的JupyterLab扩展添加导游
作为扩展开发者,有两种方法可以添加导游:最简单的是使用JupyterLab命令,而高级版本是请求此扩展令牌ITourManager。
使用TypeScript添加导游
const { commands } = app;
// Add a Tour - returns the Tour or null if something went wrong
const tour = (await app.commands.execute('jupyterlab-tour:add', {
  tour: {
    // Tour must be of type ITour - see src/tokens.ts
    id: 'test-jupyterlab-tour:welcome',
    label: 'Welcome Tour',
    hasHelpEntry: true,
    steps: [
      // Step must be of type IStep - see src/tokens.ts
      {
        content:
          'The following tutorial will point out some of the main UI components within JupyterLab.',
        placement: 'center',
        target: '#jp-main-dock-panel',
        title: 'Welcome to Jupyter Lab!'
      },
      {
        content:
          'This is the main content area where notebooks and other content can be viewed and edited.',
        placement: 'left-end',
        target: '#jp-main-dock-panel',
        title: 'Main Content'
      }
    ]
    // can also define `options`
  }
})) as ITourHandler;
if (tour) {
  app.commands.execute('jupyterlab-tour:launch', {
    id: 'test-jupyterlab-tour:welcome',
    force: false // Optional, if false the Tour will start only if the user have not seen or skipped it
  });
}
如果您想对步骤更改做出反应以触发UI元素(如打开侧边栏),则可以连接到stepChanged信号。从上一个示例构建,此片段将在第一步后打开文件浏览器。
tour.stepChanged.connect((_, data) => {
  switch (data.type) {
    case 'step:after':
      if (data.step.target === '#jp-main-dock-panel') {
        commands.execute('filebrowser:activate');
      }
      break;
  }
});
data是一个类型为CallbackProps的对象。
禁用用户、笔记本和默认导游
如果您只想看到默认的欢迎和笔记本导游,或者用户定义的导游,它们可以通过命令行或一个知名文件来禁用。
下面的示例禁用了所有非第三方扩展提供的导游。将jupyterlab-tour:plugin添加到这些中的任何一个将完全禁用导游!
从命令行禁用导游
从命令行运行
jupyter labextension disable "jupyterlab-tour:user-tours"
jupyter labextension disable "jupyterlab-tour:notebook-tours"
jupyter labextension disable "jupyterlab-tour:default-tours"
使用pageConfig.json禁用导游
创建一个pageConfig.json并将其放置在正确的位置,例如{sys.prefix}/etc/jupyter/labconfig/pageconfig.json,并将插件ID添加到disabledExtensions中。
{
  "disabledExtensions": {
    "jupyterlab-tour:user-tours": true,
    "jupyterlab-tour:notebook-tours": true,
    "jupyterlab-tour:default-tours": true
  }
}
卸载
要删除扩展,请执行
pip uninstall jupyterlab-tour
或
conda remove -c conda-forge jupyterlab-tour
贡献
开发安装
注意:您将需要NodeJS来构建扩展包。
jlpm命令是JupyterLab的固定版本yarn,它与JupyterLab一起安装。您可以使用下面的yarn或npm代替jlpm。
# Clone the repo to your local environment
# Change directory to the jupyterlab-tour directory
# Install package in development mode
pip install -e "."
# Link your development version of the extension with JupyterLab
jupyter labextension develop . --overwrite
# Rebuild extension Typescript source after making changes
jlpm build
您可以在不同的终端中同时监视源目录并运行JupyterLab,以便监视扩展源中的更改并自动重新构建扩展。
# Watch the source directory in one terminal, automatically rebuilding when needed
jlpm watch
# Run JupyterLab in another terminal
jupyter lab
在监视命令运行时,每次保存的更改都将立即在本地构建并可供运行的JupyterLab使用。刷新JupyterLab以在浏览器中加载更改(您可能需要等待几秒钟以重新构建扩展)。
默认情况下,jlpm build 命令会为这个扩展生成源映射,以便使用浏览器开发者工具进行调试。要为 JupyterLab 核心扩展生成源映射,可以运行以下命令
jupyter lab build --minimize=False
开发模式下的卸载
pip uninstall jupyterlab-tour
在开发模式下,还需要删除由 jupyter labextension develop 命令创建的符号链接。要找到其位置,可以运行 jupyter labextension list 以确定 labextensions 文件夹的位置。然后可以删除该文件夹中名为 jupyterlab-tour 的符号链接。
测试扩展
前端测试
此扩展使用 Jest 对 JavaScript 代码进行测试。
要执行它们,请执行
jlpm
jlpm test
集成测试
此扩展使用 Playwright 进行集成测试(也称为用户级测试)。更准确地说,JupyterLab 辅助程序 Galata 用于处理在 JupyterLab 中的扩展测试。
更多信息请参阅 ui-tests 中的 README 文件。
打包扩展
见 RELEASE
项目详情
下载文件
下载适合您平台文件的文件。如果您不确定选择哪一个,请了解更多关于 安装包 的信息。
源分发
构建分发
jupyterlab_tour-4.0.1.tar.gz 的哈希值
| 算法 | 哈希摘要 | |
|---|---|---|
| SHA256 | 51d860f872775ce7d85dbfd215fbab1d2c79f5c0c1a902a1d46e4bb642090cbd |
|
| MD5 | cb9796ade7d7a64ca16966891cb8b929 |
|
| BLAKE2b-256 | 61faa512426916ca282b7b486d3ed8be290abde9e21ef4d0eec7bb90f5be1a4f |
jupyterlab_tour-4.0.1-py3-none-any.whl 的哈希值
| 算法 | 哈希摘要 | |
|---|---|---|
| SHA256 | a1590e6b5e206ff29869ac2020833f61d74074bde2f6739515280a76511b3b54 |
|
| MD5 | fb92ba6acc47f3e31782dd89a0eba29a |
|
| BLAKE2b-256 | 54e2f95b8a2cb88f8c48feabb77529f06534c5ef7eb27821b8f9d69cb6df8d20 |


