JupyterLab扩展,用于通知单元格完成


项目描述
jupyterlab-notify


JupyterLab扩展,用于通知单元格完成
这受到了这里的笔记本版本启发的。
用法
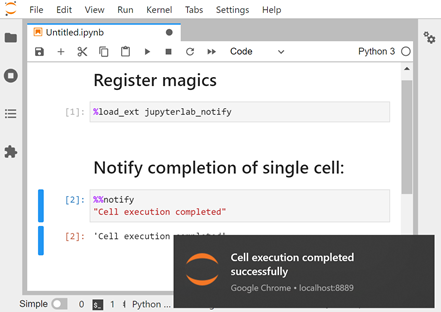
注册魔法
%load_ext jupyterlab_notify
通知单个单元格完成
%%notify
import time
time.sleep(1)
完成时发送邮件输出(可选成功执行的标题)
%%notify --mail --success 'Long-running cell in <foo> notebook is done!'
time.sleep(1)
注意: 邮件需要/假设您在“localhost”上运行了SMTP服务器 - 请参阅SMTP文档 了解更多详情。如果此假设对您不成立,请提出相关详情的问题。
失败场景
%%notify -f 'Long-running cell in <foo> notebook failed'
raise ValueError
基于阈值的提醒(单位为秒)
%notify_all --threshold 1
time.sleep(1)
一旦启用,notify_all将为超过给定阈值或引发异常的单元格引发通知。此功能也可以用来检查笔记本中所有单元格何时完成执行。例如,
# In first cell
%notify_all -t 86400 -f 'Notebook execution failed'
# ...
# ...
# In last cell
%%notify -s 'Notebook execution completed'
禁用通知
%notify_all --disable
time.sleep(1)
了解更多
%%notify?
%notify_all?
故障排除
如果您发现桌面通知没有显示,请检查以下内容
- 请确保JupyterLab在安全上下文中运行(即使用HTTPS或localhost)
- 如果您之前已拒绝该网站的通知权限,请相应地更新浏览器设置。在Chrome中,您可以通过导航到
设置 -> 隐私和安全 -> 网站设置 -> 通知来更新对JupyterLab URL的权限。 - 验证通知是否在您的浏览器中工作。您可能需要首先配置操作系统设置。您可以在此网站上进行测试。
要求
- JupyterLab >= 4.0
安装
要使用pip安装此包,请运行
pip install jupyterlab_notify
贡献
开发安装
注意:您需要NodeJS来构建扩展包。
jlpm命令是JupyterLab安装的yarn的固定版本。您可以使用下面的yarn或npm代替jlpm。
# Clone the repo to your local environment
# Change directory to the jupyterlab_notify directory
# Install package in development mode
pip install -e .
# Link your development version of the extension with JupyterLab
jupyter-labextension develop . --overwrite
# Rebuild extension Typescript source after making changes
jlpm run build
您可以在不同的终端中同时监视源目录并运行JupyterLab,以监视扩展源中的更改并自动重新构建扩展。
# Watch the source directory in one terminal, automatically rebuilding when needed
jlpm run watch
# Run JupyterLab in another terminal
jupyter lab
在监视命令运行时,每次保存的更改都会立即在本地构建并可供正在运行的JupyterLab使用。刷新JupyterLab以在浏览器中加载更改(您可能需要等待几秒钟以重新构建扩展)。
默认情况下,jlpm run build命令为此扩展生成源映射,使其更容易使用浏览器开发工具进行调试。要为JupyterLab核心扩展也生成源映射,您可以运行以下命令
jupyter lab build --minimize=False
卸载
pip uninstall jupyterlab_notify
发布
在开始之前,您需要运行: pip install twine jupyter_packaging
- 更新
package.json中的版本并更新CHANGELOG.md中的发布日期 - 提交步骤1中的更改,打上标签,然后推送
git commit -am <msg>
git tag vX.Z.Y
git push && git push --tags
- 创建工件
rm -rf dist
python setup.py sdist bdist_wheel
- 在测试pypi上测试此内容。然后您也可以从这里安装以进行测试
twine upload --repository-url https://test.pypi.org/legacy/ dist/*
# In a new venv
pip install --index-url https://test.pypi.org/simple/ jupyterlab_notify
- 上传到pypi
twine upload dist/*
卸载
pip uninstall jupyterlab_notify
历史
此插件由D. E. Shaw集团贡献给社区。

许可证
本项目遵循BSD-3-Clause许可证。
我们欢迎贡献!在您能贡献之前,请签署并提交此贡献者许可协议(CLA)。此CLA旨在保护此项目的所有用户。
“Jupyter”是NumFOCUS基金会的商标,Project Jupyter是其一部分。


下载文件
下载您平台上的文件。如果您不确定选择哪个,请了解更多关于安装包的信息。