用于模拟s3dxrd类型实验的衍射模拟工具。

项目描述


模拟多晶在3D中的X射线衍射。

X射线衍射模拟器包定义了多晶为四面体单晶的网格,并通过2D离散探测器阵列模拟衍射,同时样品绕任意旋转轴摇摆。
xrd_simulator最初开发是为了回答关于扫描X射线衍射实验中测量优化的问题。然而,xrd_simulator可以模拟广泛的实验衍射设置。基本思想是样品和束拓扑可以任意指定,它们之间的相互作用可以通过样品摇摆来模拟。这意味着可以模拟标准的“非粉末”实验,例如扫描-3dxrd和全场3dxrd(或如果您喜欢,HEDM),还可以模拟更高级的测量序列,例如螺旋扫描等。还可以使用取向密度函数作为输入来模拟类似粉末的情景。
简介
在阅读所有无聊的文档(此处托管)之前,让我们先深入研究一些端到端示例,以便我们能够开始一个良好的体验。
xrd_simulator是基于四个Python对象构建的,这些对象反映了衍射实验
一束X射线(使用xrd_simulator.beam模块)
一个二维面积探测器(使用xrd_simulator.detector模块)
一个三维多晶样品(使用xrd_simulator.polycrystal模块)
一个刚体样品的运动(使用xrd_simulator.motion模块)
一旦定义了这些对象,就可以让探测器在样品进行规定的刚体运动的同时,被X射线光束照射时收集多晶的散射。
让我们开始构建一些X射线
import numpy as np
from xrd_simulator.beam import Beam
# The beam of xrays is represented as a convex polyhedron
# We specify the vertices in a numpy array.
beam_vertices = np.array([
    [-1e6, -500., -500.],
    [-1e6, 500., -500.],
    [-1e6, 500., 500.],
    [-1e6, -500., 500.],
    [1e6, -500., -500.],
    [1e6, 500., -500.],
    [1e6, 500., 500.],
    [1e6, -500., 500.]])

beam = Beam(
    beam_vertices,
    xray_propagation_direction=np.array([1., 0., 0.]),
    wavelength=0.28523,
    polarization_vector=np.array([0., 1., 0.]))
我们还需要定义一个探测器
from xrd_simulator.detector import Detector
# The detector plane is defined by it's corner coordinates det_corner_0,det_corner_1,det_corner_2
detector = Detector(pixel_size_z=75.0,
                    pixel_size_y=55.0,
                    det_corner_0=np.array([142938.3, -38400., -38400.]),
                    det_corner_1=np.array([142938.3, 38400., -38400.]),
                    det_corner_2=np.array([142938.3, -38400., 38400.]))
接下来,我们生产一个样品,为此我们首先需要定义一个描述样品拓扑结构的网格,在这个例子中,我们使样品形状为球体
from xrd_simulator.mesh import TetraMesh
# xrd_simulator supports several ways to generate a mesh, here we
# generate meshed solid sphere using a level set.
mesh = TetraMesh.generate_mesh_from_levelset(
    level_set=lambda x: np.linalg.norm(x) - 768.0,
    bounding_radius=769.0,
    max_cell_circumradius=450.)
样品中的每个元素都由一些材料或“相”组成,我们通过一个xrd_simulator.phase.Phase对象的列表定义现有的相,在这个例子中只有一个相存在
from xrd_simulator.phase import Phase
quartz = Phase(unit_cell=[4.926, 4.926, 5.4189, 90., 90., 120.],
               sgname='P3221',  # (Quartz)
               path_to_cif_file=None  # phases can be defined from crystalographic information files
               )
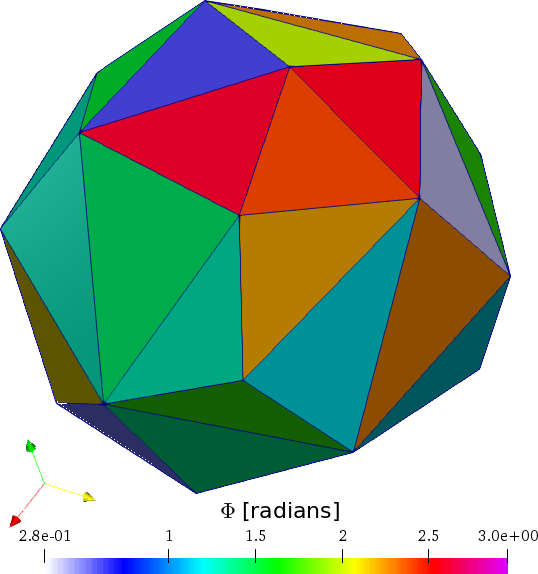
现在可以创建多晶样品了。在这个例子中,晶粒具有随机方向,而样品中的应变均匀为零
from scipy.spatial.transform import Rotation as R
from xrd_simulator.polycrystal import Polycrystal
orientation = R.random(mesh.number_of_elements).as_matrix()
polycrystal = Polycrystal(mesh,
                          orientation,
                          strain=np.zeros((3, 3)),
                          phases=quartz,
                          element_phase_map=None)
我们可以使用内置的save()命令将多晶保存到磁盘上,如下所示
polycrystal.save('my_polycrystal', save_mesh_as_xdmf=True)
我们可以通过将.xdmf文件加载到您最喜欢的3D渲染程序中来看样品。在paraview中,根据其中一个欧拉角着色的样品看起来如下所示
现在我们可以定义样品在积分衍射信号时的运动
from xrd_simulator.motion import RigidBodyMotion
motion = RigidBodyMotion(rotation_axis=np.array([0, 1/np.sqrt(2), -1/np.sqrt(2)]),
                         rotation_angle=np.radians(1.0),
                         translation=np.array([123, -153.3, 3.42]))
现在我们有了实验设置,我们可以通过让光束和探测器与样品相互作用来收集衍射
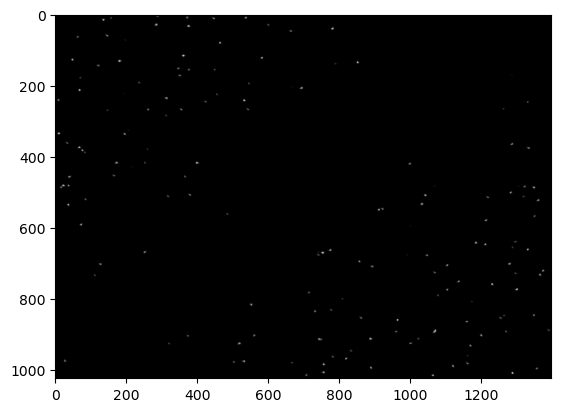
polycrystal.diffract(beam, detector, motion)
diffraction_pattern = detector.render(frames_to_render=0,
                                        lorentz=False,
                                        polarization=False,
                                        structure_factor=False,
                                        method="project")
生成的渲染探测器帧将类似于下面的图。注意,由于晶粒方向是随机生成的,衍射点的位置可能会变化!
import matplotlib.pyplot as plt
fig,ax = plt.subplots(1,1)
ax.imshow(diffraction_pattern, cmap='gray')
plt.show()
要计算多个帧,只需更改运动并再次收集衍射。每次计算之前,可以使用相同的运动或另一种运动来移动样品。
polycrystal.transform(motion, time=1.0)
polycrystal.diffract(beam, detector, motion)
实验设置和强度渲染的选项还有很多,尽情实验!上面的示例代码可以在这里找到一个单独的.py文件。
安装
Anaconda安装(Linux和Macos)
xrd_simulator在conda-forge频道上分发,安装xrd_simulator包的首选方法是使用Anaconda
conda install -c conda-forge xrd_simulator
conda create -n xrd_simulator
conda activate xrd_simulator
这意味着它可以在操作系统之间工作,并需要一个Anaconda安装。
(xrd_simulator的conda-forge饲料可以在这里找到。)
Anaconda安装(Windows)
要在Windows上使用Anaconda安装,您必须确保系统上预先安装了pygalmesh的外部依赖项。有关安装这些软件包的文档可以在其他地方找到。
Pip安装
Pip安装是可能的,但是必须在系统上预先安装pygalmesh的外部依赖项。这些软件包的安装将取决于操作系统,有关文档可以在其他地方找到。
pip install xrd-simulator
源安装
当然,也可以从源代码安装
git clone https://github.com/FABLE-3DXRD/xrd_simulator.git
cd xrd_simulator
python setup.py install
这又将需要事先解决pygalmesh依赖项。
致谢
xrd_simulator很好地利用了xfab和pygalmesh。这些存储库的源代码可以在以下位置找到


下载文件
下载您平台的文件。如果您不确定选择哪个,请了解更多关于安装包的信息。
源代码分布
构建分布
xrd_simulator-0.4.1.tar.gz的哈希值
| 算法 | 哈希摘要 | |
|---|---|---|
| SHA256 | 25a3ebdc215d74bc1cccb626b61e3ad5a7bcc2de8f6a0e796bd0a42d371a8a42 |
|
| MD5 | abe5a2d25c5c3872e94ec90b1674ccb4 |
|
| BLAKE2b-256 | b94c3a3b87b3a74b71921b9f1bf628a483b62dc69c727fa262550e7e741daa0f |
xrd_simulator-0.4.1-py3-none-any.whl的哈希值
| 算法 | 哈希摘要 | |
|---|---|---|
| SHA256 | b3449f86af526786915f23897a3790fdebe372813a010cca253ce1b4a5cb4848 |
|
| MD5 | 6442cc9e464ba82fb881d06969bdbe9b |
|
| BLAKE2b-256 | ac45993324e43026a39ac6f2cef7538f88a8a681f20f9b24dc399cd8d076c8c9 |