从Hichi智能电表收集数据并通过MQTT暴露

项目描述
py智能电表


从Hichi智能电表(又名volkszaehler.org(USB版本))收集数据并通过MQTT暴露。
讨论: https://www.photovoltaikforum.com/thread/188160-pysmartmeter(德语)
最终它可能看起来像以下Home Assistant仪表板截图,使用MQTT集成
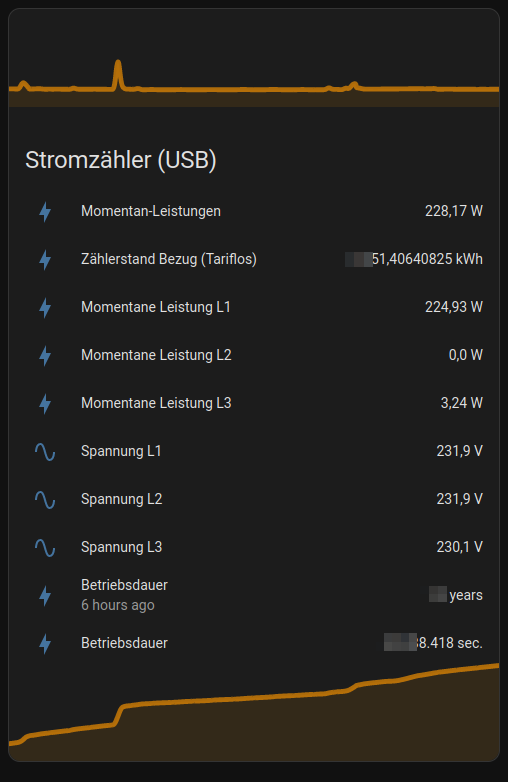
使用我来自eBZ GmbH的“eBZ DD3”能源表,值每秒实时更新;)
目前仅支持发送OBIS文本协议的能源表!(用./cli.py dump测试)
待办事项:#37 - 添加对SML(智能消息语言)二进制协议的支持
快速入门
安装最小需求,例如
~$ sudo apt install python3-venv
克隆源代码并安装项目
~$ git clone https://github.com/jedie/pysmartmeter.git
~$ cd pysmartmeter
~/pysmartmeter$ ./cli.py --help
./cli.py --help的输出如下
Usage: ./cli.py [OPTIONS] COMMAND [ARGS]...

╭─ Options ────────────────────────────────────────────────────────────────────────────────────────╮
│ --help      Show this message and exit.                                                          │
╰──────────────────────────────────────────────────────────────────────────────────────────────────╯
╭─ Commands ───────────────────────────────────────────────────────────────────────────────────────╮
│ debug-settings               Display (anonymized) MQTT server username and password              │
│ debug-systemd-service        Just print the systemd service file content                         │
│ detect-serial                Just print the detected serial port instance                        │
│ dump                         Just dump serial output                                             │
│ publish-loop                 Publish current data via MQTT (endless loop)                        │
│ setup-systemd-service        Setup PySmartMeter systemd services and starts it.                  │
│ store-settings               Store MQTT server settings.                                         │
│ systemd-restart              Restart PySmartMeter systemd services                               │
│ systemd-status               Call systemd status of PySmartMeter services                        │
│ systemd-stop                 Stop PySmartMeter systemd services                                  │
│ test-mqtt-connection         Test connection to MQTT Server                                      │
│ version                      Print version and exit                                              │
╰──────────────────────────────────────────────────────────────────────────────────────────────────╯
测试您的Hichi智能电表与CP2102 USB到UART桥接控制器是否被找到,例如
~/pysmartmeter$ ./cli.py detect-serial
也许您没有权限访问端口,例如
~/pysmartmeter$ ./cli.py dump
...
try: /dev/ttyUSB0 CP2102 USB to UART Bridge Controller - CP2102 USB to UART Bridge Controller USB VID:PID=10C4:EA60
/dev/ttyUSB0 file mode: 0o20660
/dev/ttyUSB0 user ID: 0
/dev/ttyUSB0 user group ID: 20
/dev/ttyUSB0 user group: 'dialout'
ERROR: [Errno 13] could not open port /dev/ttyUSB0: [Errno 13] Permission denied: '/dev/ttyUSB0'
...
通过添加用户到组来解决,例如
sudo usermod -a -G dialout $USER
通过MQTT发布智能电表数据
您必须一次性存储您的MQTT设置(主机、端口、用户名、密码),例如
~/pysmartmeter$ ./cli.py store-settings
这将在这里创建一个JSON文件:~/.pysmartmeter
您可以使用以下命令测试读取此设置文件
~/pysmartmeter$ ./cli.py debug-settings
使用以下命令测试您的MQTT设置
~/pysmartmeter$ ./cli.py test-mqtt-connection
设置systemd服务
~/pysmartmeter$ sudo ./cli.py setup-systemd-service
这将创建一个systemd服务,在每次启动时自动启动。
注意:在启动systemd服务之前,请使用./cli.py dump和./cli.py publish-loop检查一切是否正常工作。否则,您可能会启动一个只会处理垃圾的服务(例如:您的能量表不支持OBIS文本协议),并且不断重启 ;)
检查服务是否正在运行
~/pysmartmeter$ sudo ./cli.py systemd-status
如果一切正常:前往您的Home Assistant并检查MQTT集成设备发现将自动进行。
开始黑客活动
~$ git clone https://github.com/jedie/pysmartmeter.git
~$ cd pysmartmeter
~/pysmartmeter$ ./dev-cli.py --help
Usage: ./dev-cli.py [OPTIONS] COMMAND [ARGS]...

╭─ Options ────────────────────────────────────────────────────────────────────────────────────────╮
│ --help      Show this message and exit.                                                          │
╰──────────────────────────────────────────────────────────────────────────────────────────────────╯
╭─ Commands ───────────────────────────────────────────────────────────────────────────────────────╮
│ check-code-style            Check code style by calling darker + flake8                          │
│ coverage                    Run tests and show coverage report.                                  │
│ fix-code-style              Fix code style of all pysmartmeter source code files via darker      │
│ install                     Run pip-sync and install 'pysmartmeter' via pip as editable.         │
│ mypy                        Run Mypy (configured in pyproject.toml)                              │
│ publish                     Build and upload this project to PyPi                                │
│ safety                      Run safety check against current requirements files                  │
│ test                        Run unittests                                                        │
│ tox                         Run tox                                                              │
│ update                      Update "requirements*.txt" dependencies files                        │
│ update-test-snapshot-files  Update all test snapshot files (by remove and recreate all snapshot  │
│                             files)                                                               │
│ version                     Print version and exit                                               │
╰──────────────────────────────────────────────────────────────────────────────────────────────────╯
不兼容的更改
v0.4.x -> v0.5.x
我们将CLI文件拆分为
./cli.py- 适用于最终用户的命令./dev-cli.py- 适用于开发者的命令
v0.2.x -> v0.3.x
包更改
- 我们已从
poetry切换到pip-tools - 移除了
Makefile - 将
cli.sh重命名为cli.py
不再需要Makefile,因为“引导”将通过调用cli.py来完成
要迁移,只需删除现有的.venv并创建一个新的,例如
~$ cd pysmartmeter
~/pysmartmeter$ git pull origin main
~/pysmartmeter$ rm -Rf .venv
~/pysmartmeter$ ./cli.py --help
各种链接
- 讨论: https://www.photovoltaikforum.com/thread/188160-pysmartmeter(德语)
- https://github.com/pyserial/pyserial
- https://github.com/eclipse/paho.mqtt.python
- https://github.com/eclipse/mosquitto
- https://dewiki.de/Lexikon/OBIS-Kennzahlen (de) | https://www.promotic.eu/en/pmdoc/Subsystems/Comm/PmDrivers/IEC62056_OBIS.htm (en)
- https://www.photovoltaikforum.com/thread/145886-habe-lesk%C3%B6pfe-mit-usb-%C3%BCber/ (de)
- https://www.heise.de/tests/Ausprobiert-Guenstiger-IR-Lesekopf-fuer-Smart-Meter-mit-Tastmota-Firmware-7065559.html (de)
- https://www.home-assistant.io


下载文件
下载适合您平台的文件。如果您不确定要选择哪个,请了解有关安装包的更多信息。