在您的Pyramid网站上嵌入IPython笔记本外壳


项目描述
pyramid_notebook 在您的Pyramid网站上嵌入IPython笔记本外壳。只需一键即可启动强大的通过浏览器运行的Python外壳。
IPython Notebook 是研究人员、数据分析师和软件开发人员进行视觉和批量任务的默认工具。 pyramid_notebook 将IPython Notebook的强大功能嵌入到 Pyramid网站 中。


优点
方便访问:通过网页浏览器获取强大的shell,无需安装任何额外的软件。
自动默认变量:根据您在具有shell按钮的页面中填充笔记本的变量和数据。
身份验证集成:使用您用于网站管理的相同凭据。每个Pyramid用户都有自己的IPython笔记本进程。
丰富的用户界面:使用鼠标放置光标,使用桌面快捷键进行行编辑。
工作原理
用例
可视化和分析您的网站数据。
普通Python提示符的更简单、更强大的替代品 - 网页浏览器用户界面比旧式的终端更丰富。
与团队成员共享代码会话和食谱。
先决条件
Pyramid网站(可以轻松扩展到其他Web框架)
Python 3.5+
OSX、Linux
uWSGI(仅在生产服务器上)
演示
检查源代码仓库
git clone https://github.com/websauna/pyramid_notebook.git
为Python 3.5创建virtualenv。安装依赖项
cd pyramid_notebook
python3 -m venv env  # Create virtual environment
source env/bin/activate  # Activate virtual environment
pip install requirements.txt
python setup.py develop
运行演示
pserve pyramid_notebook/demo/development.ini
然后,将您的浏览器指向https://:9999。
此演示的凭据为
用户1
用户名:user
密码:password
用户2
用户名:user2
密码:password
安装
建议使用pip和virtualenv进行安装。请参阅Python包安装指南。
pip install pyramid_notebook
在生产服务器上,您使用uWSGI WebSocket支持
pip install pyramid_notebook[uwsgi]
使用
您的应用程序需要配置三个自定义视图。
一个或多个launch_ipython()笔记本启动点。此操作执行用户身份验证和授权,然后调用pyramid_notebook.views.launch_notebook()以打开一个新笔记本供用户使用。 launch_ipython()接受笔记本上下文参数(见下文),如有必要,启动新的笔记本内核,然后将用户重定向到笔记本本身。
shutdown_ipython()执行身份验证和授权,并调用pyramid_notebook.views.shutdown_notebook()强制关闭用户的笔记本。
notebook_proxy()执行身份验证和授权,并调用pyramid_notebook.views.notebook_proxy()将HTTP请求代理到绑定到本地主机端口的IPython笔记本服务器。 notebook_proxy映射到您的站点URL中的/notebook/路径。您的站点和笔记本上游服务器应在此位置达成一致。
示例代码
以下是一个示例,说明如何构建在第一次访问视图时为当前登录的Pyramid用户启动笔记本的admin_shell视图。为了额外的安全性,笔记本视图的权限不能通过常规组分配,而必须在INI设置文件的允许名单中列出用户名。这保证了shell最初只能由具有服务器本身shell访问权的人员访问。
有关这些视图的另一种方法,请参阅演示源代码。
views.py:
from pyramid.httpexceptions import HTTPFound
from pyramid.view import view_config
from pyramid_notebook import startup
from pyramid_notebook.views import launch_notebook
from pyramid_notebook.views import shutdown_notebook as _shutdown_notebook
from pyramid_notebook.views import notebook_proxy as _notebook_proxy
from pyramid_web20.models import Base


#: Include our database session in notebook so it is easy to query stuff right away from the prompt
SCRIPT = """
from pyramid_web20.models import DBSession as session
"""


GREETING="""
* **session** - SQLAlchemy database session
"""


@view_config(route_name="notebook_proxy", permission="shell")
def notebook_proxy(request):
    """Proxy IPython Notebook requests to the upstream server."""
    return _notebook_proxy(request, request.user.username)


@view_config(route_name="admin_shell", permission="shell")
def admin_shell(request):
    """Open admin shell with default parameters for the user."""
    # Make sure we have a logged in user
    nb = {}

    # Pass around the Pyramid configuration we used to start this application
    global_config = request.registry.settings["pyramid_web20.global_config"]

    # Get the reference to our Pyramid app config file and generate Notebook
    # bootstrap startup.py script for this application
    config_file = global_config["__file__"]
    startup.make_startup(nb, config_file)
    startup.add_script(nb, SCRIPT)
    startup.add_greeting(nb, GREETING)

    #: Include all our SQLAlchemy models in the notebook variables
    startup.include_sqlalchemy_models(nb, Base)

    return launch_notebook(request, request.user.username, notebook_context=nb)


@view_config(route_name="shutdown_notebook", permission="shell")
def shutdown_notebook(request):
    """Shutdown the notebook of the current user."""
    _shutdown_notebook(request, request.user.username)
return HTTPFound(request.route_url("home"))我们还需要在服务器启动时捕获INI设置文件,以便我们可以将其传递给IPython笔记本进程。在__init__.py
def main(global_config, **settings):
    settings["pyramid_web20.global_config"] = global_config
然后,我们有一个自定义的principals处理器,它根据配置文件中的用户名单授予shell权限
def find_groups(userid, request):
    """Get applied groups and other for the user"""

    from horus.interfaces import IUserModel
    user_class = request.registry.queryUtility(IUserModel)

    # Read superuser names from the config
    superusers = aslist(request.registry.settings.get("pyramid_web20.superusers"))

    user = models.DBSession.query(user_class).get(userid)
    if user:
        if user.can_login():
            principals = ['group:{}'.format(g.name) for g in user.groups]

        # Allow superuser permission
        if user.username in superusers or user.email in superusers:
            principals.append("superuser:superuser")

        return principals

    # User not found, user disabled
return None我们引用Pyramid站点根对象中的superuser:super
class Root:

    __acl__ = [
        ...
        (Allow, "superuser:superuser", 'shell'),
    ]
下面是配置文件的部分
pyramid_web20.superusers =
    mikko@example.com
Pyramid设置
python_notebook 从您的 Pyramid INI 配置文件读取以下参数
# Where we store IPython Notebook runtime and persistent files
# (pid, saved notebooks, etc.).
# Each user will get a personal subfolder in this folder
pyramid_notebook.notebook_folder = /tmp/pyramid_notebook

# Automatically shutdown IPython Notebook kernel
# after his many seconds have elapsed since startup
pyramid_notebook.kill_timeout = 3600

# Websocket proxy launch function.
# This is a view function that upgrades the current HTTP request to Websocket (101 upgrade protocol)
# and starts the web server websocket proxy loop. Currently only uWSGI supported
# (see below).
pyramid_notebook.websocket_proxy =

# For uWSGI in production
# pyramid_notebook.websocket_proxy = pyramid_notebook.uwsgi.serve_websocket

# If you need to server websockets from alternative domain (See below).
# Example value: https://ws.example.com
pyramid_notebook.alternative_domain =
笔记本上下文参数
笔记本可以通过上下文敏感参数打开。一些参数由框架填充,一些您可以自己设置。
您在调用 launch_notebook() 时传递笔记本上下文参数。
要更改自定义上下文变量,请修改 startup 脚本。
要更改不同的信息屏幕,请更改 greeting 文本
以下是可以传递的上下文信息的示例
{

    # Extra Python script executed on notebook startup - this is saved as startup.py
    "startup": ""

    # Markdown text displayed at the beginning of the notebook
    "greeting": ""

    # List of paths where to load IPython Notebook Jinja templates
    # https://ipython.pythonlang.cn/ipython-doc/3/config/options/notebook.html
    "extra_template_paths": []

    # Notebook daemon process id - filled it in by the daemon itself
    "pid": 1234,

    # Notebook daemon kill timeout in seconds - filled in by the the daemon itself after parsing command line arguments
    "kill_timeout": 5,

    # Bound localhost port for this notebook - filled in by the daemon itself after parsing command line arguments
    "http_port": 9999,

    # Set Notebook HTTP Allow Origin header to tell where websockets are allowed to connect
    "allow_origin": 'localhost:9999',

    # Override websocket URL
    "websocket_url": 'ws://:9998',

    # Path in URL where Notebook is proxyed, must match notebook_proxy() view
    "notebook_path": '/notebook/',

    # Hash of this context. This is generated automatically from supplied context dictionary if not given. If the hash changes the notebook is restarted with new context data.
    "context_hash": 'foo',
}
死亡开关
启动的笔记本进程有最大生命周期,之后它们会自行终止。目前终止是无条件的,自启动以来的秒数,但预计在未来的版本中,这将改为一个死机开关,其中进程只有在没有最近的活动时才会自行终止。
WebSocket代理
IPython Notebook 需要两种不同类型的连接才能正常运行
HTTP 连接用于加载页面、资产
WebSocket 用于与笔记本内核进行实时通信
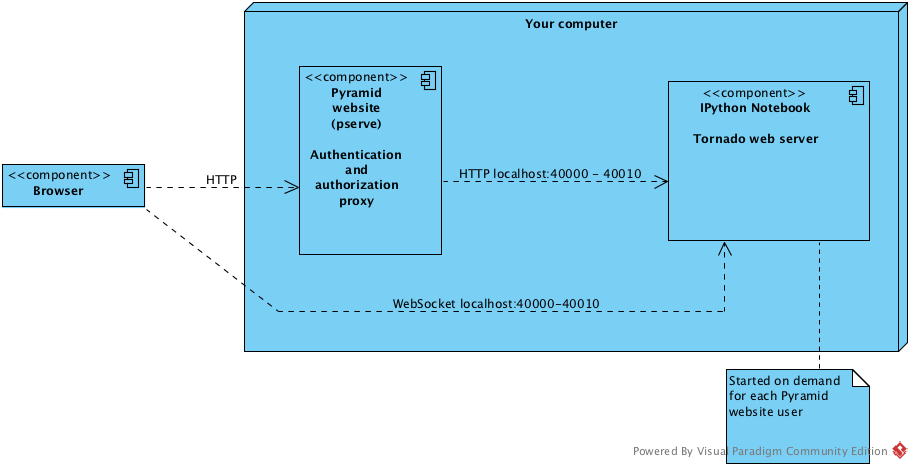
当您在本地机器上运行 Pyramid 的 pserve 开发服务器并进入笔记本 shell 时,WebSocket 连接直接连接到 IPython Notebook 绑定的 localhost 端口。这是因为 pserve 没有任何 WebSocket 支持功能。这种行为由 pyramid_notebook.websocket_proxy 设置控制。
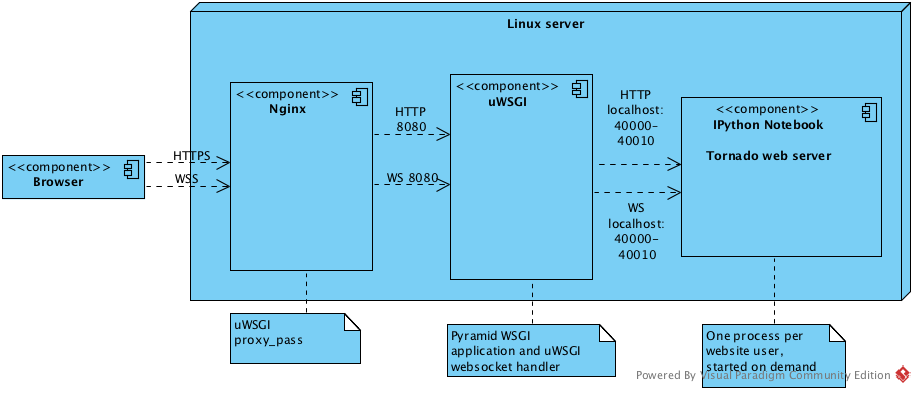
在生产服务器上,您通常运行一个 Web 服务器,该服务器会生成进程以执行 WSGI 请求,这是托管 Web 应用程序的标准 Python。不幸的是,像 WSGI 用于 HTTP 一样,在 Python 应用程序中不存在进行 WebSocket 请求的标准。因此,必须为每个 Web 服务器单独添加 WebSocket 支持。目前 pyramid_notebook 支持以下 Web 服务器
在 uWSGI 前面可以有一个其他 Web 服务器,如 Nginx,因为这些 Web 服务器通常可以代理 WebSocket 连接。您可能需要将以下内容添加到您的 Nginx 配置中
# include a variable for the upgrade header
map $http_upgrade $connection_upgrade {
    default   upgrade;
    ''        close;
}

server {
    location / {
        include uwsgi_params;

        proxy_http_version 1.1;
        proxy_set_header Upgrade $http_upgrade;
        proxy_set_header Connection $connection_upgrade;
    }
}
uWSGI
要在您的 uWSGI 生产服务器上启用 WebSocket 支持,请将以下内容添加到您的生产 INI 设置中
pyramid_notebook.websocket_proxy = pyramid_notebook.uwsgi.serve_websocket
此外,您还需要在 uWSGI 设置中启用 WebSocket
http-websockets = true
WebSocket和反向代理服务
反向代理服务,如 CloudFlare <https://support.cloudflare.com/hc/en-us/articles/200169466-Can-I-use-CloudFlare-with-WebSockets->`_,可能只提供有限或没有 WebSocket 支持。这可能会以服务器返回 400 Bad Request 响应的形式出现,因为反向代理服务会删除 Connection: Upgrade HTTP 请求头。在这种情况下,建议您从单独的域名托管 IPython Notebook,以便 WebSocket 连接不受阻碍地访问您的服务器。
您需要
配置您的裸 Web 服务器以响应对应的域名(ws.example.com)。
配置 pyramid_notebook 以重写来自替代域的笔记本 URL
pyramid_notebook.alternative_domain = https://ws.example.com
默认情况下,Pyramid 的 AuthTktAuthenticationPolicy 支持通配符身份验证 cookie。
您可以限制裸域名仅暴露 /notebook/ URL。
架构
每个 Pyramid 用户都有一个命名的笔记本进程。每个笔记本进程都有自己的工作文件夹,在第一次启动时动态创建。笔记本由 NotebookManager 类管理,该类检测笔记本上下文的变化,并在需要时重启具有新上下文的用户笔记本进程。
笔记本绑定到 localhost 端口。Pyramid 视图代理将 /notebook/ HTTP 请求代理到笔记本,并首先检查 HTTP 请求是否有必要的权限,通过执行身份验证和授权检查。代理视图还负责启动特定于 Web 服务器的 WebSocket 代理循环。
启动的笔记本进程被转换为守护进程并与网络服务器进程分离。网络服务器与守护进程之间的通信通过命令行、PID 文件和上下文文件(如上所述的笔记本上下文参数的 JSON 导出)进行。
本地部署
生产部署
可伸缩性
该工具仅供团队内部使用。默认设置限制了可以创建和访问笔记本的用户数量为 10 人。
目前以非可扩展的方式为每个用户启动一个新的守护进程。如果需要 100+ 用户的可扩展性,有几种方法可以使该工具更加轻量级。例如,可以将 Websockets 从主 uWSGI 服务器卸载到专门的 gevent 服务器。
安全性
力量越大,责任越大。
pyramid_notebook 依赖于用户通过 Pyramid 网络框架进行授权和身份验证。这是您的网站,因此身份验证和授权系统与您制作的系统一样好。如果您不习惯暴露这么多关于网站身份验证的权力,您仍然可以通过 SSH 隧道等方式拥有笔记本会话。
以下是一些您应该考虑的安全事项。
仅HTTPS
pyramid_notebook 只接受 HTTPS 连接。HTTP 连接未加密,通过 HTTP 泄露信息可能导致严重的安全漏洞。
VPN限制
您可以配置您的网络服务器,仅允许来自白名单 IP 网络的 /notebook/ URL 访问。
受限制的服务器访问
您不需要在主网络服务器上运行 pyramid_notebook 会话。您可以为运行 pyramid_notebook 配置一个具有有限数据和代码的服务器。
受限制访问的服务器可以有
数据库上的只读账户
移除包含敏感机密的源代码和配置文件(HTTPS 密钥、API 令牌等)
Linux容器化
笔记本进程可以在 Linux 容器内部启动。因此,它仍然会在同一服务器上运行,但您可以通过内核限制对文件系统和网络的访问。了解更多关于 Linux cgroups 的信息。
双因素认证
考虑要求您的网站管理员使用 双因素身份验证 来防止由于恶意软件、键盘记录器等恶意行为导致管理员凭证丢失。例如,Python 的双因素库示例。
故障排除
卸下松散的笔记本
如果笔记本守护进程卡住,例如,用户启动了一个无限循环且没有正确终止,您可以将其关闭。
每次为用户启动具有不同上下文(不同参数)的笔记本时,先前的笔记本进程都会被强制终止
您可以手动终止所有笔记本进程。例如
pkill -f notebook_daemon.py
笔记本崩溃
以下是一些崩溃的笔记本进程的指示。当您尝试通过网页启动笔记本时,以下笔记本页面会出现
显然,用户的 IPython Notebook 守护进程没有运行
……或者 IPython Notebook 对话框 连接失败,连接到内核不工作。
笔记本很可能是由于 Python 异常而死亡。存在一个名为 notebook.stderr.log 的文件,每个用户一个,您应该能够从中读取发生的回溯。
调试笔记本守护进程
笔记本守护进程可以从命令行启动,并支持正常的 UNIX 守护进程 start、stop 和 fg 命令。您需要提供强制性的 PID 文件、工作文件夹、HTTP 端口和杀戮超时参数。
如何手动启动笔记本守护进程的示例
python $SOMEWHERE/pyramid_notebook/server/notebook_daemon.py fg /tmp/pyramid_notebook/$USER/notebook.pid /tmp/pyramid_notebook/$USER 8899 3600
查看启动脚本异常
如果启动脚本没有像您希望的那样填充笔记本的默认变量,您始终可以
print(locals()) 来查看设置了哪些局部变量
print(globals()) 来查看设置了哪些全局变量
在IPython笔记本中手动执行启动脚本,例如 exec(open("/tmp/pyramid_notebook/user-1/.jupyter/profile_default/startup/startup.py").read())(通过在本地文件系统中探索/tmp/pyramid_notebook来检查实际路径)。
开发
测试
安装测试依赖项
pip install -e ".[test]"
运行手动实例
pserve pyramid_notebook/demo/development.ini --reload
用户名是username,密码是password。
运行测试
py.test tests --splinter-webdriver=chrome --splinter-make-screenshot-on-failure=false --ini=pyramid_notebook/demo/development.ini
运行单个测试
py.test tests/* --splinter-webdriver=chrome --splinter-make-screenshot-on-failure=false --ini=pyramid_notebook/demo/development.ini -s -k test_notebook_template
运行完整的测试覆盖率
py.test tests/* --cov pyramid_notebook --cov-report xml --splinter-webdriver=chrome --splinter-make-screenshot-on-failure=false --ini=pyramid_notebook/demo/development.ini -s -k test_notebook_template
运行带有WebSocket的uWSGI服务器
uwsgi --virtualenv=venv --wsgi-file=pyramid_notebook/demo/wsgi.py --pythonpath=venv/bin/python uwsgi.ini
在OSX上,运行uWSGI并在Nginx下进行手动WebSocket代理测试
pkill nginx ; nginx -c `pwd`/nginx.conf
uwsgi --virtualenv=venv --wsgi-file=pyramid_notebook/demo/wsgi.py --pythonpath=venv/bin/python uwsgi-under-nginx.ini
手动测试
您可以手动启动进程以查看IPython笔记本启动时的任何错误。
运行test_start_stop测试并捕获标准输出中的日志输出
py.test tests --splinter-webdriver=chrome --splinter-make-screenshot-on-failure=false --ini=pyramid_notebook/demo/development.ini -s -k test_start_stop
...
INFO:pyramid_notebook.notebookmanager:Running notebook command: python ./pyramid_notebook/server/notebook_daemon.py start /tmp/pyramid_notebook_tests/testuser1/notebook.pid /tmp/pyramid_notebook_tests/testuser1 40007 60
您可以使用以下方式:
python ./pyramid_notebook/server/notebook_daemon.py start /tmp/pyramid_notebook_tests/testuser1/notebook.pid /tmp/pyramid_notebook_tests/testuser1 40005 60
pyramid_notebook的变更日志
0.3.0 (2018-10-09)
升级到IPython 7.0.1 / Jupyter。
支持Python 3.6、3.7和3.8。
移除对Python 3.4的支持。
强制执行Python风格检查。
更新README。
0.2.1 (2017-01-29)
使用最新的Jupyter Notebook版本修复不必要的“输入令牌”提示
0.2 (2016-12-06)
升级到IPython 5.1 / Jupyter
在各种情况下提供更好的错误消息
通过自定义IPython工具栏菜单添加自定义关闭命令
0.1.11 (2016-04-18)
升级到Daemonocle 1.0
0.1.10 (2016-01-31)
允许轻松覆盖IPython笔记本当前工作目录。
0.1.9 (2016-01-31)
使覆盖默认的bootstrap脚本和make_startup()的问候语成为可能
0.1.8 (2016-01-31)
由于uWSGI需要ws4py作为依赖项,因此将其添加为依赖项,它是目前唯一支持的实现
0.1.7 (2016-01-16)
修复README reST语法
0.1.6 (2016-01-16)
切换到xdaemonocle分叉的Daemonocle库
0.1.5 (2016-01-07)
现在通过setup.py pinnings将IPython笔记本保持在3.x系列,因为IPython 4.0尚不支持
0.1.4 (2015-12-19)
在README中修复相对图像链接到绝对链接
0.1.3 (2015-12-19)
修复由于setuptools_git不存在而导致的MANIFEST.in和发布问题
0.1.2 (2015-12-19)
修复README标记
修复损坏的drone.io集成,该集成阻止CI上的测试通过
0.1.1 (2015-12-19)
修复损坏的setup.py分类器
0.1 (2015-12-19)
初始发布。


下载文件
下载适用于您平台的应用程序。如果您不确定要选择哪个,请了解有关安装包的更多信息。