OpenWISP通知模块


项目描述


OpenWISP Notifications 为 OpenWISP 提供电子邮件和Web通知。
其主要目标是允许其他OpenWISP模块通知用户有关其网络中发生的有意义事件。
要了解OpenWISP模块和架构的更完整概述,请参阅OpenWISP架构概述。
可用功能
安装说明
从pypi安装稳定版本
从pypi安装
pip install openwisp-notifications安装开发版本
安装tarball
pip install https://github.com/openwisp/openwisp-notifications/tarball/master或者,您也可以使用pip通过git安装
pip install -e git+git://github.com/openwisp/openwisp-notifications#egg=openwisp_notifications开发版安装
我们使用Redis作为celery代理(如果您想使用不同的代理,也可以)。开发推荐的方式是使用Docker运行,所以您需要先安装docker和docker-compose。
如果您不想使用Docker,可以从您的仓库中安装Redis,但请注意,您发行版打包的版本可能不同。
安装SQLite
sudo apt install sqlite3 libsqlite3-dev openssl libssl-dev分叉并克隆分叉的仓库
git clone git://github.com/<your_fork>/openwisp-notifications进入克隆的仓库
cd openwisp-notifications/设置并激活一个虚拟环境。(我们将使用virtualenv)
python -m virtualenv env
source env/bin/activate
升级以下基本Python包
pip install -U pip wheel setuptools安装开发依赖
pip install -e .
pip install -r requirements-test.txt
npm install -g jslint stylelint
使用docker-compose启动Redis
docker-compose up -d创建数据库
cd tests/
./manage.py migrate
./manage.py createsuperuser
启动开发服务器
./manage.py runserver您可以在http://127.0.0.1:8000/admin/访问管理界面。
运行celery工作进程(需要单独的终端窗口)
# (cd tests)
celery -A openwisp2 worker -l info
使用以下命令运行测试
# run qa checks
./run-qa-checks

# standard tests
./runtests.py

# tests for the sample app
SAMPLE_APP=1 ./runtests.py

# If you running tests on PROD environment
./runtests.py --exclude skip_prod
在运行上一个示例的最后一条命令时,环境变量 SAMPLE_APP 会激活位于 /tests/openwisp2/ 的示例应用,这是一个简单的 Django 应用,它仅用于测试 openwisp-notifications 的扩展性。有关此概念的信息,请参阅以下部分。
设置(集成到现有Django项目中)
settings.py 中的 INSTALLED_APPS 应该如下所示
INSTALLED_APPS = [
    'django.contrib.auth',
    'django.contrib.contenttypes',
    'django.contrib.sessions',
    'django.contrib.messages',
    'django.contrib.staticfiles',
    'django.contrib.sites',
    'django_extensions',
    'allauth',
    'allauth.account',
    'allauth.socialaccount',
    # rest framework
    'rest_framework',
    'rest_framework.authtoken',
    'drf_yasg',
    'django_filters',
    'openwisp_users',
    # notifications module
    'openwisp_notifications',
    # add openwisp theme
    # (must be loaded here)
    'openwisp_utils.admin_theme',
    'django.contrib.admin',
    # channels
    'channels',
]注意: openwisp_utils.admin_theme 和 django.contrib.admin 应始终在 INSTALLED_APPS 中位于 openwisp_notifications 之后,如上述示例所示。否则可能会产生不良行为,例如在管理站点上不显示通知铃声。
添加 notification_api_settings 上下文处理器
TEMPLATES = [
    {
        # ...
        'OPTIONS': {
            # ...
            'context_processors': [
                # ...
                'openwisp_notifications.context_processors.notification_api_settings',
                # ...
            ],
        },
    },
]urls.py:
from django.contrib import admin
from django.urls import include, path
from django.contrib.staticfiles.urls import staticfiles_urlpatterns

urlpatterns = [
    path('admin/', admin.site.urls),
    path('api/v1/', include(('openwisp_users.api.urls', 'users'), namespace='users')),
    path('', include('openwisp_notifications.urls', namespace='notifications')),
]

urlpatterns += staticfiles_urlpatterns()
添加 WebSocket 路由
# In yourproject/asgi.py
from channels.auth import AuthMiddlewareStack
from channels.routing import ProtocolTypeRouter, URLRouter
from django.core.asgi import get_asgi_application
from openwisp_notifications.websockets.routing import get_routes

application = ProtocolTypeRouter(
    {'websocket': AuthMiddlewareStack(URLRouter(get_routes()))}
)
配置缓存(如果您想使用不同的缓存存储,则可以这样做)
CACHES = {
    'default': {
        'BACKEND': 'django_redis.cache.RedisCache',
        'LOCATION': 'redis:///0',
        'OPTIONS': {
            'CLIENT_CLASS': 'django_redis.client.DefaultClient',
        }
    }
}

SESSION_ENGINE = 'django.contrib.sessions.backends.cache'
SESSION_CACHE_ALIAS = 'default'
配置 celery
# Here we are showing how to configure celery with Redis but you can
# use other brokers if you want, consult the celery docs
CELERY_BROKER_URL = 'redis:///1'
配置 celery beat
CELERY_BEAT_SCHEDULE = {
    'delete_old_notifications': {
        'task': 'openwisp_notifications.tasks.delete_old_notifications',
        'schedule': timedelta(days=1),
        'args': (90,),
    },
}注意:只有在您想自动删除旧通知的情况下,才需要添加 CELERY_BEAT_SCHEDULE 设置。请阅读 Scheduled deletion of notifications 部分以了解更多关于此功能的信息。
如果您决定使用 redis(如这些示例所示),请确保在您的系统中安装了 python 依赖项
pip install redis django-redis配置 ASGI_APPLICATION
ASGI_APPLICATION = 'yourproject.asgi.application'配置 channel layers(您可以使用 不同的 channel layer)
CHANNEL_LAYERS = {
    'default': {
        'BACKEND': 'channels_redis.core.RedisChannelLayer',
        'CONFIG': {
            'hosts': ['redis:///7'],
        },
    },
}
在开发过程中,您可以将其配置为如下所示的 localhost
INTERNAL_IPS = ['127.0.0.1']运行迁移
./manage.py migrate注意:除了创建数据库模式外,运行迁移也是创建 通知设置 的必要条件。
发送通知
可以使用 notify 信号创建通知。例如
from django.contrib.auth import get_user_model
from swapper import load_model

from openwisp_notifications.signals import notify

User = get_user_model()
Group = load_model('openwisp_users', 'Group')
admin = User.objects.get(email='admin@admin.com')
operators = Group.objects.get(name='Operator')

notify.send(
    sender=admin,
    recipient=operators,
    description="Test Notification",
    verb="Test Notification",
    email_subject='Test Email Subject',
    url='https://:8000/admin',
)
上述代码片段创建并发送一个通知给所有属于 Operators 组的用户,前提是他们已选择接收通知。非超级用户仅接收他们所属组织的通知。
注意:如果没有提供收件人,则默认为所有超级用户。如果提供了目标,则目标对象所属组织的用户将被添加到收件人列表中,前提是他们具有职员状态并已选择接收通知。
notify 的完整语法
notify.send(
    actor,
    recipient,
    verb,
    action_object,
    target,
    level,
    description,
    **kwargs
)注意:由于 openwisp-notifications 在底层使用 django-notifications,因此 notify signal 的使用保持不变,以保持与 django-notifications 的一致性。您可以从 django-notifications 文档 中了解接受的参数。
额外的 notify 关键字参数
参数 |
描述 |
email_subject |
设置要发送的电子邮件通知的主题。 默认为通知消息。 |
url |
在电子邮件文本中添加一个 URL,例如 更多信息请见 <url>。 默认为 None,表示不会将上述消息添加到电子邮件文本中。 |
type |
根据注册的 通知类型 设置其他参数的值 默认为 None,表示您需要提供其他参数。 |
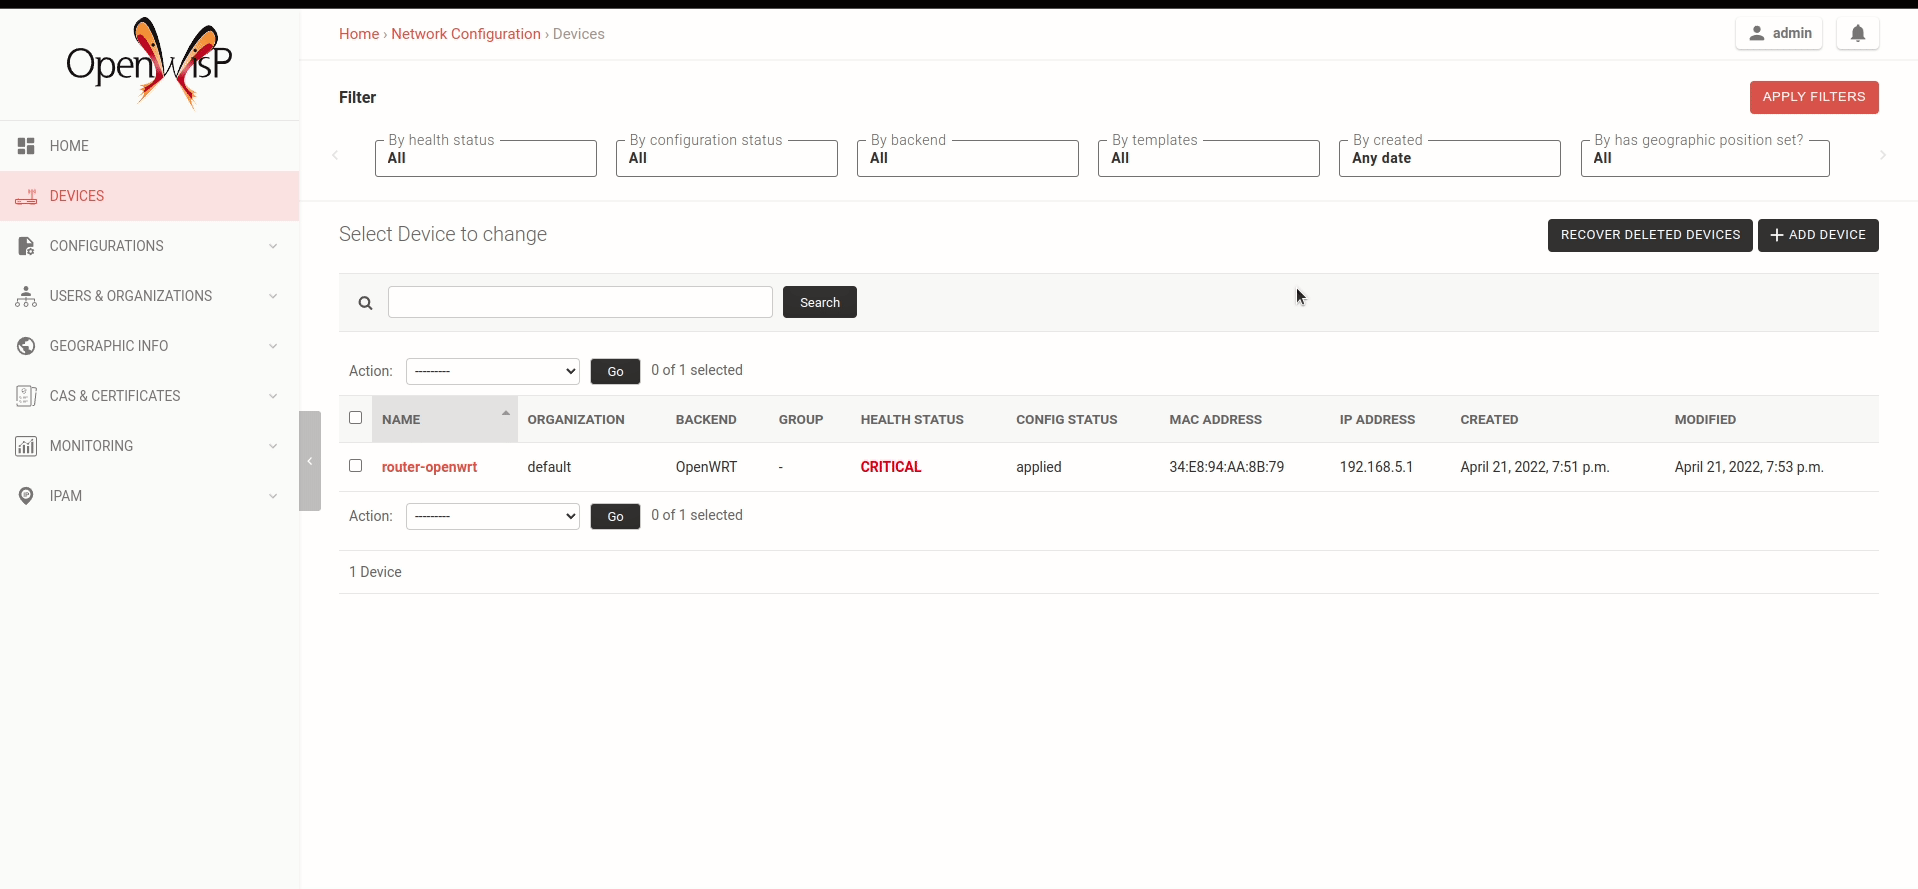
Web通知
Openwisp Notifications 通过 Django 的管理站点向收件人发送 Web 通知。以下是一些允许浏览 Web 通知的组件
通知小部件
已添加一个JavaScript小部件,使用户能够轻松消费通知。通知小部件提供以下功能:
一个极简的UI,帮助快速完成任务。
动态加载通知,并支持无限滚动,以防止不必要的网络请求。
可选功能:过滤未读通知。
可选功能:一键标记所有通知为已读。
通知提示
通知吐司实时发送通知。这允许用户在不打开通知小部件的情况下阅读通知。每当通过通知吐司显示通知时,还会播放一个通知铃声。
电子邮件通知
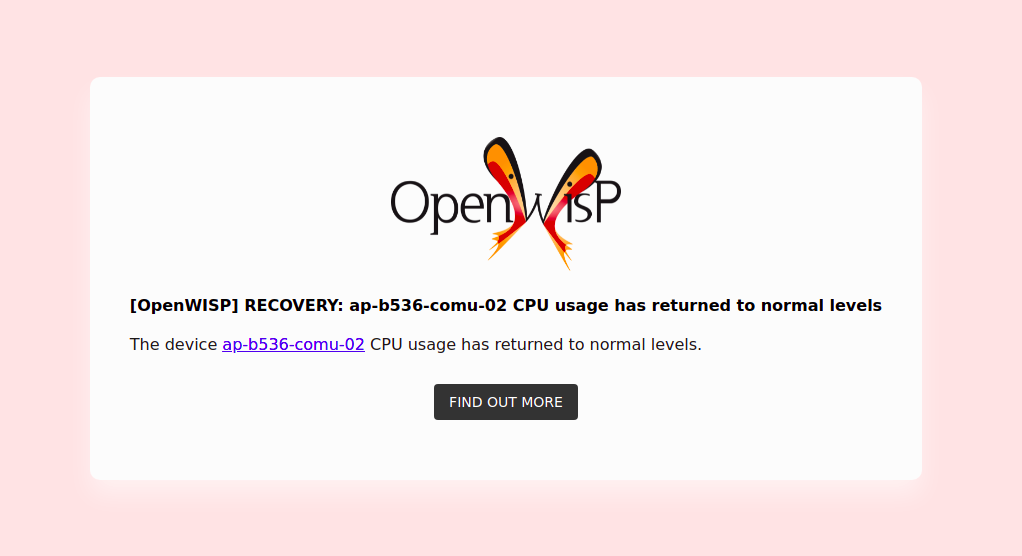
除了Web通知外,OpenWISP通知还利用openwisp-utils send_email功能发送电子邮件通知。
通知缓存
在典型的OpenWISP安装中,许多通知的actor(行为者)、action_object(动作对象)和target(目标)对象是相同的。为了优化数据库查询,这些对象使用Django的缓存框架进行缓存。缓存值会自动更新以反映数据库中的实际数据。您可以使用OPENWISP_NOTIFICATIONS_CACHE_TIMEOUT设置来控制这些对象的缓存持续时间。
缓存失效
可以使用函数register_notification_cache_update来注册一个用作actor、action_object和target对象的模型信号。由于这些值用于优化而进行缓存,因此当它们更改时,需要更改它们的缓存值。您可以注册任何想要的信号,该信号将删除缓存值。要在您的apps.py中注册信号,需要包含以下代码。
from django.db.models.signals import post_save
from swapper import load_model

def ready(self):
    super().ready()

    # Include lines after this inside
    # ready function of you app config class
    from openwisp_notifications.handlers import register_notification_cache_update

    model = load_model('app_name', 'model_name')
register_notification_cache_update(model, post_save, dispatch_uid="myapp_mymodel_notification_cache_invalidation")注意:您需要在ready函数内部导入register_notification_cache_update,或者您可以定义另一个函数来注册信号,该函数将在ready中调用,然后在此函数中导入。此外,dispatch_uid是信号的唯一标识符。您可以通过传递任何想要的值,但需要是唯一的。有关更多详细信息,请参阅Django文档中防止重复信号的章节
通知类型
OpenWISP通知通过使用通知类型简化了单个通知的配置。您可以将通知类型视为通知的模板。
可以为每种通知类型配置以下属性
属性 |
描述 |
level |
设置通知的level属性。 |
verb |
设置通知的verb属性。 |
verbose_name |
设置通知类型的显示名称。 |
message |
设置通知的message属性。 |
email_subject |
设置电子邮件通知的主题。 |
message_template |
包含通知消息模板的文件路径。 |
email_notification |
设置电子邮件通知的首选项。默认为True。 |
web_notification |
设置Web通知的首选项。默认为True。 |
注意:通知类型配置应至少包含一个message或message_template设置。如果两者都存在,则优先考虑message。
定义 message_template
您可以从默认消息模板扩展,或者从头开始编写自己的Markdown格式消息模板。以下是一个扩展默认消息模板的示例。
# In templates/your_notifications/your_message_template.md
{% extends 'openwisp_notifications/default_message.md' %}
{% block body %}
    [{{ notification.target }}]({{ notification.target_link }}) has malfunctioned.
{% endblock body %}注意:您可以使用如上所示的消息模板中的 notification 变量访问通知的所有属性。此外,还有 actor_link、action_link 和 target_link 等附加属性,用于提供对应对象的超链接。
注意:在编写注册或注销通知类型的代码后,建议运行数据库迁移以创建 通知设置。
注册/注销通知类型
OpenWISP 通知 通过实用函数 openwisp_notifications.types.register_notification_type 和 openwisp_notifications.types.unregister_notification_type 提供注册和注销通知的功能。使用这些函数,您可以从代码中注册或注销通知类型。
register_notification_type
此函数用于从您的代码中注册一个新的通知类型。
语法
register_notification_type(type_name, type_config, models)参数 |
描述 |
type_name |
定义通知类型名称的 str。 |
type_config |
定义通知类型配置的 dict。 |
models |
可选的与通知类型关联的模型列表 list。 |
下面是一个示例用法。
from openwisp_notifications.types import register_notification_type
from django.contrib.auth import get_user_model

User = get_user_model()

# Define configuration of your notification type
custom_type = {
    'level': 'info',
    'verb': 'added',
    'verbose_name': 'device added',
    'message': '[{notification.target}]({notification.target_link}) was {notification.verb} at {notification.timestamp}',
    'email_subject' : '[{site.name}] A device has been added',
    'web_notification': True,
    'email_notification': True,
}

# Register your custom notification type
register_notification_type('custom_type', custom_type, models=[User])注意:如果已注册了具有相同名称的通知类型(不要与 verbose_name 混淆),则将引发 ImproperlyConfigured 异常。
注意:在定义通知类型的 message 和 email_subject 配置时,您可以使用 site 和 notification 变量。它们分别指的是 django.contrib.sites.models.Site 和 openwisp_notifications.models.Notification 的对象。这允许您在配置中使用它们的任何属性。与 message_template 类似,message 属性也可以使用 markdown 格式化。
unregister_notification_type
此函数用于从您的代码的任何位置注销通知类型。
语法
unregister_notification_type(type_name)参数 |
描述 |
type_name |
定义通知类型名称的 str。 |
下面是一个示例用法。
from openwisp_notifications.types import unregister_notification_type

# Unregister previously registered notification type
unregister_notification_type('custom type')注意:如果相关通知类型未注册,则将引发 ImproperlyConfigured 异常。
向通知传递额外数据
如果需要,可以在通知消息中包含未知的数据。
这种情况的一个完美例子是错误通知,错误消息将根据发生的情况而变化,所以我们无法知道,直到通知生成。
下面是如何操作的。
from openwisp_notifications.types import register_notification_type

register_notification_type('error_type', {
    'verbose_name': 'Error',
    'level': 'error',
    'verb': 'error',
    'message': 'Error: {error}',
    'email_subject': 'Error subject: {error}',
})
然后在应用程序代码中
from openwisp_notifications.signals import notify

try:
    operation_which_can_fail()
except Exception as error:
    notify.send(
        type='error_type',
        sender=sender,
        error=str(error)
)注意:建议在 Django 应用程序 AppConfig 的 ready 方法中注册或注销所有通知类型。
通知偏好设置
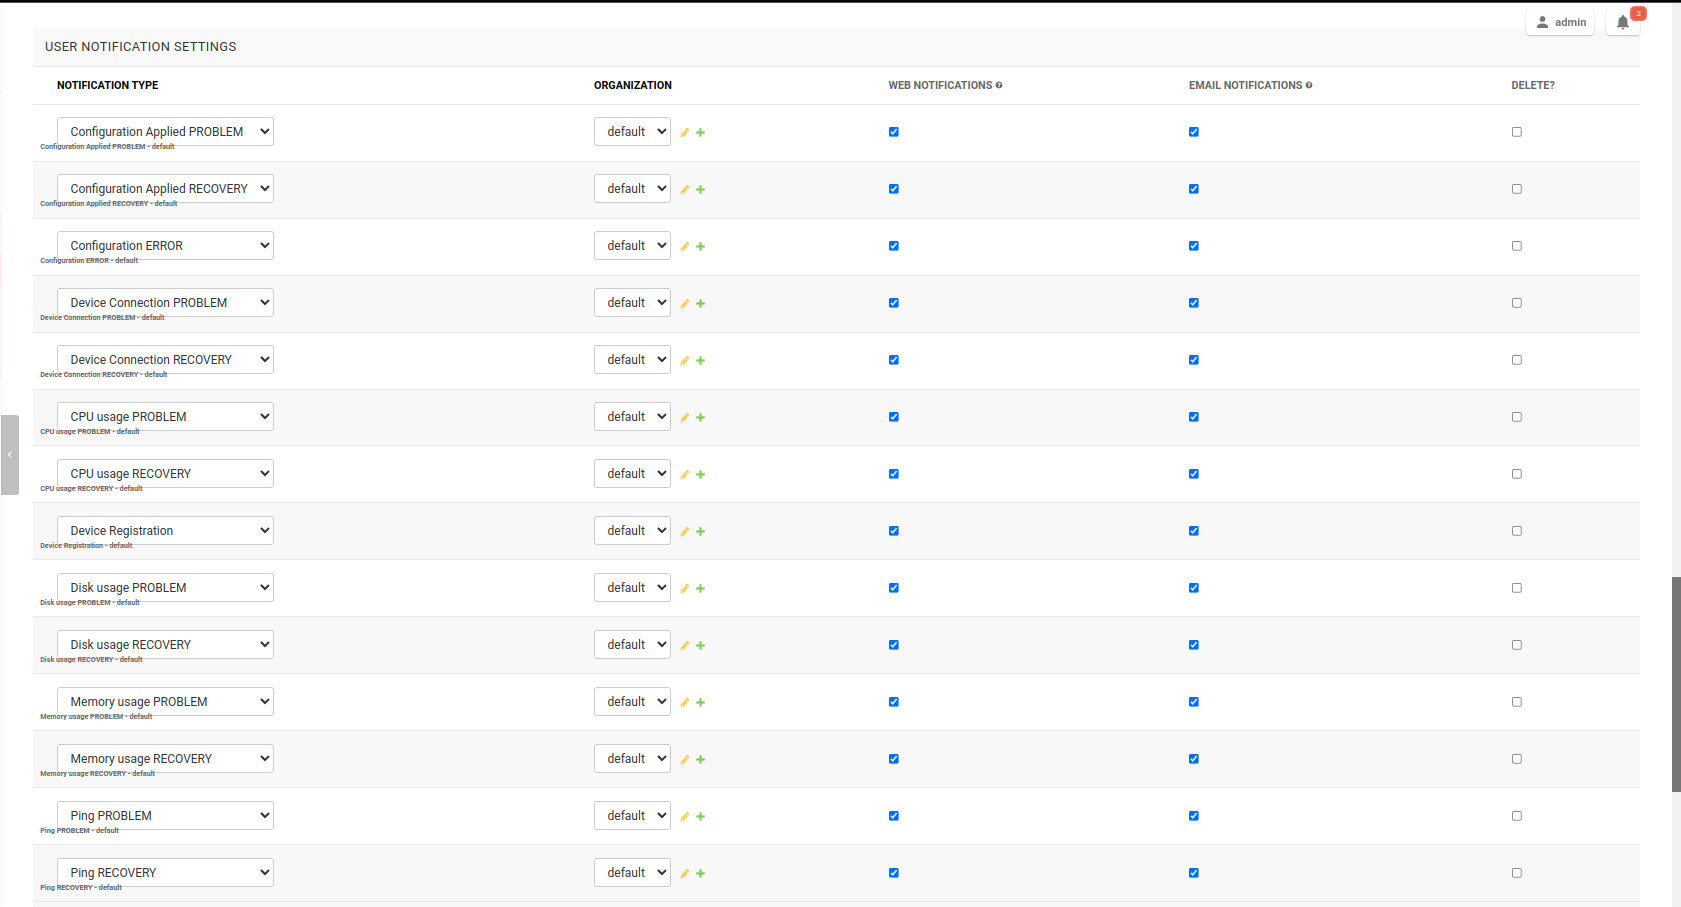
OpenWISP 通知 允许用户选择他们接收通知的首选方式。用户可以从网站或电子邮件通知中进行选择。这些设置已按通知类型和组织分类,因此用户只能接收所选组织或通知类型的通知。
为所有用户和所有通知类型和组织自动创建了通知设置。虽然超级用户可以为所有人添加或删除通知设置,但工作人员用户只能修改他们接收通知的首选方式。通过提供的功能,用户可以选择接收网站和电子邮件通知,或者只接收网站通知。用户还可以通过禁用通知设置的网站和电子邮件选项来停止接收通知。
注意:如果用户未为特定通知设置配置电子邮件或网站首选项,则将分别使用相关通知类型的 email_notification 或 web_notification 选项。
删除通知偏好设置
删除通知偏好设置是一个高级选项。用户应关闭网页和电子邮件通知,而不是删除通知偏好设置。如果系统需要,删除的通知偏好设置可能会自动重新创建。
临时或永久地静音特定对象的通知
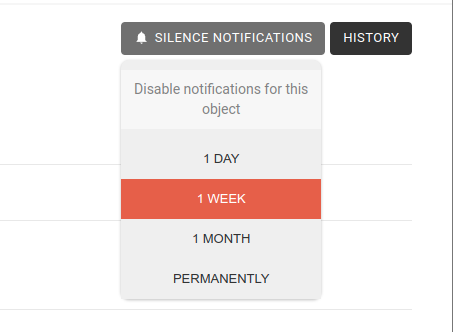
OpenWISP 通知 允许用户在一段时间内或永久地屏蔽他们不感兴趣的特定对象生成的所有通知,而其他用户将继续正常接收通知。
使用对象管理更改表单上的小部件,用户可以禁用该对象一天、一周、一个月或永久生成的所有通知。
注意:此功能需要将 “OPENWISP_NOTIFICATIONS_IGNORE_ENABLED_ADMIN” 配置为在所需模型的行政部分启用小部件。
通知的预定删除
OpenWISP 通知 提供一个 celery 任务,可以自动删除超过预先配置天数的旧通知。为了定期运行此任务,您需要配置 CELERY_BEAT_SCHEDULE 设置,如 设置说明 中所示。
celery 任务仅接受一个参数,即天数。您可以在配置 CELERY_BEAT_SCHEDULE 设置时在 args 键中提供任意天数。
例如,如果您想自动删除超过10天的旧通知,则配置 CELERY_BEAT_SCHEDULE 如下
CELERY_BEAT_SCHEDULE = {
    'delete_old_notifications': {
        'task': 'openwisp_notifications.tasks.delete_old_notifications',
        'schedule': timedelta(days=1),
        'args': (10,), # Here we have defined 10 instead of 90 as shown in setup instructions
    },
}
请参阅 Celery 文档中的“定期任务”部分 了解更多。
设置
OPENWISP_NOTIFICATIONS_HOST
type |
str |
default |
在 ALLOWED_HOST 中定义的任何域名 |
此设置定义 API 和 Web Socket 通信时使用的域名,以使通知小部件正常工作。
注意:如果您不在不同的子域上托管 API 端点,则不需要配置此设置。
如果您的根域名是 example.com,并且 API 和 Web Socket 在 api.example.com 上托管,则配置设置如下
OPENWISP_NOTIFICATIONS_HOST = 'https://api.example.com'此功能要求您在服务器上允许 CORS。我们使用 django-cors-headers 模块轻松设置 CORS 标头。请参阅 django-cors-headers 的设置文档。
按照以下方式配置 django-cors-headers 设置
CORS_ALLOW_CREDENTIALS = True
CORS_ORIGIN_WHITELIST = ['https://www.example.com']
按照以下方式配置 Django 的设置
SESSION_COOKIE_DOMAIN = 'example.com'
CSRF_COOKIE_DOMAIN = 'example.com'
请参阅 Django 的设置文档 了解有关 SESSION_COOKIE_DOMAIN 和 CSRF_COOKIE_DOMAIN 设置的更多信息。
OPENWISP_NOTIFICATIONS_SOUND
type |
str |
default |
此设置定义在管理员网站上实时接收到通知时播放的通知声音。
提供音频文件的相对路径(托管在您的 Web 服务器上),如下所示。
OPENWISP_NOTIFICATIONS_SOUND = 'your-appname/audio/notification.mp3'OPENWISP_NOTIFICATIONS_CACHE_TIMEOUT
type |
int |
default |
172800 (2天,以秒为单位) |
它设置了通知内容应在缓存中存储的秒数。如果您想使缓存的 notification 内容永远不会过期,则将其设置为 None。如果您根本不想在缓存中存储通知内容,则将其设置为 0。
OPENWISP_NOTIFICATIONS_IGNORE_ENABLED_ADMIN
type |
list |
default |
[] |
此设置启用了允许用户在指定 ModelAdmin 类的更改页面中暂时或永久屏蔽特定对象通知的小部件。
例如,如果您想为 openwisp_users.models.User 模型的对象启用小部件,则配置设置如下
OPENWISP_NOTIFICATIONS_IGNORE_ENABLED_ADMIN = ['openwisp_users.admin.UserAdmin']OPENWISP_NOTIFICATIONS_POPULATE_PREFERENCES_ON_MIGRATE
type |
bool |
default |
True |
此设置允许在运行迁移时禁用创建通知偏好设置。
OPENWISP_NOTIFICATIONS_NOTIFICATION_STORM_PREVENTION
当系统因网络故障(例如:停电、全局配置错误)开始创建大量通知时,通知风暴预防机制避免持续显示新的通知警报及其声音,只定期更新通知计数器,尽管在通知风暴结束后不会发出任何声音或创建任何其他视觉元素。
此设置允许调整此机制的工作方式。
默认配置如下
OPENWISP_NOTIFICATIONS_NOTIFICATION_STORM_PREVENTION = {
    # Time period for tracking burst of notifications (in seconds)
    'short_term_time_period': 10,
    # Number of notifications considered as a notification burst
    'short_term_notification_count': 6,
    # Time period for tracking notifications in long time interval (in seconds)
    'long_term_time_period': 180,
    # Number of notifications in long time interval to be considered as a notification storm
    'long_term_notification_count': 30,
    # Initial time for which notification updates should be skipped (in seconds)
    'initial_backoff': 1,
    # Time by which skipping of notification updates should be increased (in seconds)
    'backoff_increment': 1,
    # Maximum interval after which the notification widget should get updated (in seconds)
    'max_allowed_backoff': 15,
}
异常
NotificationRenderException
openwisp_notifications.exceptions.NotificationRenderException当无法从相关的通知类型中渲染通知属性(如email或message)时抛出。它继承自Exception类。
它可能由于访问不存在的键(例如,在相关的通知类型的email或message设置中缺少相关对象)而引发。
REST API
实时文档
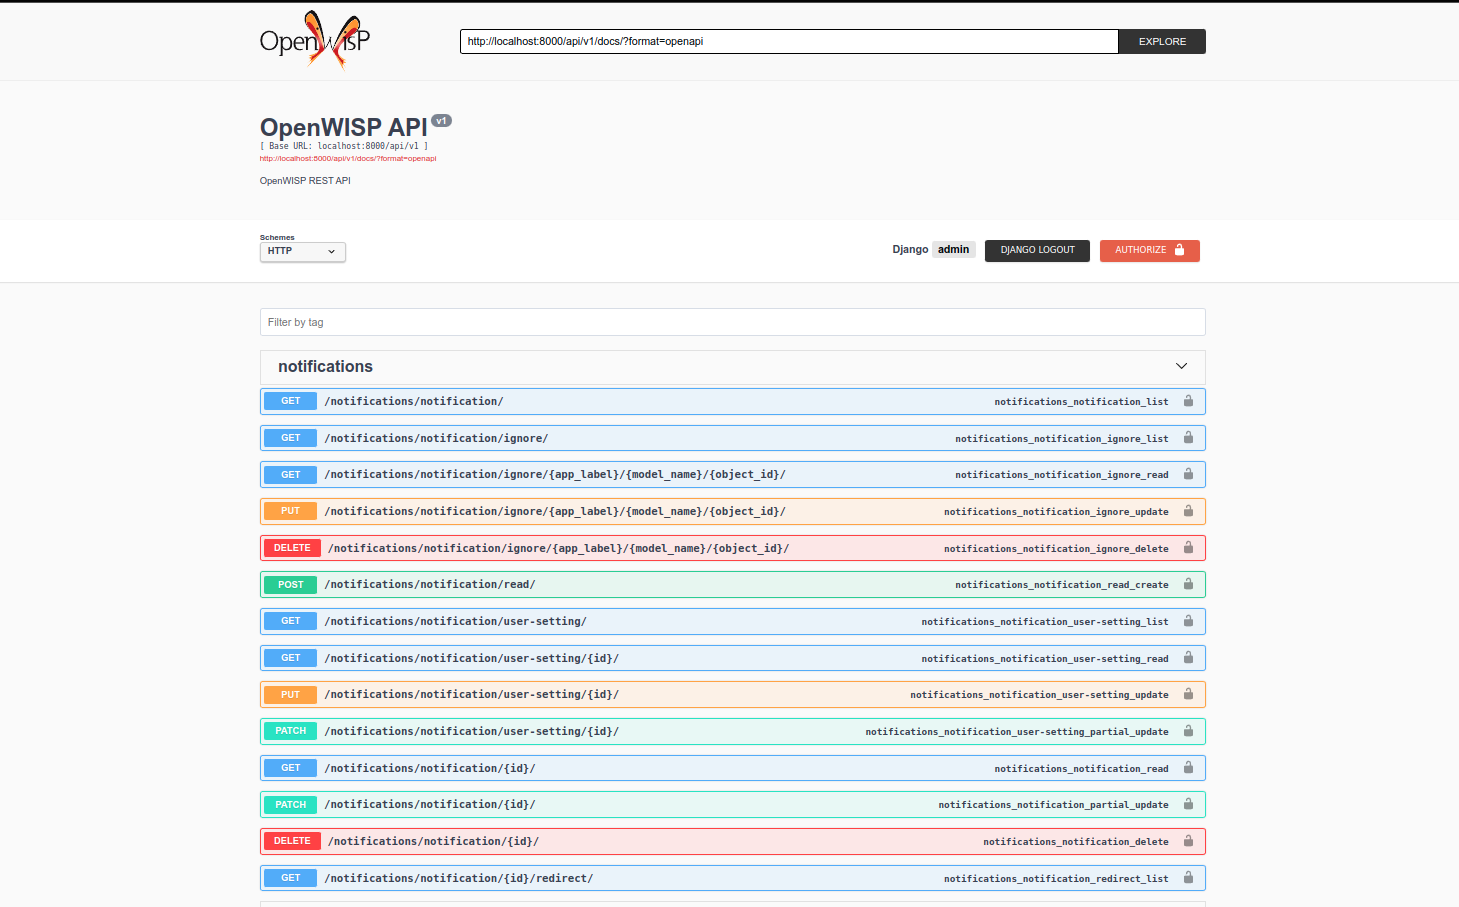
通用实时API文档(遵循OpenAPI规范)可在/api/v1/docs/找到。
可浏览的Web界面

此外,直接在浏览器中打开以下列出的端点将显示Django-REST-Framework的可浏览API界面,这使得查找每个端点的详细信息变得更加容易。
认证
请参阅openwisp-users:使用用户令牌进行身份验证。
分页
list端点支持page_size参数,该参数允许与page参数结合进行分页。
GET /api/v1/notifications/notification/?page_size=10
GET /api/v1/notifications/notification/?page_size=10&page=2
端点列表
由于详细的说明包含在每个端点的实时文档和可浏览网页中,因此这里我们只提供可用的端点列表,有关更多信息,请打开浏览器中的端点URL。
列出用户的通知
GET /api/v1/notifications/notification/标记所有用户的通知为已读
POST /api/v1/notifications/notification/read/获取通知详情
GET /api/v1/notifications/notification/{pk}/标记通知为已读
PATCH /api/v1/notifications/notification/{pk}/删除通知
DELETE /api/v1/notifications/notification/{pk}/列出用户的通知设置
GET /api/v1/notifications/notification/user-setting/获取通知设置详情
GET /api/v1/notifications/notification/user-setting/{pk}/更新通知设置详情
PATCH /api/v1/notifications/notification/user-setting/{pk}/列出用户的对象通知设置
GET /api/v1/notifications/notification/ignore/获取对象通知设置详情
GET /api/v1/notifications/notification/ignore/{app_label}/{model_name}/{object_id}/创建对象通知设置
PUT /api/v1/notifications/notification/ignore/{app_label}/{model_name}/{object_id}/删除对象通知设置
DELETE /api/v1/notifications/notification/ignore/{app_label}/{model_name}/{object_id}/管理命令
populate_notification_preferences
此命令将为用户所属的组织的所有用户填充通知偏好设置。
示例用法
# cd tests/
./manage.py populate_notification_preferences注意:在运行此命令之前,请确保celery代理正在运行且可以通过celery工作进程访问。
create_notification
此命令将为default组织的成员创建具有default通知类型的模拟通知。此命令主要提供用于仅在开发中测试通知的单一目的。
示例用法
# cd tests/
./manage.py create_notification
扩展openwisp-notifications
OpenWISP项目的核心价值之一是软件可重用性,因此OpenWISP Notifications提供了一套基础类,可以导入、扩展和重用以创建衍生应用程序。
为了实现您自己的openwisp-notifications版本,您需要执行本节其余部分中描述的步骤。
如有疑问,测试项目和sample_notifications中的代码将指导您正确方向:只需复制并修改该代码以使openwisp-notifications的基本衍生版本工作。
前提:如果您计划使用此模块的定制版本,我们建议从一开始就使用它,因为从默认模块迁移数据到您的扩展版本可能需要花费较长时间。
1. 初始化自定义模块
要扩展openwisp-notifications,您需要做的第一件事是创建一个新的django应用程序,该应用程序将包含您的自定义版本的openwisp-notifications应用程序。
一个 Django 应用实际上就是一个 Python 包(Python 脚本的目录),在以下示例中,我们将这个 Django 应用称为 mynotifications,但你可以根据需要命名
django-admin startapp mynotifications请注意,上述命令必须从你的 PYTHON_PATH 中可用的目录中调用,这样你就可以将结果导入到你的项目中。
现在你需要在你的 settings.py 中的 INSTALLED_APPS 中添加 mynotifications,并确保已经移除了 openwisp_notifications
INSTALLED_APPS = [
    # ... other apps ...
    # 'openwisp_notifications',        <-- comment out or delete this line
    'mynotifications',
]
有关如何与 Django 项目和 Django 应用一起工作的更多信息,请参阅 Django 文档。
2. 安装 openwisp-notifications
安装(并将 openwisp-notifications 添加到你的项目需求中)
pip install -U https://github.com/openwisp/openwisp-notifications/tarball/master3. 添加 EXTENDED_APPS
将以下内容添加到你的 settings.py
EXTENDED_APPS = ['openwisp_notifications']4. 添加 openwisp_utils.staticfiles.DependencyFinder
将 openwisp_utils.staticfiles.DependencyFinder 添加到你的 settings.py 中的 STATICFILES_FINDERS
STATICFILES_FINDERS = [
    'django.contrib.staticfiles.finders.FileSystemFinder',
    'django.contrib.staticfiles.finders.AppDirectoriesFinder',
    'openwisp_utils.staticfiles.DependencyFinder',
]
5. 添加 openwisp_utils.loaders.DependencyLoader
将 openwisp_utils.loaders.DependencyLoader 添加到你的 settings.py 中的 TEMPLATES
TEMPLATES = [
    {
        'BACKEND': 'django.template.backends.django.DjangoTemplates',
        'OPTIONS': {
            'loaders': [
                'django.template.loaders.filesystem.Loader',
                'django.template.loaders.app_directories.Loader',
                'openwisp_utils.loaders.DependencyLoader',
            ],
            'context_processors': [
                'django.template.context_processors.debug',
                'django.template.context_processors.request',
                'django.contrib.auth.context_processors.auth',
                'django.contrib.messages.context_processors.messages',
            ],
        },
    }
]
6. 继承AppConfig类
请参考测试项目的示例应用中的以下文件
有关 AppConfig 概念的更多信息,请参阅 Django 文档中的“Applications”部分。
7. 创建自定义模型
为了展示示例,我们在测试项目中示例应用的 模型中添加了一个简单的“详细信息”字段。
你可以在类似的 models.py 文件中添加字段。
注意:有关如何使用、扩展或开发模型的疑问,请参阅 Django 文档中的“Models”部分。
8. 添加交换器配置
将以下内容添加到你的 settings.py
# Setting models for swapper module
OPENWISP_NOTIFICATIONS_NOTIFICATION_MODEL = 'mynotifications.Notification'
OPENWISP_NOTIFICATIONS_NOTIFICATIONSETTING_MODEL = 'mynotifications.NotificationSetting'
OPENWISP_NOTIFICATIONS_IGNOREOBJECTNOTIFICATION_MODEL = 'mynotifications.IgnoreObjectNotification'
9. 创建数据库迁移
创建并应用数据库迁移
./manage.py makemigrations
./manage.py migrate
有关更多信息,请参阅 Django 文档中的“Migrations”部分。
10. 创建自定义管理界面
请参考示例应用的 admin.py 文件。
要引入对管理员的更改,你可以通过以下两种主要方式之一进行。
注意:有关 Django 管理员如何工作或如何定制的更多信息,请参阅 Django 文档中的“Django admin site”部分。
1. Monkey patching
如果你需要添加的更改相对较小,你可以求助于猴子补丁。
例如
from openwisp_notifications.admin import NotificationSettingInline

NotificationSettingInline.list_display.insert(1, 'my_custom_field')
NotificationSettingInline.ordering = ['-my_custom_field']
2. 继承admin类
如果你需要引入重大更改,或者你不想求助于猴子补丁,你可以按照以下步骤进行
from django.contrib import admin
from openwisp_notifications.admin import (
    NotificationSettingInline as BaseNotificationSettingInline,
)
from openwisp_notifications.swapper import load_model

NotificationSetting = load_model('NotificationSetting')

admin.site.unregister(NotificationSettingAdmin)
admin.site.unregister(NotificationSettingInline)


@admin.register(NotificationSetting)
class NotificationSettingInline(BaseNotificationSettingInline):
    # add your changes here
    pass
11. 创建根URL配置
请参考测试项目的 urls.py 文件。
有关 Django 中 URL 配置的更多信息,请参阅 Django 文档中的“URL dispatcher”部分。
12. 创建根路由配置
请参考测试项目的 routing.py 文件。
有关 Django 中 URL 配置的更多信息,请参阅 Channels 文档中的 “Routing” 部分。
13. 创建celery.py
请参考测试项目的 celery.py 文件。
有关在Django中使用Celery的更多信息,请参阅Celery文档中的“Django入门”部分。
14. 导入Celery任务
请在您的settings.py中添加以下内容以从openwisp_notifications应用程序导入Celery任务。
CELERY_IMPORTS = ('openwisp_notifications.tasks',)16. 注册通知类型
您可以根据注册通知类型部分所示的方法注册通知类型。
在sample_notifications/apps.py中提供了一个注册通知类型的参考。当创建TestApp模型的对象时,将使用sample_notifications应用程序注册的通知类型来创建通知。您可以将sample_notifications/models.py作为您实现的参考。
17. 导入自动化测试
当基于此模块开发自定义应用程序时,导入并运行基本测试也是一个好主意,这样您可以确保您引入的更改不会破坏openwisp-notifications的一些现有功能。
如果您需要添加破坏性更改,可以覆盖基类中定义的测试来测试您自己的行为。
请参阅sample_notifications的测试以了解如何进行此操作。
注意:如果templatetags和admin/base.html没有正确配置,某些测试将失败。请参阅前面的部分以正确配置它们。
可以继承和扩展的其他基类
以下步骤不是必需的,而是用于更高级的自定义。
API视图
API视图类也可以扩展到其他Django应用程序中。请注意,将openwisp-notifications扩展到您的应用程序不是必需的,并且此更改仅在您计划更改API视图时才是必需的。
创建一个视图文件,如sample_notifications/views.py中所示。
有关Django REST Framework API视图的更多信息,请参阅Django REST Framework文档中的“通用视图”部分。
WebSocket消费者
WebSocket消费者类也可以扩展到其他Django应用程序中。请注意,将openwisp-notifications扩展到您的应用程序不是必需的,并且此更改仅在您计划更改消费者时才是必需的。
创建一个消费者文件,如sample_notifications/consumers.py中所示。
有关Channels消费者的更多信息,请参阅Channels文档中的“消费者”部分。
贡献
请阅读OpenWISP贡献指南。
许可协议
请参阅LICENSE。
支持
请参阅OpenWISP支持渠道。
归属
图标
使用的图标来自Font Awesome项目。
LICENSE: https://fontawesome.com/license
声音


下载文件
下载适合您平台的文件。如果您不确定选择哪个,请了解更多关于 安装包 的信息。
源代码分发
构建分发
哈希值 for openwisp_notifications-1.0.3-py2.py3-none-any.whl
| 算法 | 哈希摘要 | |
|---|---|---|
| SHA256 | bc670c4f92d30a7dae96cbeb8fdd9329c3cf8be3b994f77a1529c2f1c27fce82 |
|
| MD5 | 515ea9436ad4c7b41a61d621e0870c9f |
|
| BLAKE2b-256 | 39c1eaf3abbaade35927007e10b7632cce4c16c22aac79d501a7cbcdab3e4a0e |