OpenWISP 2 控制器


项目描述


OpenWISP 控制器是一个配置管理器,允许自动化许多网络任务,如采用、配置、管理VPN配置、X509证书自动生成、撤销X509证书等更多功能。
OpenWISP不仅是一个面向最终用户的应用程序,还可以作为一个框架,在上面构建自定义网络自动化解决方案。
OpenWISP生态系统中的其他流行组件包括:
openwisp-monitoring:提供设备状态监控、指标收集、图表、警报,可以定义自定义检查
openwisp-firmware-upgrader:自动固件升级(单个设备或大规模网络升级)
openwisp-radius:基于FreeRADIUS,允许实现网络访问认证系统,如802.1x WPA2企业版、捕获门户认证、Hotspot 2.0(802.11u)
openwisp-network-topology:提供从动态网状路由守护进程或其他网络软件(例如:OpenVPN)收集和可视化网络拓扑数据的方法;它可以与openwisp-monitoring结合使用,以更好地了解网络状态
openwisp-ipam:允许管理网络中使用的IP地址的分配
openwisp-notifications:允许用户了解网络中发生的重要事件。
有关OpenWISP模块和架构的更完整概述,请参阅OpenWISP架构概述。

想帮助OpenWISP吗? 在这里了解如何帮助我们成长。
项目结构 & 主要功能
OpenWISP控制器是一个由四个Django应用组成的Python包
配置应用
- 配置管理,支持不同固件的嵌入式设备
可以通过指定自定义后端添加对其他固件的支持
配置编辑器,基于JSON-Schema编辑器
高级编辑模式:编辑设备配置对象以实现最大灵活性
配置模板:将重复性降至最低,配置默认和必需的模板
配置变量:在配置和模板中引用类似于Ansible的变量
模板标签:对模板进行标记以自动配置不同类型的自动配置(例如:网状,WDS,4G)
设备组:将设备添加到专用组,以简化设备组的管理
简单的HTTP资源:允许设备自动下载配置更新
VPN管理:自动配置VPN隧道,包括加密密钥和IP地址
PKI应用
PKI应用基于django-x509,它允许从管理仪表板直接创建、导入和查看X509 CA和证书,它还向REST API添加了不同的端点。
连接应用
此应用使控制器能够实例化与设备的连接,以执行推送操作
默认实现的是SSH连接协议,但其他协议机制是可扩展的,也可以实现自定义协议。
建议通过SSH密钥访问,支持的SSH密钥算法包括
RSA
Ed25519
地理应用
地理应用基于django-loci,允许定义设备的地理坐标以及它们在楼层平面图上的室内坐标。
它还向REST API添加了不同的端点。
子网划分应用
此应用允许自动配置子网和IP地址,这些子网和IP地址将作为系统定义的配置变量提供,可以在模板中使用。此应用的目的允许用户自动配置特定子网和IP地址到设备,无需手动干预。
有关此应用提供的功能,请参阅此文档中“如何配置子网和IP地址的自动配置”部分。
此应用是可选的,如果您不需要它,则可以避免将其添加到settings.INSTALLED_APPS。
安装说明
在生产环境中部署
查看
依赖关系
Python >= 3.7
OpenSSL
从pypi安装稳定版本
从PyPI安装
pip install openwisp-controller安装开发版本
安装tar包
pip install https://github.com/openwisp/openwisp-controller/tarball/master或者您可以使用pip通过git安装
pip install -e git+git://github.com/openwisp/openwisp-controller#egg=openwisp_controller如果您想贡献,请按照为开发安装中的说明操作。
为开发安装
安装系统依赖项
sudo apt update
sudo apt install -y sqlite3 libsqlite3-dev openssl libssl-dev
sudo apt install -y gdal-bin libproj-dev libgeos-dev libspatialite-dev libsqlite3-mod-spatialite
sudo apt install -y chromium
分叉并克隆分叉的存储库
git clone git://github.com/<your_fork>/openwisp-controller导航到克隆的存储库
cd openwisp-controller/启动Redis
docker-compose up -d redis设置并激活虚拟环境。(我们将使用 virtualenv)
python -m virtualenv env
source env/bin/activate
在进入下一步之前,请确保您正在使用 pip 版本 20.2.4。
pip install -U pip wheel setuptools安装开发依赖项
pip install -e .
pip install -r requirements-test.txt
npm install -g jshint stylelint
从 https://chromedriver.chromium.org/home 安装适合您浏览器版本的 WebDriver for Chromium,并将 chromedriver 解压到您的 $PATH 中的一个目录下(例如: ~/.local/bin/)。
创建数据库
cd tests/
./manage.py migrate
./manage.py createsuperuser
启动 celery worker(用于后台任务)
celery -A openwisp2 worker -l info启动开发服务器
./manage.py runserver 0.0.0.0:8000您可以在 http://127.0.0.1:8000/admin/ 访问管理界面。
使用以下命令运行测试
./runtests.py --parallel使用以下命令运行质量保证测试
./run-qa-checks在docker上安装和运行
注意:此 Docker 镜像仅用于开发目的。有关官方 OpenWISP Docker 镜像,请参阅:docker-openwisp。
从 Dockerfile 构建
docker-compose build运行 docker 容器
docker-compose up常见安装问题的故障排除步骤
在安装 GeoDjango 时,您可能会遇到一些问题。
无法加载SpatiaLite库扩展吗?
如果您遇到以下异常
django.core.exceptions.ImproperlyConfigured: Unable to load the SpatiaLite library extension
那么,您需要在您的 settings.py 中指定 SPATIALITE_LIBRARY_PATH,如 django 文档中关于如何安装和配置 spatialte 的说明 所述。
其他地理空间库有问题吗?
请参阅 与地理空间库相关的问题排除。
设置(集成到现有Django项目中)
将 openwisp_controller 应用程序添加到 INSTALLED_APPS
INSTALLED_APPS = [
    ...
    # openwisp2 modules
    'openwisp_controller.config',
    'openwisp_controller.pki',
    'openwisp_controller.geo',
    'openwisp_controller.connection',
    'openwisp_controller.subnet_division', # Optional
    'openwisp_controller.notifications',
    'openwisp_users',
    'openwisp_notifications',
    'openwisp_ipam',
    # openwisp2 admin theme
    # (must be loaded here)
    'openwisp_utils.admin_theme',
    'django.contrib.admin',
    'django.forms',
    ...
]
EXTENDED_APPS = ('django_x509', 'django_loci')注意:在 INSTALLED_APPS 中的应用程序顺序应保持不变,否则可能无法正常工作。
在 settings.py 中需要的其他设置
STATICFILES_FINDERS = [
    'django.contrib.staticfiles.finders.FileSystemFinder',
    'django.contrib.staticfiles.finders.AppDirectoriesFinder',
    'openwisp_utils.staticfiles.DependencyFinder',
]

ASGI_APPLICATION = 'openwisp_controller.geo.channels.routing.channel_routing'
CHANNEL_LAYERS = {
    # in production you should use another channel layer backend
    'default': {'BACKEND': 'channels.layers.InMemoryChannelLayer'},
}

TEMPLATES = [
    {
        'BACKEND': 'django.template.backends.django.DjangoTemplates',
        'DIRS': [],
        'OPTIONS': {
            'loaders': [
                'django.template.loaders.filesystem.Loader',
                'django.template.loaders.app_directories.Loader',
                'openwisp_utils.loaders.DependencyLoader',
            ],
            'context_processors': [
                'django.template.context_processors.debug',
                'django.template.context_processors.request',
                'django.contrib.auth.context_processors.auth',
                'django.contrib.messages.context_processors.messages',
                'openwisp_utils.admin_theme.context_processor.menu_items',
                'openwisp_notifications.context_processors.notification_api_settings',
            ],
        },
    }
]

FORM_RENDERER = 'django.forms.renderers.TemplatesSetting'
将 URL 添加到您的主 urls.py
urlpatterns = [
    # ... other urls in your project ...
    # openwisp-controller urls
    url(r'^admin/', admin.site.urls),
    url(r'', include('openwisp_controller.urls')),
]
配置缓存(如果您想使用不同的缓存存储,也可以)
CACHES = {
    'default': {
        'BACKEND': 'django_redis.cache.RedisCache',
        'LOCATION': 'redis:///0',
        'OPTIONS': {
            'CLIENT_CLASS': 'django_redis.client.DefaultClient',
        }
    }
}

SESSION_ENGINE = 'django.contrib.sessions.backends.cache'
SESSION_CACHE_ALIAS = 'default'
配置 celery(如果您想使用不同的代理,也可以)
# here we show how to configure celery with redis but you can
# use other brokers if you want, consult the celery docs
CELERY_BROKER_URL = 'redis:///1'

INSTALLED_APPS.append('djcelery_email')
EMAIL_BACKEND = 'djcelery_email.backends.CeleryEmailBackend'
如果您决定使用 redis(如以下示例所示),请安装所需的 python 包
pip install redis django-redis
然后运行
./manage.py migrate用法参考
默认模板
当模板被标记为默认时,它们将自动分配给新设备。
如果有多个默认模板,则根据其名称的字母顺序将这些模板分配给设备,例如,给定以下默认模板
访问
接口
SSH 密钥
它们将以 exactly that order 分配给设备。
如果出于某些技术原因(例如:一个默认模板依赖于必须先分配的另一个默认模板)您需要更改顺序,您可以简单地通过在模板前加数字来重命名模板,例如
1 接口
SSH 密钥
访问
所需模板
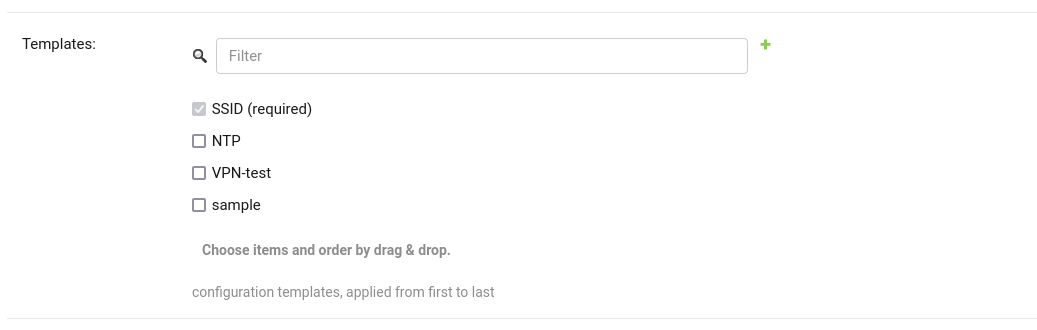
必需模板与 默认模板 相似,但不能从设备配置中取消分配,它们只能被覆盖。
它们将始终在默认模板之前分配,因此如果需要,可以覆盖。
在上面的示例中,"SSID" 模板被标记为 "(必需)",其复选框始终被选中并禁用。
如何使用配置变量
有时配置在所有设备上并不完全相同,一些参数对每个设备来说是唯一的或需要用户更改。
在这些情况下,可以使用配置变量与模板一起使用,此功能也称为 配置上下文,将其视为传递给渲染配置的函数的字典,以便它可以根据传递的上下文填充变量。
以下列出了定义变量的不同方式。
预定义设备变量
每个设备都通过配置变量传递以下属性
id
key
name
mac_address
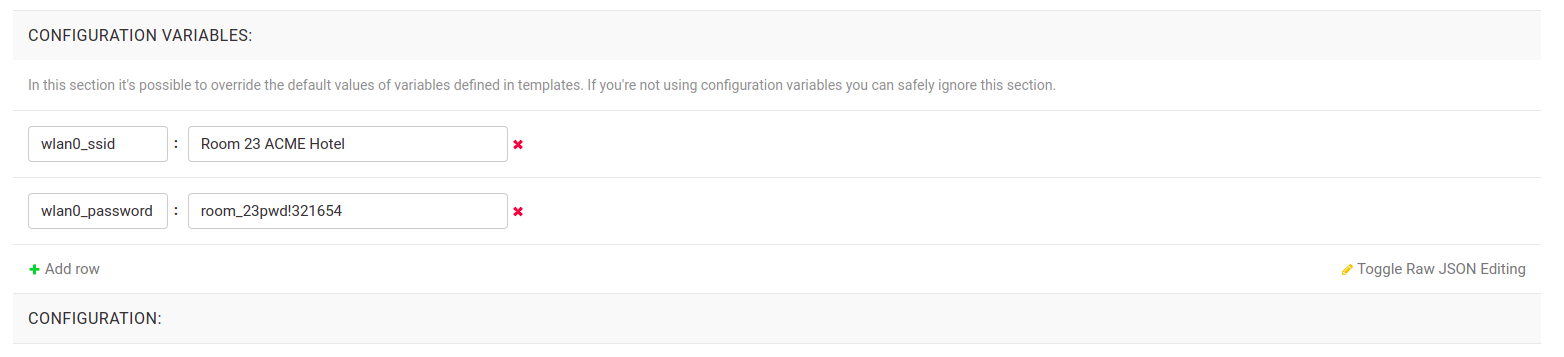
用户定义设备变量
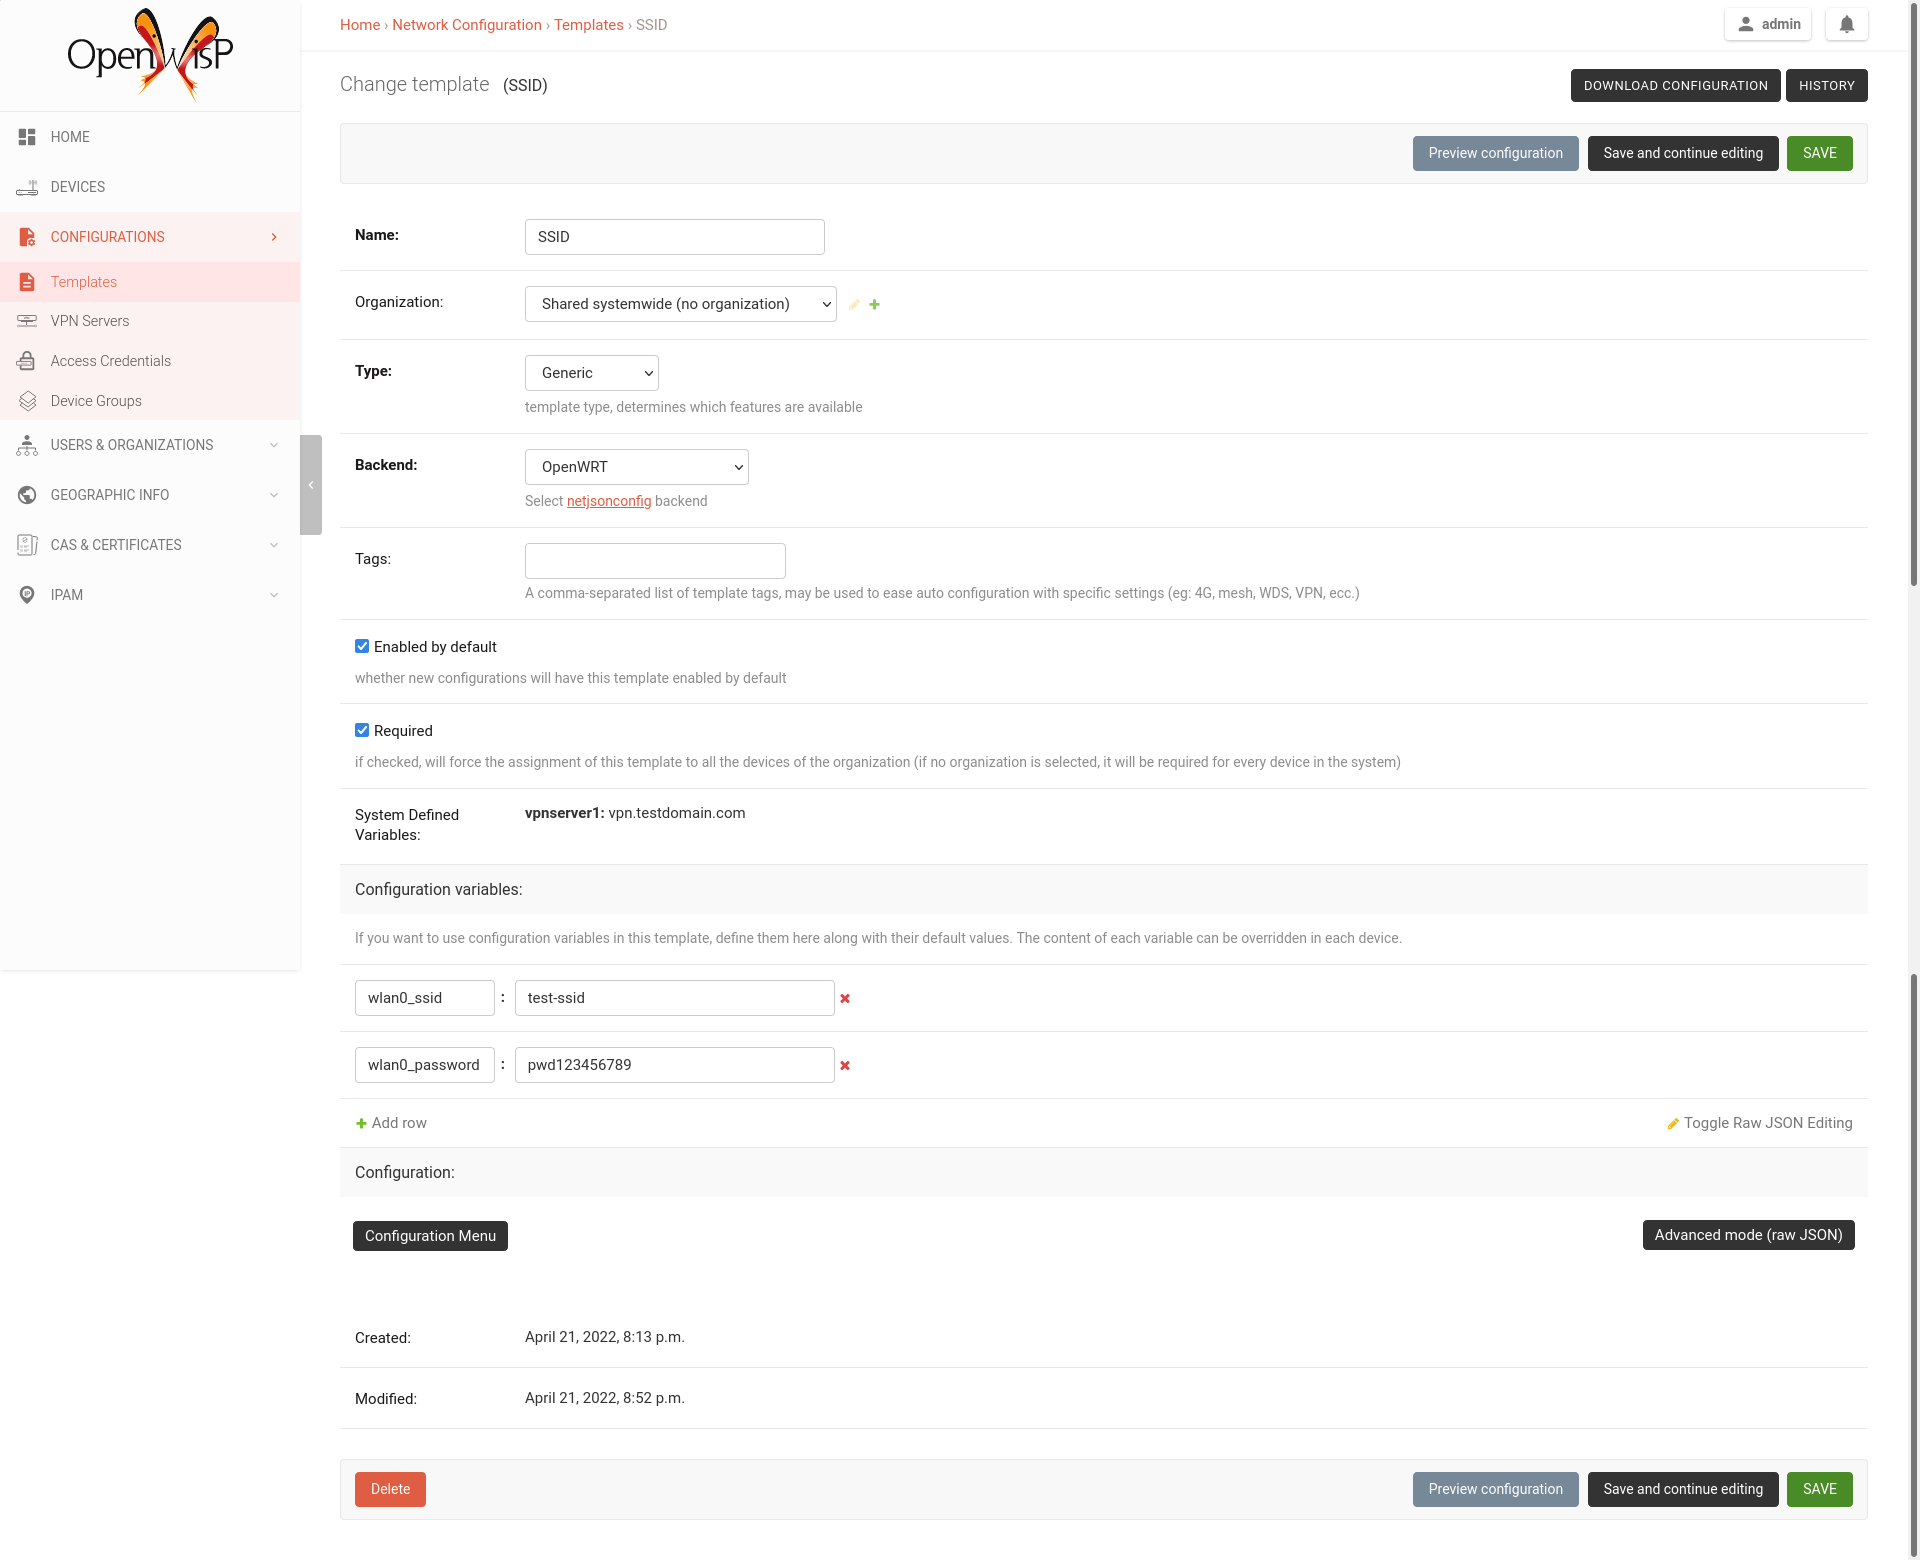
在设备配置部分,您可以找到一个名为“配置变量”的部分,在这里可以定义配置变量及其值,如下例所示:
模板默认值
可以指定模板中定义的变量的默认值。
这可以实现两个目标:
通过模式验证,不出现错误(否则一开始就无法保存模板)
提供在大多数情况下都有效但可以在设备中覆盖的好的默认值
这些默认值将被用户定义的设备变量覆盖。
可以从编辑模板页面的“配置变量”部分操作变量的默认值。
全局变量
可以使用OPENWISP_CONTROLLER_CONTEXT设置全局定义变量。
系统定义变量
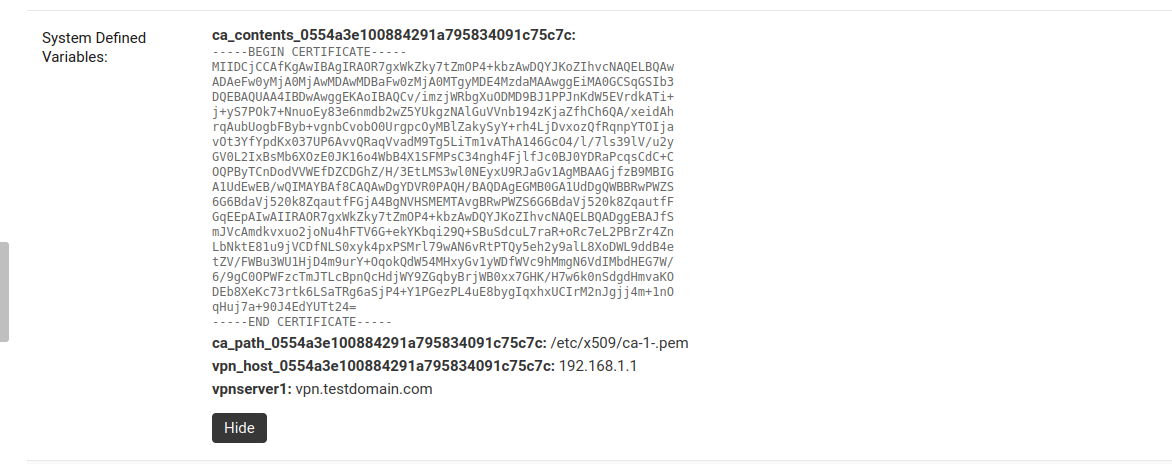
预定义的设备变量、全局变量以及其他由系统自动管理的变量(例如:当使用类型为VPN-client的模板时)在管理UI中以只读模式显示为系统定义变量。
变量的示例用法
以下是一个典型用例,WiFi SSID和WiFi密码。您不想为每个设备定义这些,但您可能希望允许操作员轻松地更改特定设备的SSID或WiFi密码,而不必重新定义整个WiFi接口以避免重复信息。
这就是模板:
{
    "interfaces": [
        {
            "type": "wireless",
            "name": "wlan0",
            "wireless": {
                "mode": "access_point",
                "radio": "radio0",
                "ssid": "{{wlan0_ssid}}",
                "encryption": {
                    "protocol": "wpa2_personal",
                    "key": "{{wlan0_password}}",
                    "cipher": "auto"
                }
            }
        }
    ]
}
这就是模板中的默认值:
{
    "wlan0_ssid": "SnakeOil PublicWiFi",
    "wlan0_password": "Snakeoil_pwd!321654"
}如果需要,可以在设备级别覆盖默认值,例如:
{
    "wlan0_ssid": "Room 23 ACME Hotel",
    "wlan0_password": "room_23pwd!321654"
}
如何配置推送更新
按照以下说明进行操作以启用从OpenWISP到您的设备的SSH安全访问,这是启用推送更新(每当配置更改时,OpenWISP都会在后台触发更新)和/或固件更新(通过额外的模块openwisp-firmware-upgrader)的必要条件。
注意:如果您使用openwisp2 Ansible角色安装了OpenWISP,则可以跳过以下步骤。Ansible角色会自动创建一个默认模板,以使用默认访问凭证在网络设备上更新authorized_keys。
1. 生成SSH密钥
首先,我们需要生成OpenWISP访问设备将使用的SSH密钥,为此,您可以使用以下命令:
echo './sshkey' | ssh-keygen -t rsa -b 4096 -C "openwisp"这将在当前目录中创建两个文件,一个称为sshkey(私钥),另一个称为sshkey.pub(公钥)。
将这些文件的内容保存在安全的位置。
2. 将SSH私钥保存到OpenWISP(访问凭证)
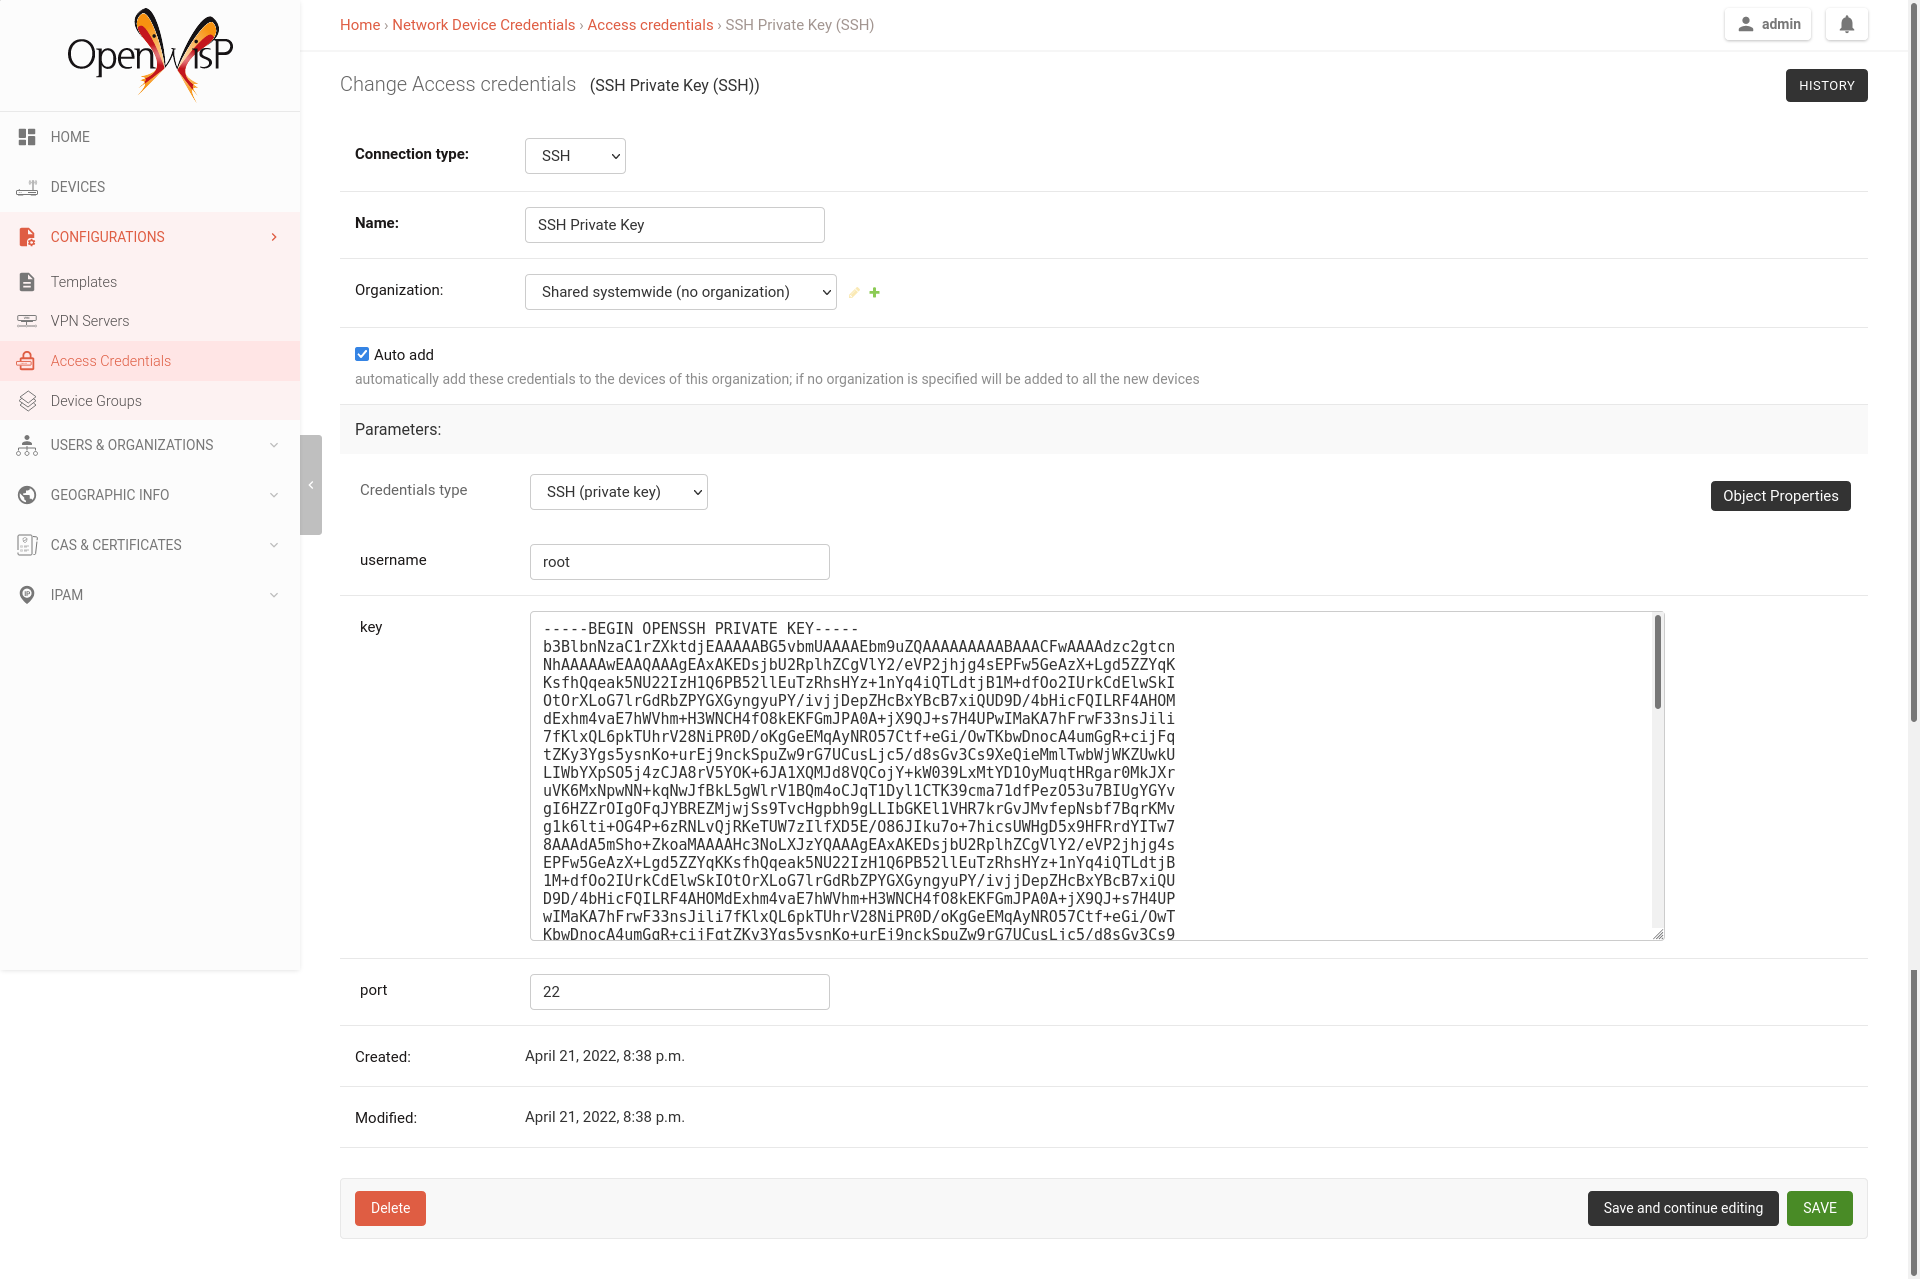
从OpenWISP的第一页点击“访问凭证”,然后点击右上角的“添加访问凭证”按钮(或者,转到以下URL:/admin/connection/credentials/add/)。
选择SSH作为类型,启用自动添加复选框,然后在“凭证类型”字段中选择“SSH(私钥)”,现在在用户名字段中输入“root”,而在密钥字段中您必须粘贴刚刚创建的私钥的内容。
现在点击保存。
刚刚创建的凭证将自动为系统中的所有设备启用(包括现有设备和未来将添加的设备)。
3. 将公钥添加到您的设备
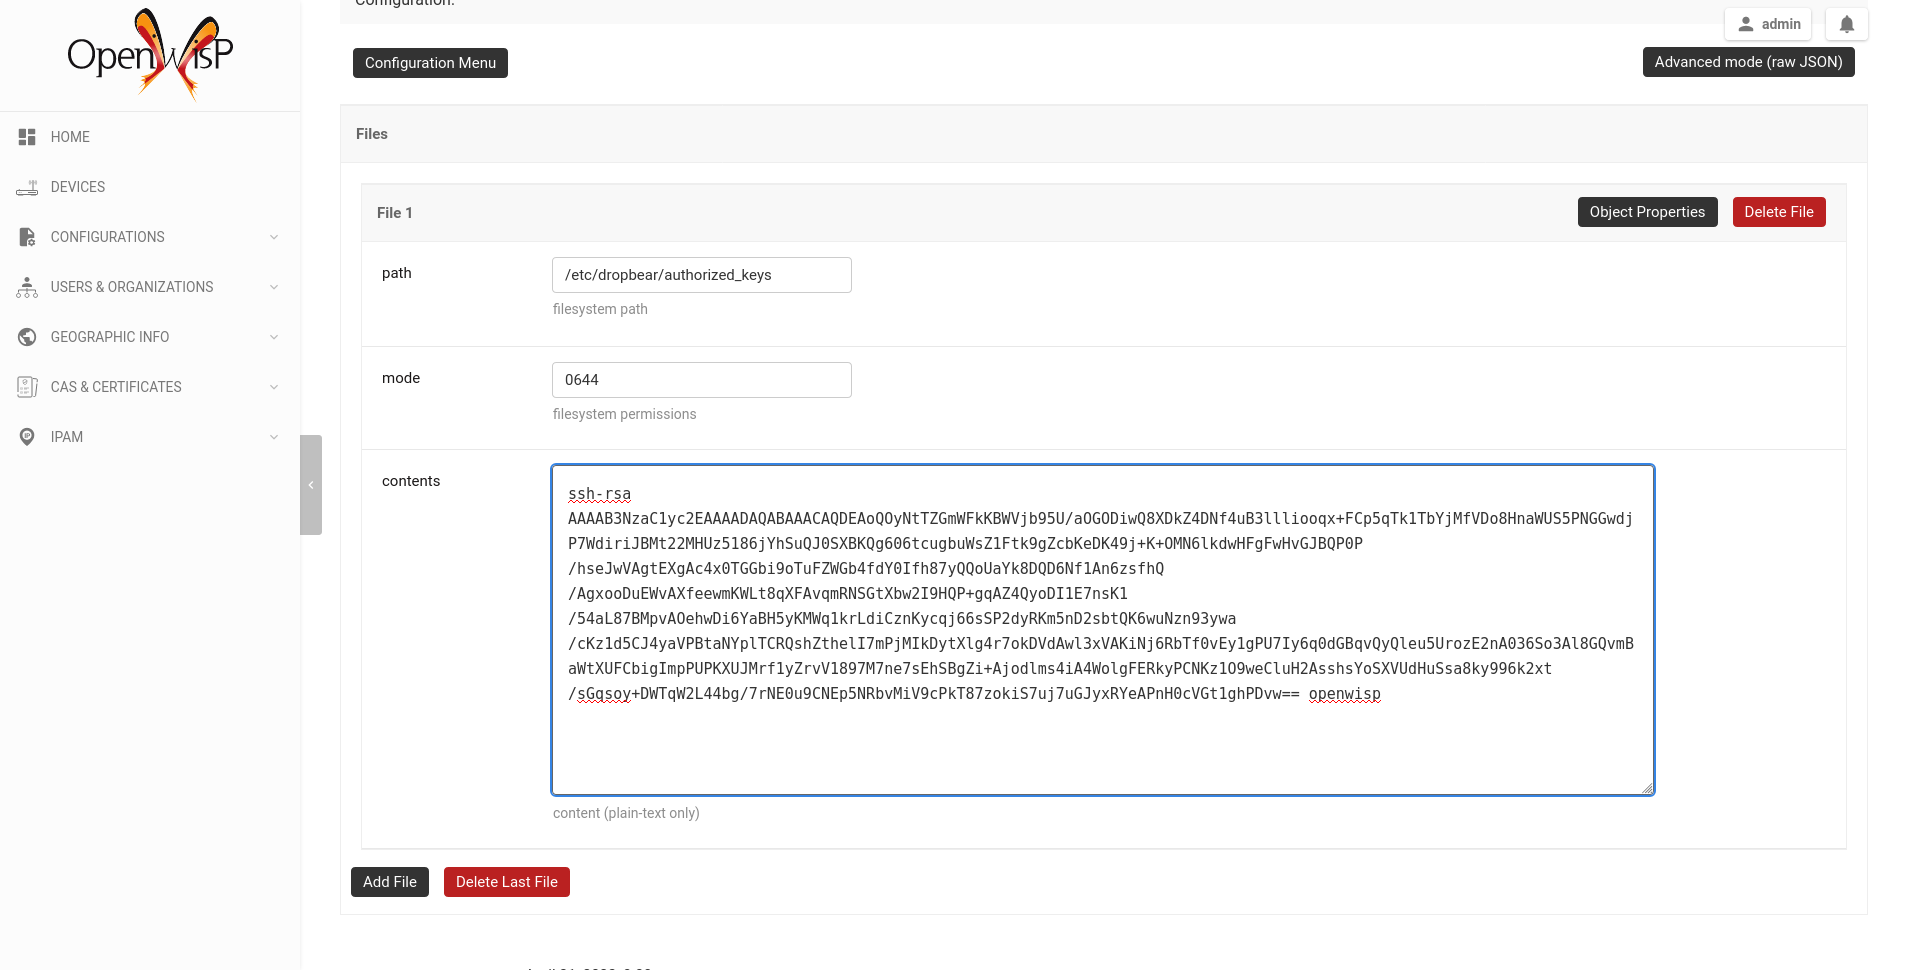
现在我们需要指导您的设备允许 OpenWISP 通过 SSH 访问。为了做到这一点,我们需要将步骤 1 中创建的公钥文件(sshkey.pub)的内容添加到设备上的文件 /etc/dropbear/authorized_keys 中。建议的方法是在 OpenWISP 中创建一个配置模板:从 OpenWISP 的第一页开始,点击“模板”,然后在右上角点击 “添加模板” 按钮(或者,也可以访问以下 URL:/admin/config/template/add/)。
勾选 默认启用,然后滚动到配置部分,点击“配置菜单”,滚动到底部,点击“文件”,然后再次点击“配置菜单”关闭菜单。现在在文件的 路径 字段中输入 /etc/dropbear/authorized_keys,然后在 内容 中粘贴 sshkey.pub 的内容。
现在点击保存。
注意:您需要将模板分配给任何现有的设备。
4. 测试它
完成上述 3 个步骤后,您可以按照以下方法进行测试
确保至少有一台设备开启并连接到 OpenWISP,确保该设备已分配“SSH授权密钥”。
确保 OpenWISP 控制器的 celery 工作进程正在运行(例如:ps aux | grep celery)
通过 SSH 登录到设备,等待(最多 2 分钟),直到 /etc/dropbear/authorized_keys 出现,如模板中指定。
在通过 SSH 连接到设备的同时,在控制台运行以下命令:logread -f,现在尝试在 OpenWISP 中更改设备名称
在 OpenWISP 中更改名称后不久,您应该在 SSH 控制台中看到一些输出,表明进行了另一个 SSH 访问和配置更新。
向设备发送命令
默认情况下,在 发送命令 下拉菜单中有三个选项
重启
更改密码
自定义命令
虽然前两个选项的含义很明显,但 自定义命令 选项允许您在设备上执行任何命令,如下面的示例所示。

注意:为了使此功能正常工作,设备需要至少有一个 访问凭证(请参阅 如何配置推送更新)。
直到设备至少有一个 访问凭证,发送命令 按钮将被隐藏。
如果您需要允许用户快速发送在网络中使用频率较高的特定命令,而不考虑用户是否了解 Linux 壳命令,您可以按照以下 “如何在命令菜单中定义新选项” 部分的说明添加新命令。
如果您是高级用户并且想以编程方式注册命令,请参阅以下 “注册/注销命令” 部分。
如何在命令菜单中定义新选项
让我们来定义新的自定义命令,以帮助用户执行额外的管理操作,而无需成为 Linux/Unix 专家。
我们可以通过使用 OPENWISP_CONTROLLER_USER_COMMANDS django 设置来实现这一点。
以下示例定义了一个简单的命令,可以通过网络接口 interface_name 通过 ping 输入 destination_address。
# In yourproject/settings.py

def ping_command_callable(destination_address, interface_name=None):
    command = f'ping -c 4 {destination_address}'
    if interface_name:
        command += f' -I {interface_name}'
    return command

OPENWISP_CONTROLLER_USER_COMMANDS = [
    (
        'ping',
        {
            'label': 'Ping',
            'schema': {
                'title': 'Ping',
                'type': 'object',
                'required': ['destination_address'],
                'properties': {
                    'destination_address': {
                        'type': 'string',
                        'title': 'Destination Address',
                    },
                    'interface_name': {
                        'type': 'string',
                        'title': 'Interface Name',
                    },
                },
                'message': 'Destination Address cannot be empty',
                'additionalProperties': False,
            },
            'callable': ping_command_callable,
        }
    )
]
上述代码将在用户界面中添加“Ping”命令,如下面的 GIF 所示

OPENWISP_CONTROLLER_USER_COMMANDS 设置接受一个包含两个元素的 tuple 列表。该元组的第一个元素应包含命令的标识符,第二个元素应包含定义命令配置的 dict。
命令配置
定义命令配置的 dict 应包含以下键
1. label
一个用于 Django 内部使用的 str,定义命令的标签。
2. schema
一个定义命令输入 JSONSchema 的 dict。您可以指定命令的输入,添加执行验证的规则,并使输入为必填或可选。
以下是上述示例中使用的 schema 的详细说明
{
    # Name of the command displayed in "Send Command" widget
    'title': 'Ping',
    # Use type "object" if the command needs to accept inputs
    # Use type "null" if the command does not accepts any input
    'type': 'object',
    # Specify list of inputs that are required
    'required': ['destination_address'],
    # Define the inputs for the commands along with their properties
    'properties': {
        'destination_address': {
            # type of the input value
            'type': 'string',
            # label used for displaying this input field
            'title': 'Destination Address',
        },
        'interface_name': {
            'type': 'string',
            'title': 'Interface Name',
        },
    },
    # Error message to be shown if validation fails
    'message': 'Destination Address cannot be empty'),
    # Whether specifying addtionaly inputs is allowed from the input form
    'additionalProperties': False,
}
此示例仅使用 JSONSchema 中的一小部分属性。您可以针对您命令的 schema 尝试其他 JSONSchema 属性。
3. callable
一个 callable 或 str,定义到可调用的点路径。它应返回要在设备上执行的命令(str)。命令的输入作为参数传递给此可调用。
上述示例包括一个用于 ping 命令的可调用(ping_command_callable)。
注册/注销命令
OpenWISP Controller 通过实用函数 openwisp_controller.connection.commands.register_command 和 openwisp_notifications.types.unregister_notification_type 提供注册和注销命令的功能。您可以使用这些函数在您的代码中注册或注销命令。
注意:这些函数在根据 openwisp-controller 开发自定义模块或开发自定义第三方应用时,作为 “OPENWISP_CONTROLLER_USER_COMMANDS” 的替代方案使用。
register_command
参数 |
描述 |
command_name |
一个 str,定义命令的标识符。 |
command_config |
一个 dict,定义命令配置,如 “命令配置” 中所示。 |
注意:如果已使用相同名称注册了命令,将引发 ImproperlyConfigured 异常。
unregister_command
参数 |
描述 |
command_name |
一个 str,定义命令的名称。 |
注意:如果不存在此类命令,将引发 ImproperlyConfigured 异常。
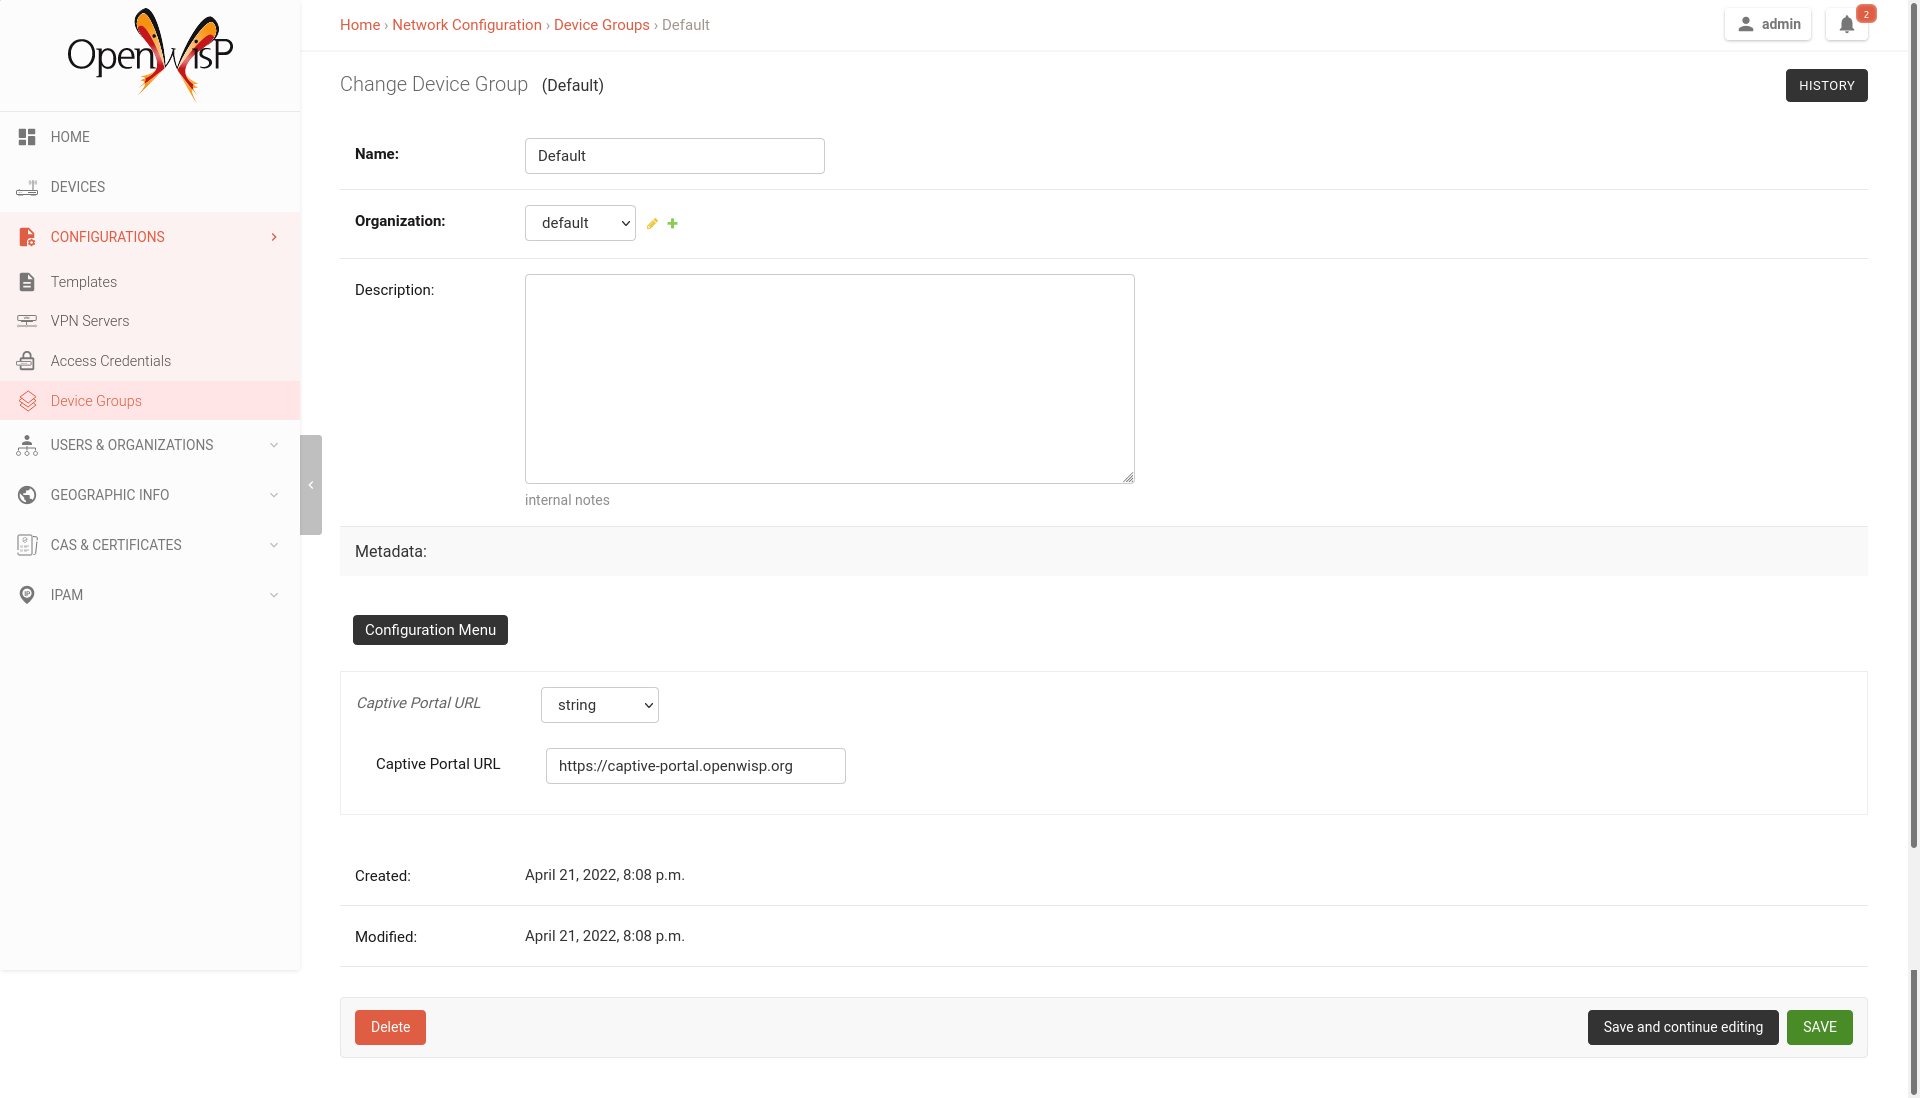
设备组
设备组提供了一种方便的方式来组织特定组织的设备。设备组提供以下功能
通过为接入点、路由器等设置专用组来分组类似设备。
在结构化元数据字段中存储有关组的相关附加信息。
通过使用 “OPENWISP_CONTROLLER_DEVICE_GROUP_SCHEMA” 设置来定制 DeviceGroup 的元数据字段的结构和验证,以标准化所有组的信息。
如何设置WireGuard隧道
按照以下步骤在您的设备上设置 WireGuard 隧道。
注意:此示例使用 共享系统级(无组织) 选项作为 VPN 服务器和 VPN 客户端模板的组织。只要 VPN 服务器、VPN 客户端模板和设备具有相同的组织,您可以使用任何组织。
1. 为WireGuard创建VPN服务器配置
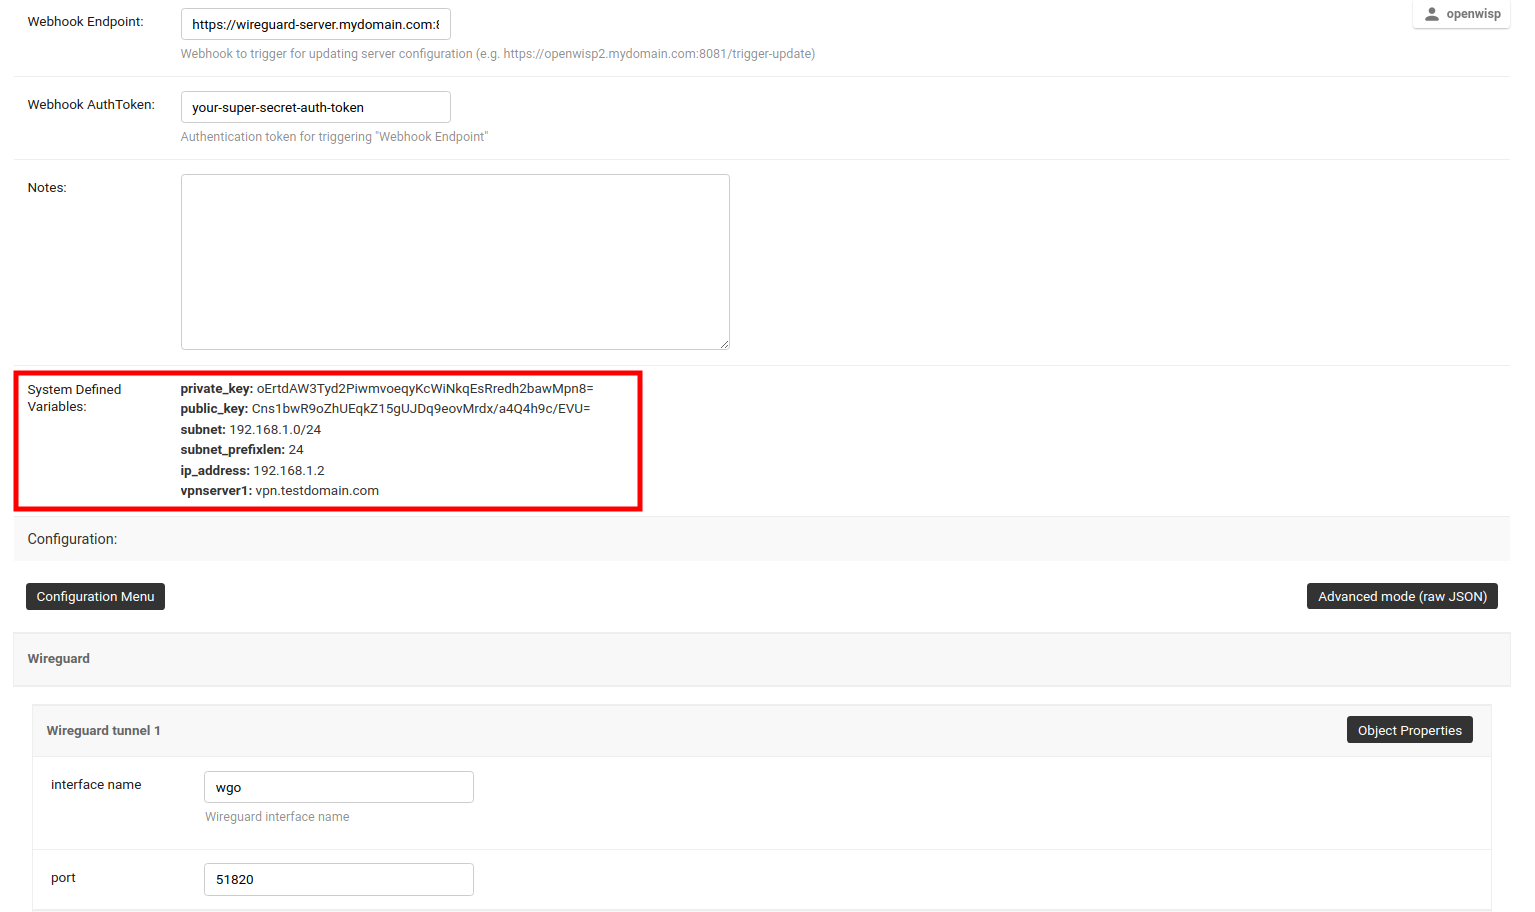
访问 /admin/config/vpn/add/ 以添加新的 VPN 服务器。
我们将设置此 VPN 服务器的 Name 为 Wireguard,并将 Host 设置为 wireguard-server.mydomain.com(更新此信息以指向您的 WireGuard VPN 服务器)。
从下拉菜单中选择 WireGuard 作为 VPN 后端。
当使用 WireGuard 时,OpenWISP 负责管理 IP 地址(为每个 VPN 对等方分配一个 IP 地址)。您可以从下拉菜单创建一个新的子网或选择现有的一个。您还可以将 内部 IP 分配给 WireGuard 服务器,或者留空由 OpenWISP 配置。此 IP 地址将由服务器上的 WireGuard 接口使用。
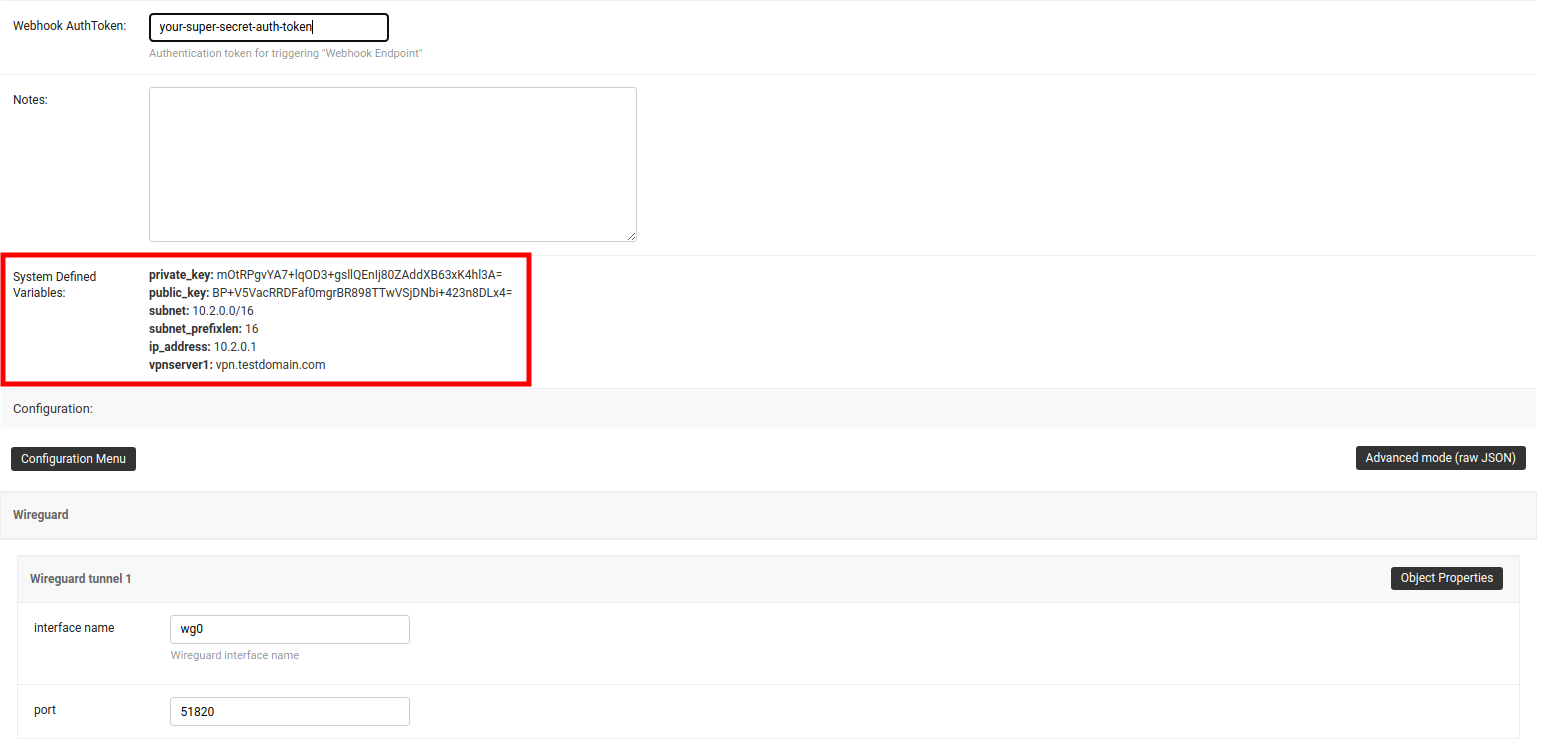
我们已将 Webhook 端点 设置为 https://wireguard-server.mydomain.com:8081/trigger-update 作为此示例。您需要根据您的 VPN 升级端点进行更新。将 Webhook AuthToken 设置为任何强大的密码短语,这将用于确保配置升级来自受信任的来源。
注意:如果您正在遵循此教程以设置 WireGuard VPN 服务器,只需将 wireguard-server.mydomain.com 替换为您的 VPN 服务器的主机名,并遵循下一节中的步骤。
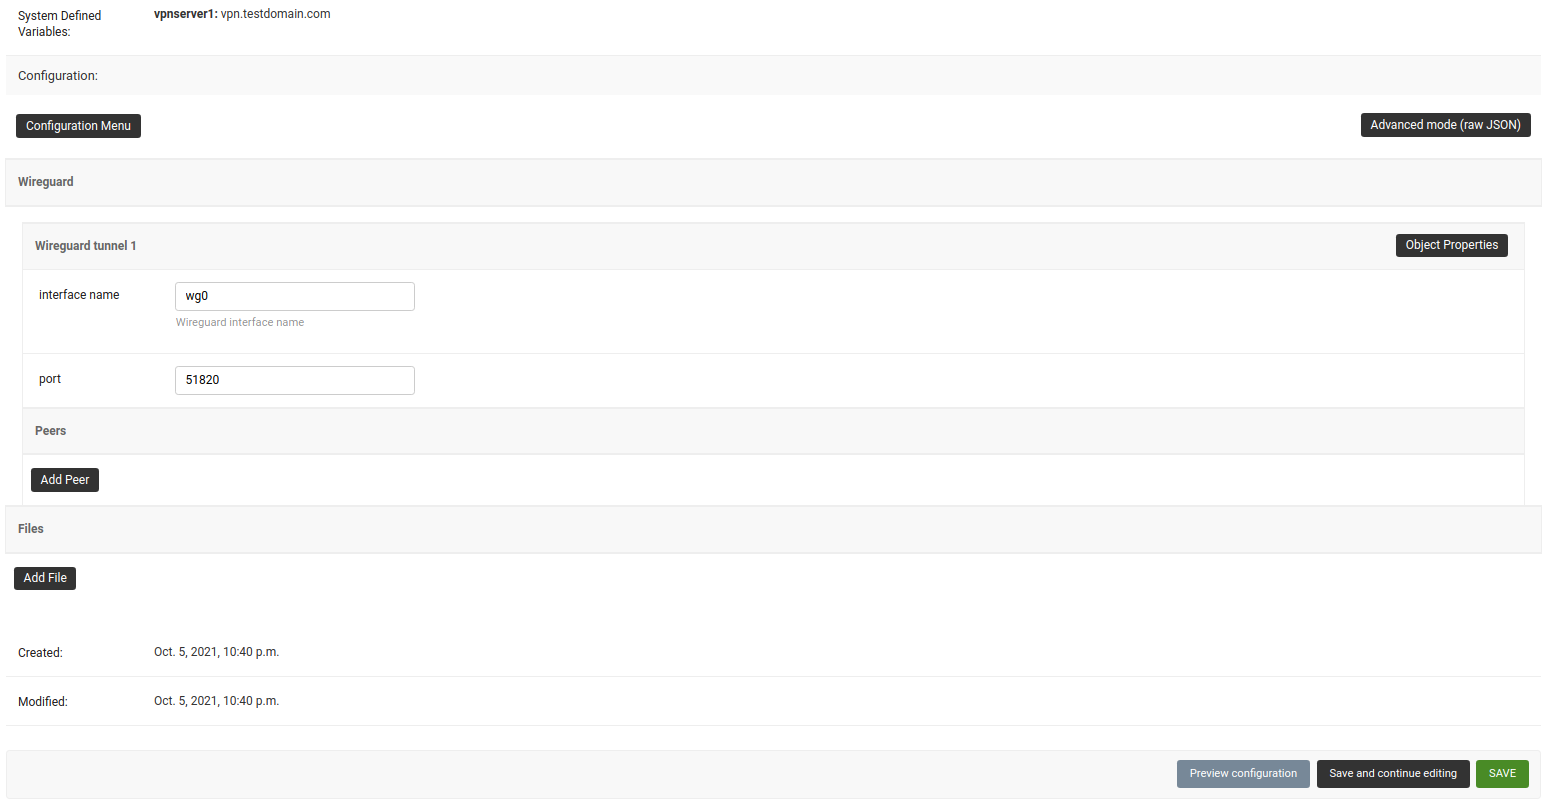
在配置部分下,设置 WireGuard 隧道 1 接口的名称。在此示例中,我们使用了 wg0。
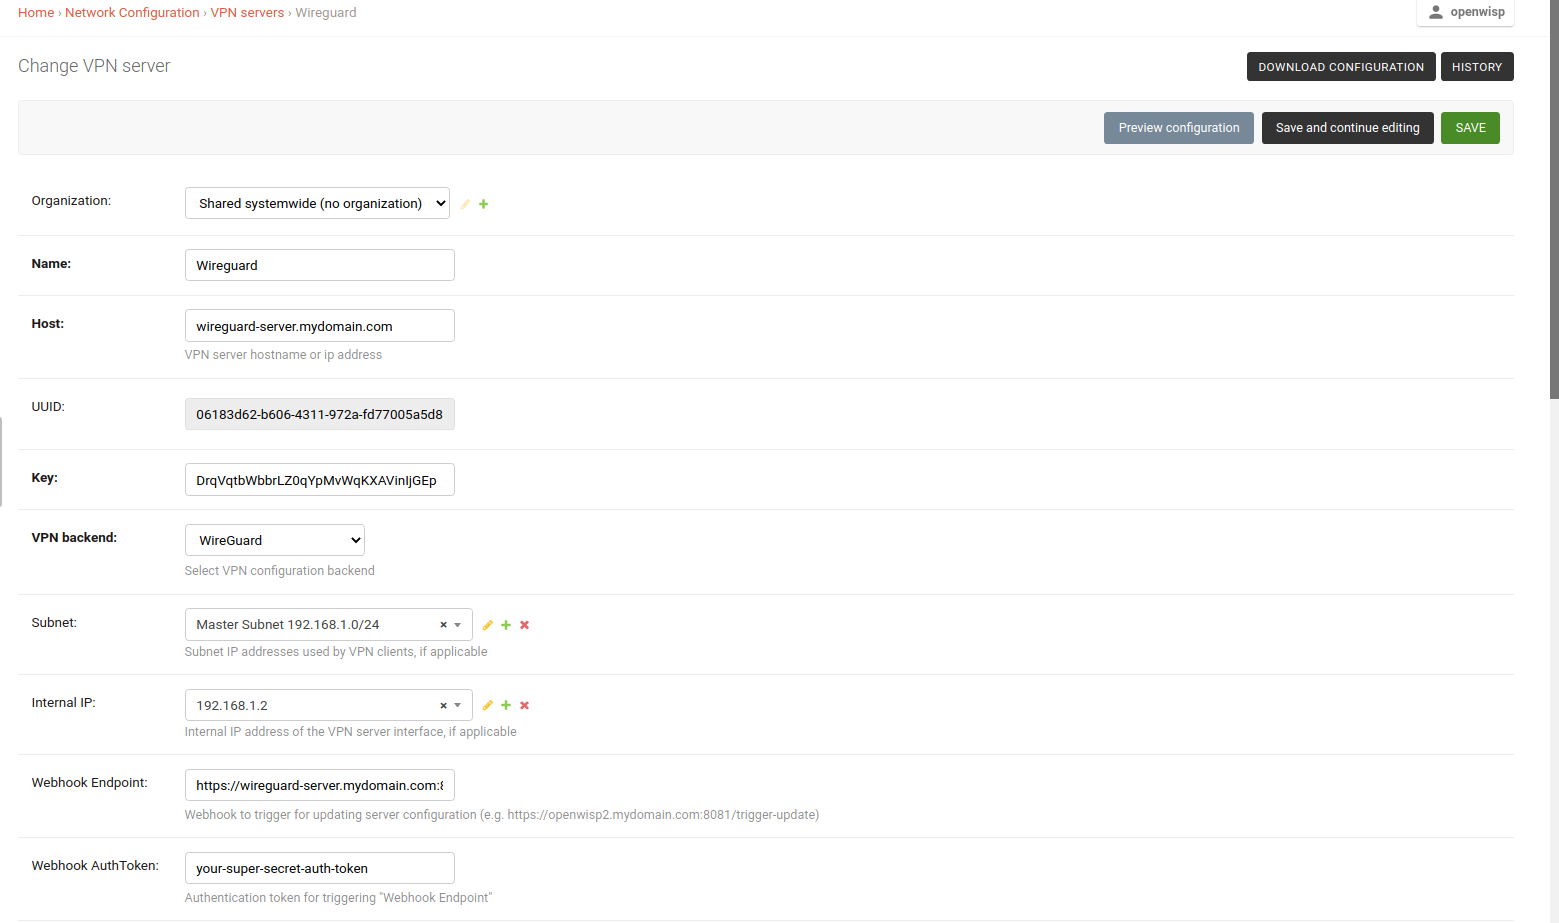

点击 保存并继续编辑 后,您将看到 OpenWISP 已自动在 系统定义变量 中为 WireGuard 服务器创建了公钥和私钥,以及内部 IP 地址信息。
2. 部署Wireguard VPN服务器
如果您尚未在 VPN 服务器上设置 WireGuard,现在是设置的好时机。我们建议使用 ansible-wireguard-openwisp 角色安装 WireGuard,因为它还安装了允许 OpenWISP 管理WireGuard VPN 服务器的脚本。
请注意您在剧本中使用的 VPN 服务器属性。它应该与 OpenWISP 中的 VPN 服务器配置相同。
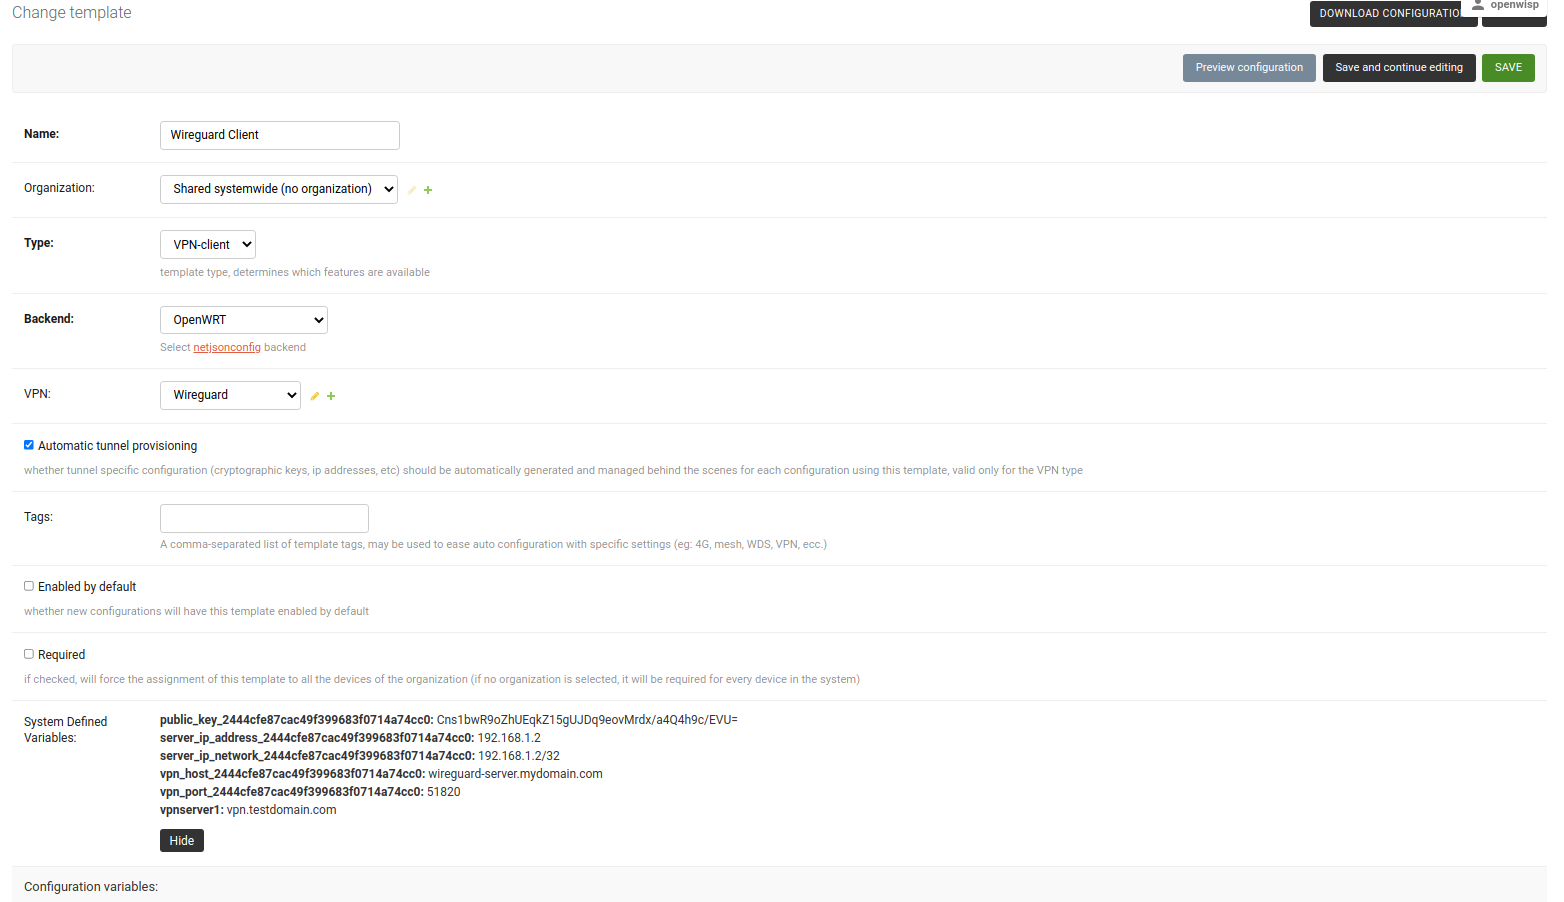
3. 为WireGuard VPN服务器创建VPN客户端模板
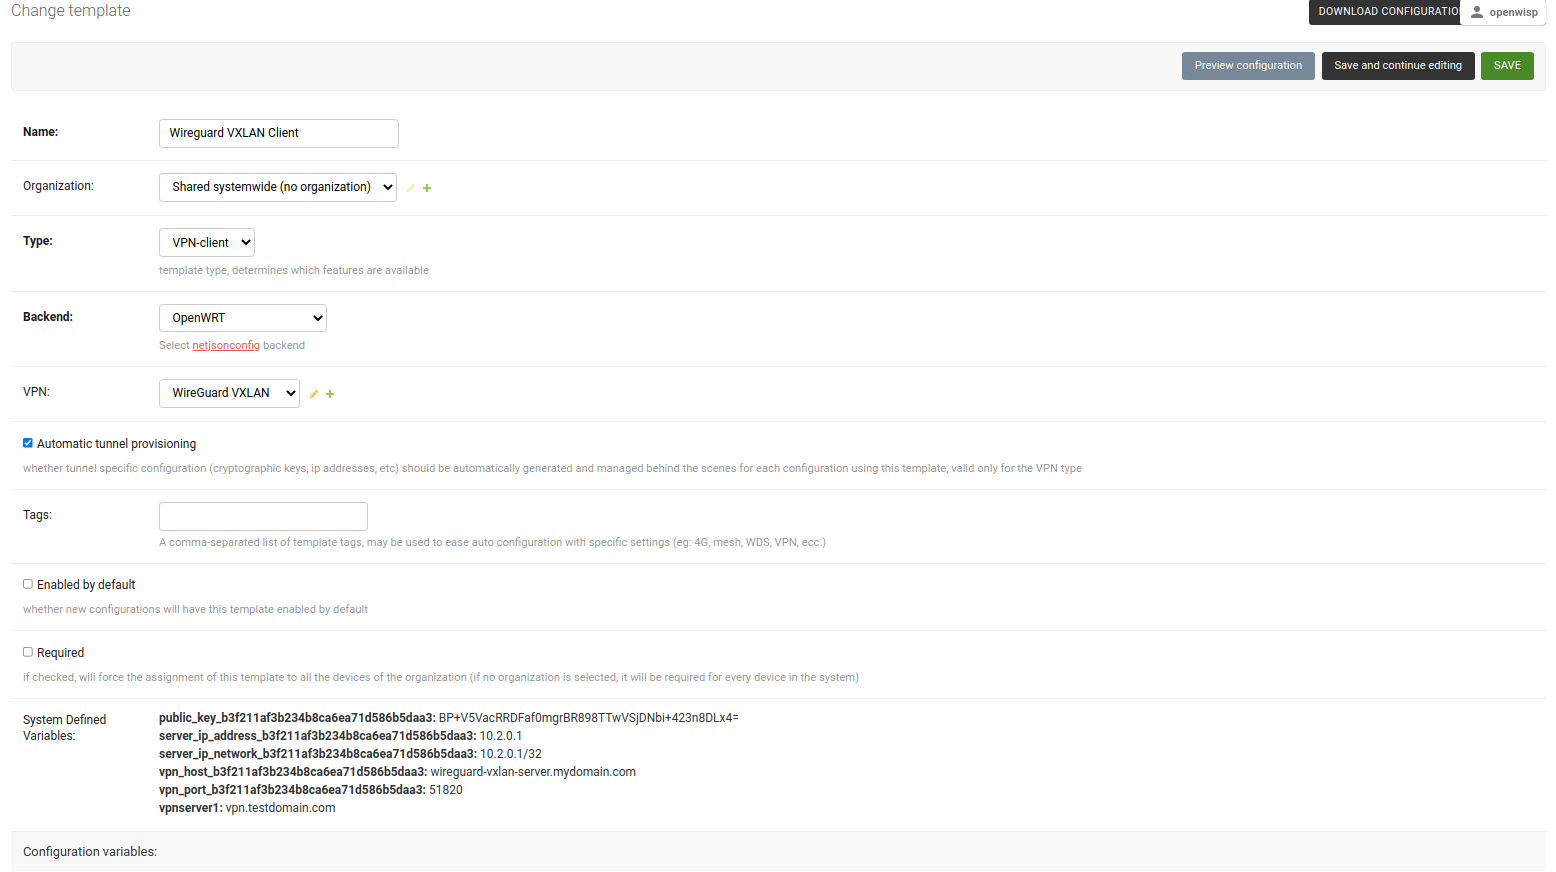
访问 /admin/config/template/add/ 以添加新模板。
将 Wireguard 客户端 设置为 名称(您可以设置任何内容)并从下拉列表中选择 VPN-client 作为 类型。
后端 字段指的是此模板可以应用于设备的后端。在此示例中,我们将它保留为 OpenWRT。
从下拉列表中选择正确的 VPN 服务器作为 VPN 字段。这里它是 Wireguard。
确保选中 自动隧道配置。这将使 OpenWISP 自动生成公钥和私钥,并为每个 WireGuard VPN 客户端配置 IP 地址。
点击 保存并继续编辑 按钮后,您将在 系统定义变量 中看到 Wireguard VPN 服务器的详细信息。将自动生成模板配置,您可以相应地进行调整。我们将使用自动生成的 VPN 客户端配置作为此示例。
4. 将Wireguard VPN模板应用到设备
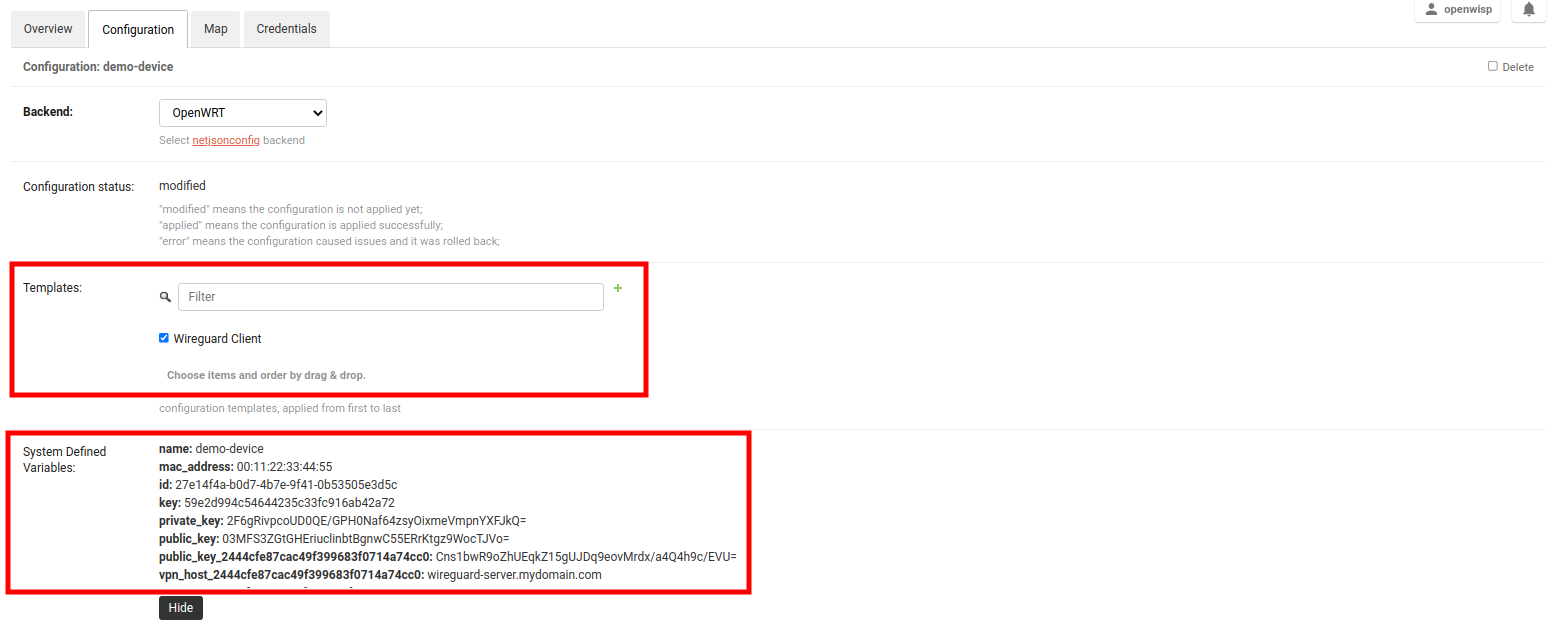
注意:此步骤假设您已经在 OpenWISP 上注册了设备。在继续之前,请注册或创建设备。
打开相关设备的 配置 选项卡。
选择 WireGuard 客户端 模板。
点击 保存并继续编辑 按钮后,您将在 系统定义变量 中看到一些条目。它将包含设备上 WireGuard 客户端的内部 IP 地址、私钥和公钥,以及 WireGuard VPN 服务器的详细信息。
太好了! 您已成功配置 OpenWISP 以管理您的设备的 WireGuard 隧道。
如何设置通过WireGuard隧道传输的VXLAN
按照这些步骤,您将能够设置封装在 WireGuard 隧道中的第 2 层 VXLAN 隧道,它在第 3 层上工作。
注意:此示例使用 共享系统级(无组织) 选项作为 VPN 服务器和 VPN 客户端模板的组织。只要 VPN 服务器、VPN 客户端模板和设备具有相同的组织,您可以使用任何组织。
1. 为通过WireGuard传输的VXLAN创建VPN服务器配置
访问 /admin/config/vpn/add/ 以添加新的 VPN 服务器。
我们将此 VPN 服务器的 名称 设置为 Wireguard VXLAN,并将 主机 设置为 wireguard-vxlan-server.mydomain.com(更新此以指向您的 WireGuard VXLAN VPN 服务器)。
从下拉列表中选择 VXLAN over WireGuard 作为 VPN 后端。
当使用 WireGuard 上 VXLAN 时,OpenWISP 负责管理 IP 地址(为每个 VPN 对等方分配一个 IP 地址)。您可以从下拉菜单创建一个新的子网或选择现有的一个。您还可以将 内部 IP 分配给 WireGuard 服务器,或者留空让 OpenWISP 进行配置。此 IP 地址将由服务器上的 WireGuard 接口使用。
我们已将 Webhook 终端 设置为 https://wireguard-vxlan-server.mydomain.com:8081/trigger-update 作为此示例。您需要根据您的 VPN 升级端点进行更新。将 Webhook AuthToken 设置为任何强大的密码短语,这将用于确保配置升级来自可信来源。
注意:如果您正在遵循此教程以设置 WireGuard VPN 服务器,只需将 wireguard-server.mydomain.com 替换为您的 VPN 服务器的主机名,并遵循下一节中的步骤。
在配置部分下,设置 WireGuard 隧道 1 接口的名称。在此示例中,我们使用了 wg0。
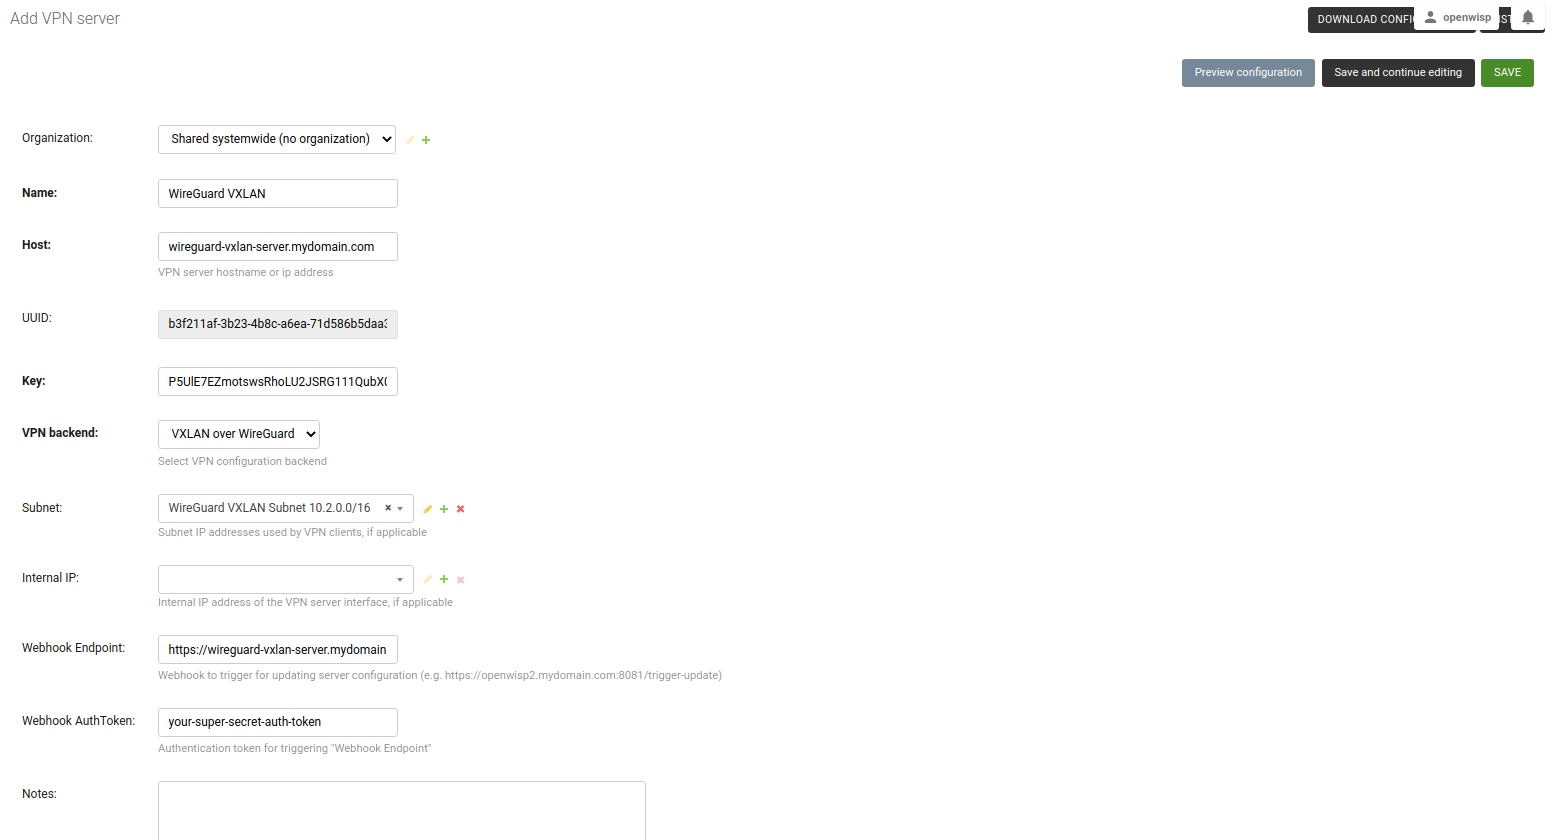
点击 保存并继续编辑 后,您将看到 OpenWISP 已自动在 系统定义变量 中为 WireGuard 服务器创建了公钥和私钥,以及内部 IP 地址信息。
2. 部署Wireguard VXLAN VPN服务器
如果您尚未在 VPN 服务器上设置 WireGuard,现在是时候这样做。我们建议使用 ansible-wireguard-openwisp 角色安装 WireGuard,因为它还安装了允许 OpenWISP 管理带有 VXLAN 隧道的 WireGuard VPN 服务器的脚本。
请注意您在剧本中使用的 VPN 服务器属性。它应该与 OpenWISP 中的 VPN 服务器配置相同。
3. 为Wireguard VXLAN VPN服务器创建VPN客户端模板
访问 /admin/config/template/add/ 以添加新模板。
将 Wireguard VXLAN 客户端 作为 名称(您可以设置任何名称)并从下拉列表中选择 VPN-client 作为 类型。
后端 字段指的是此模板可以应用于设备的后端。在此示例中,我们将它保留为 OpenWRT。
从下拉列表中选择正确的 VPN 服务器以填充 VPN 字段。这里为 Wireguard VXLAN。
确保勾选 自动隧道配置。这将使 OpenWISP 自动生成公钥和私钥,并为每个 WireGuard VPN 客户端以及 VXLAN 网络标识符(VNI)分配 IP 地址。
点击 保存并继续编辑 按钮,您将在 系统定义变量 中看到 Wireguard VXLAN VPN 服务器详情。将自动生成配置模板,您可以相应地进行调整。我们将使用自动生成的 VPN 客户端配置作为此示例。
4. 将Wireguard VXLAN VPN模板应用到设备
注意:此步骤假设您已经在 OpenWISP 上注册了设备。在继续之前,请注册或创建设备。
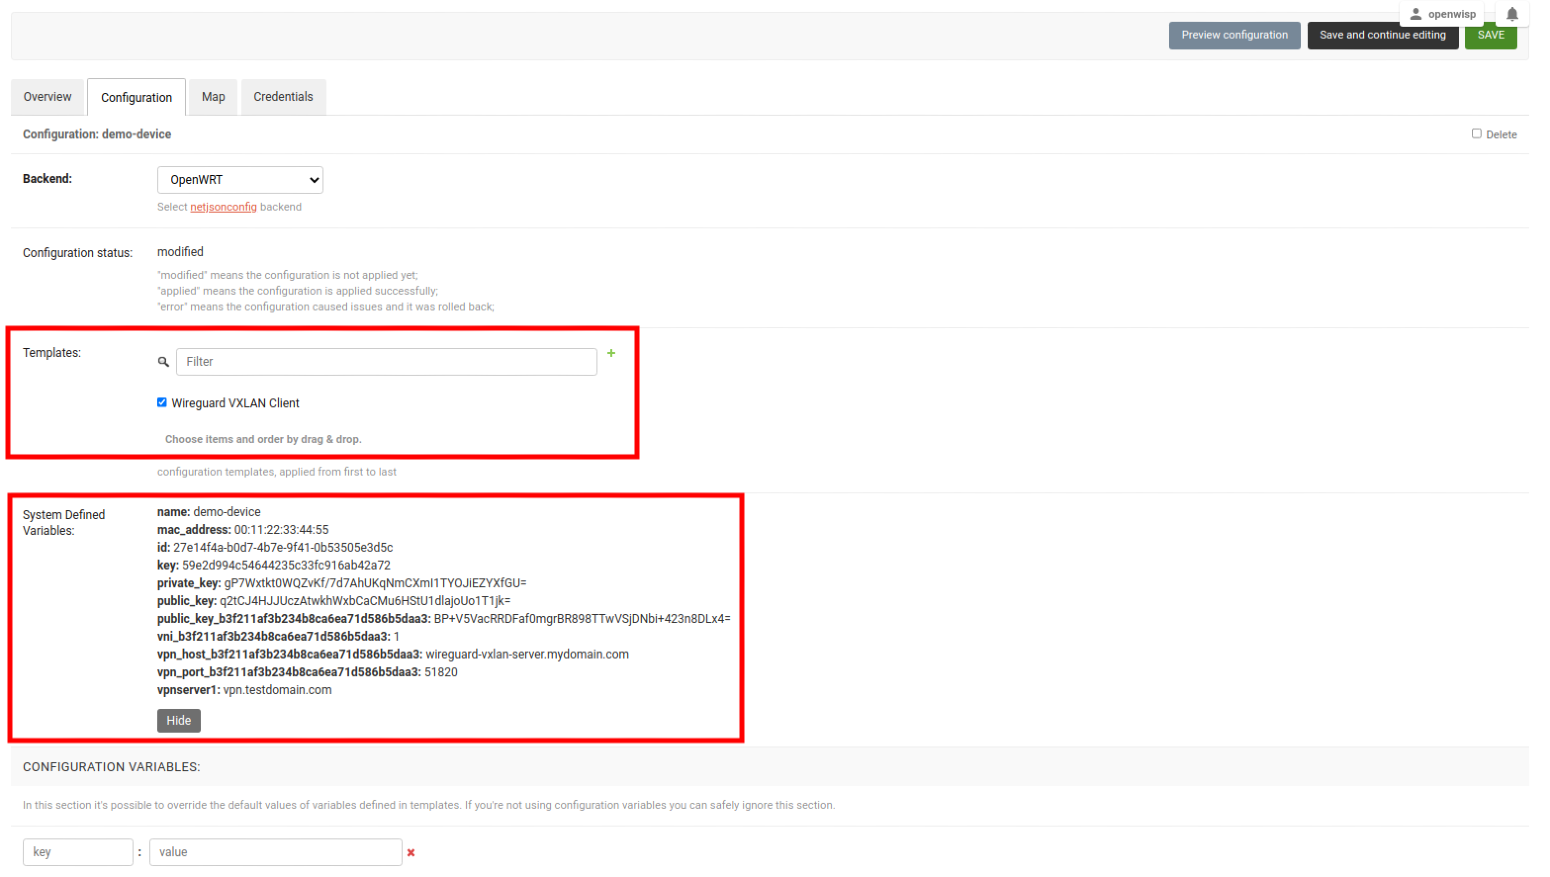
打开相关设备的 配置 选项卡。
选择 WireGuard VXLAN 客户端 模板。
点击 保存并继续编辑 按钮,您将在 系统定义变量 中看到一些条目。它将包含设备上 WireGuard 客户端的内部 IP 地址、私钥和公钥以及 WireGuard VPN 服务器详情以及此设备的 VXLAN 网络标识符(VNI)。
成功了! 您已成功配置 OpenWISP 以管理设备上 WireGuard 隧道上的 VXLAN。
如何配置子网和IP的自动配置
以下步骤将帮助您配置子网和 IP 地址的自动配置。
1. 创建子网和子网划分规则
创建一个主子网,自动生成的子网将在此主子网下配置。
注意:根据您的用例适当选择子网的大小。
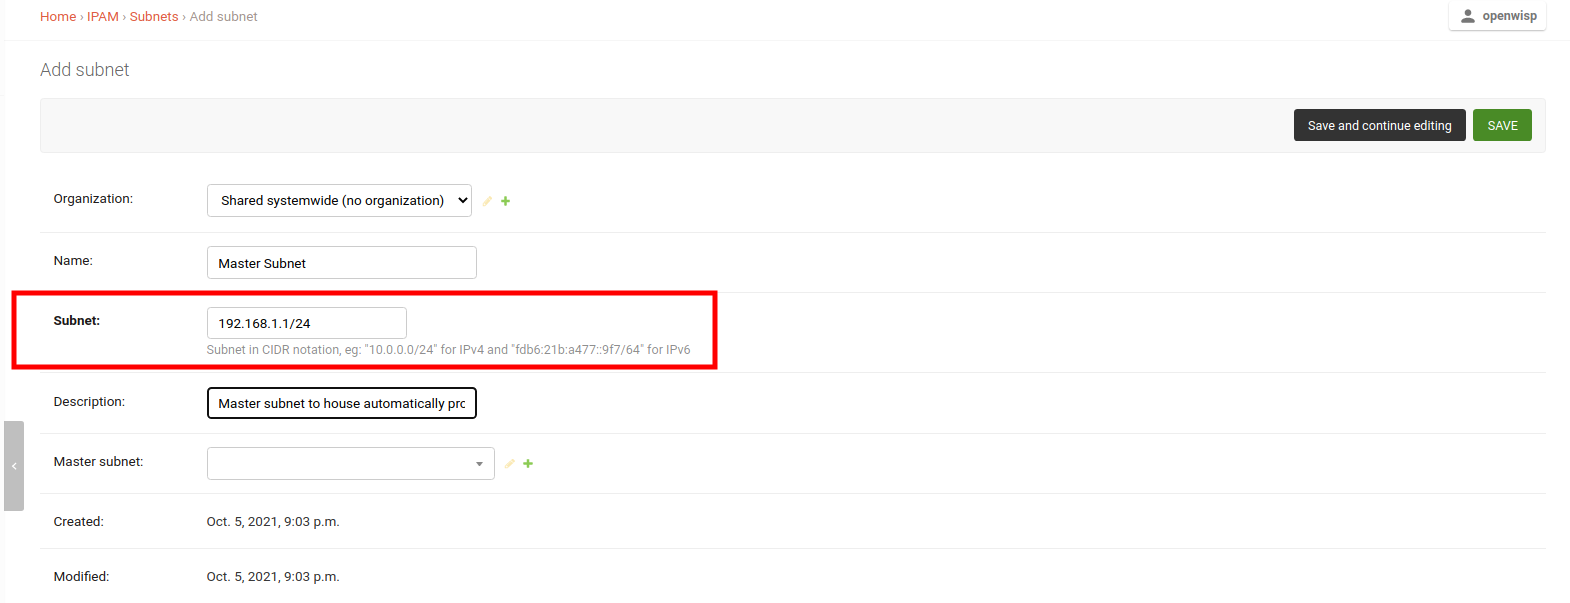
在相同页面上,添加一个 子网划分规则,该规则将用于在主子网下配置子网。
子网划分规则类型控制何时为设备配置子网和 IP 地址。目前实现的子网划分规则类型如下所述。
设备子网划分规则
此规则类型在为规则中指定的组织创建设备配置(config.Config 模型)时触发。
创建一个“设备”类型的新规则也将自动为组织的现有设备配置子网和 IP 地址。
注意:未配置的设备不会触发此规则。
VPN 子网划分规则
当将 VPN 客户端模板分配给设备时,此规则被触发,前提是 VPN 客户端模板相关的 VPN 服务器具有为该子网划分规则创建的相同子网。
注意:此规则仅适用于 WireGuard 和 WireGuard 上 VXLAN VPN 服务器。
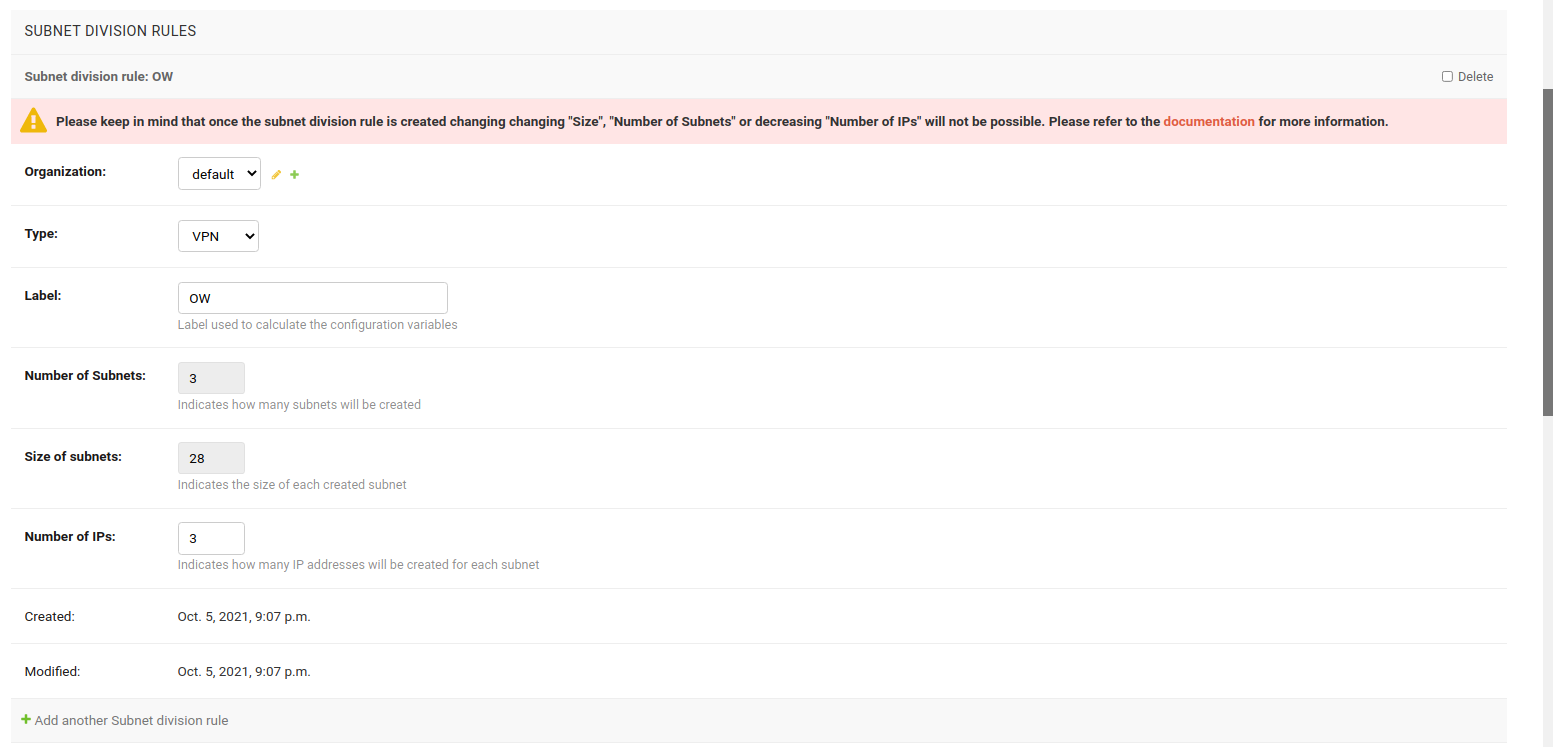
在此示例中,使用 VPN 子网划分规则。
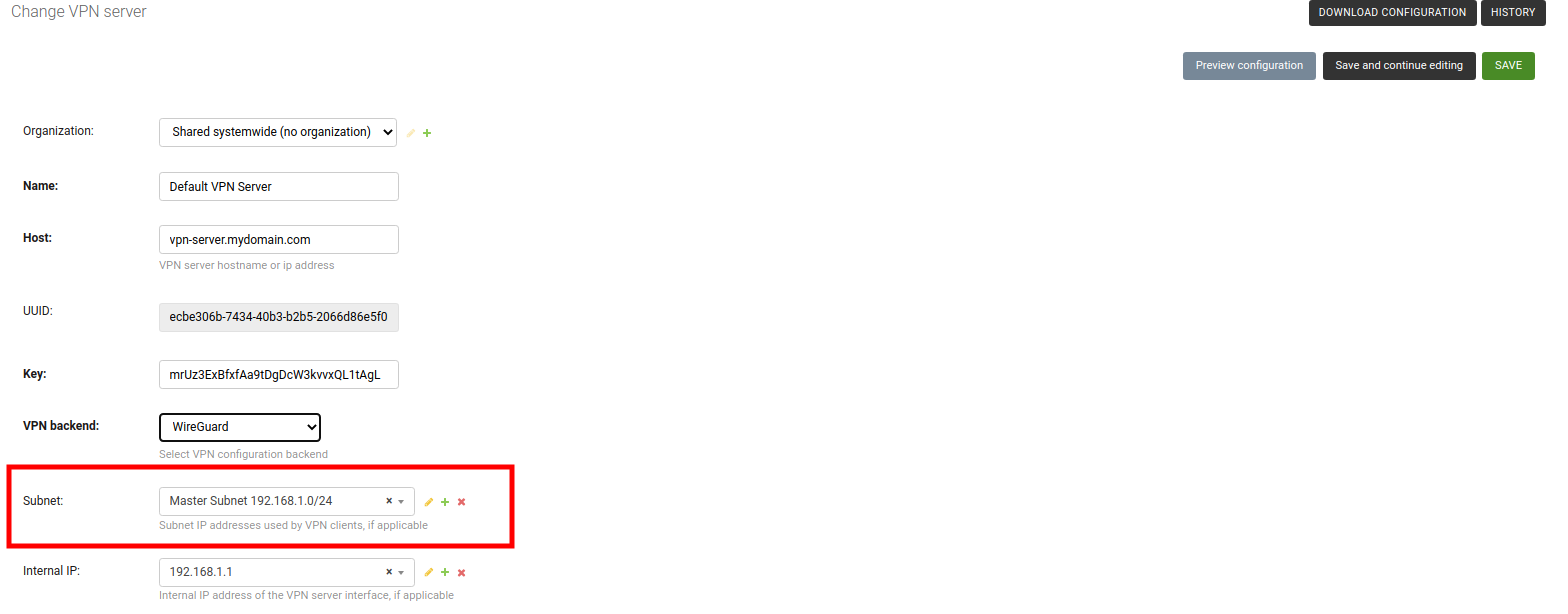
2. 创建VPN服务器
现在创建一个 VPN 服务器,并选择先前创建的 主子网 作为此 VPN 服务器的子网。
3. 创建VPN客户端模板
创建一个模板,将 类型 字段设置为 VPN客户端,并将 VPN 字段设置为使用之前创建的VPN服务器。
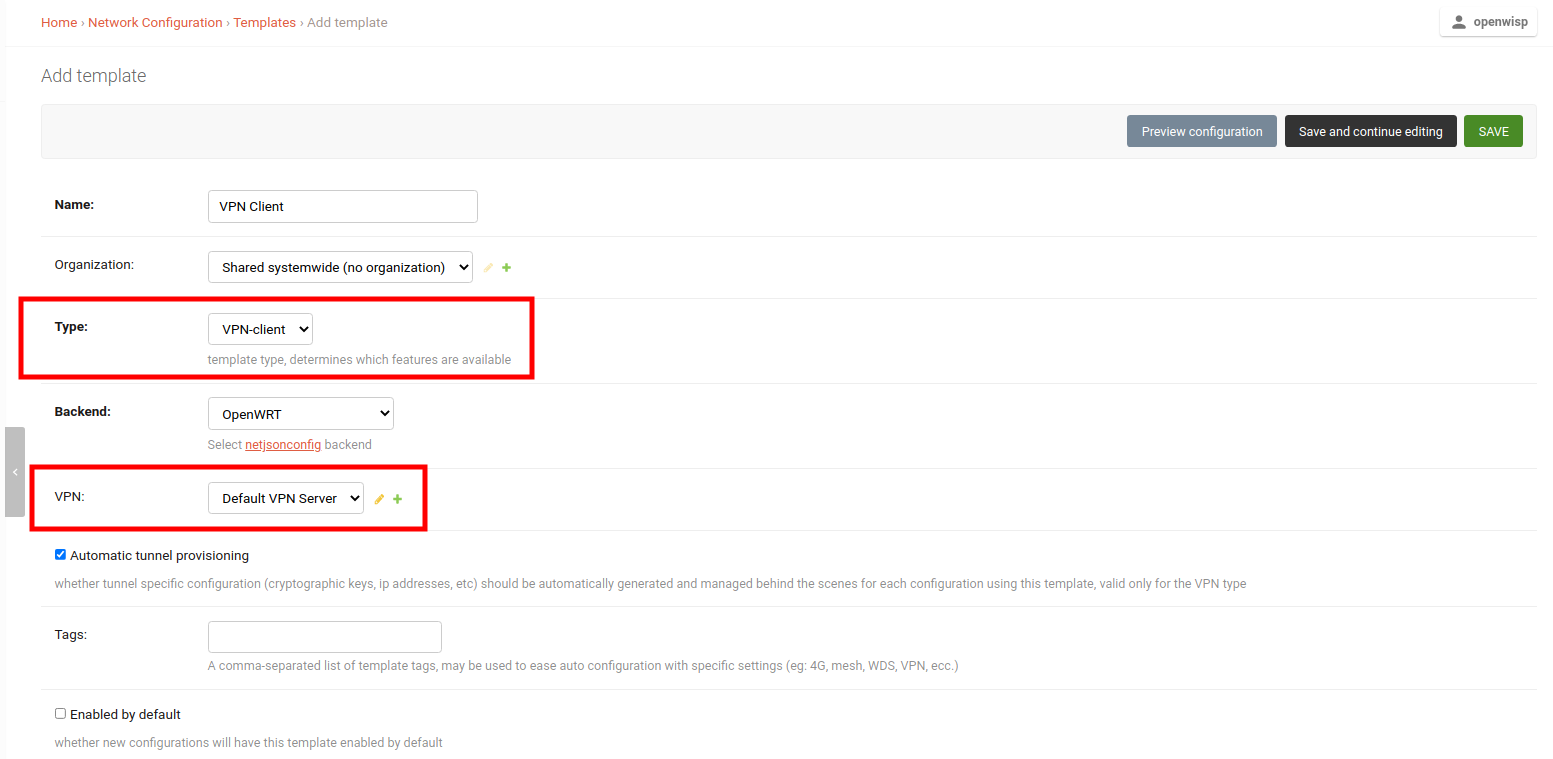
注意:如果您想自动将此模板应用于未来将注册的设备,也可以勾选 默认启用 字段。
4. 将VPN客户端模板应用到设备
一切准备就绪后,您现在可以应用VPN客户端模板到设备上。
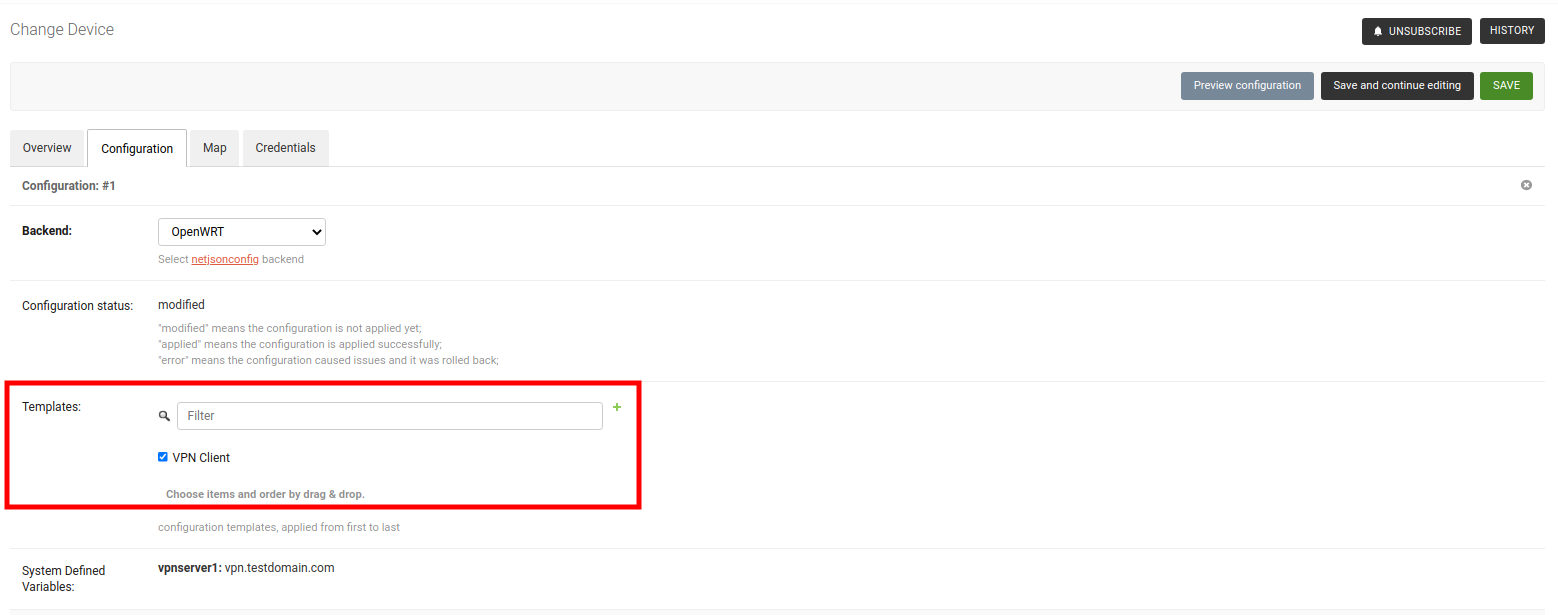
保存设备后,您应该可以在 系统定义变量 下看到此设备的所有配置的子网和IP地址。

太好了!现在您可以在设备的配置中使用这些变量。请参考文档中的 如何使用配置变量 部分,了解如何使用配置变量。
使用子网划分的重要注意事项
在上面的示例中,子网、VPN服务器和VPN客户端模板属于 默认 组织。您也可以使用 全局共享 子网、VPN服务器或VPN客户端模板,但子网划分规则将始终与组织相关联。只有当此类VPN客户端模板将应用于与子网划分规则具有相同组织的设备时,子网划分规则才会被触发。
您还可以在模板中使用配置变量来配置已配置的子网和IP地址。每个变量将针对不同的设备以不同的方式解析。例如,OW_subnet1_ip1 对于一个设备将解析为 10.0.0.1,而对于另一个设备则是 10.0.0.55。每个设备都有一组自己的子网和IP地址。但不要忘记在“默认值”模板字段(主要用于验证)中提供默认回退值。
子网划分规则将自动创建一个保留子网,此子网可用于配置必须手动创建的任何IP地址。其余主子网地址空间 不得 被干扰,否则此模块中实现的自动化将不会工作。
上述示例使用了 VPN子网划分规则。同样,可以使用 设备子网划分规则,这只需要 创建子网和子网划分规则。
子网划分的限制
由于以下原因,在当前实现中,无法更改现有子网划分规则的“大小”、“子网数量”和“IP数量”字段:
大小
允许更改现有子网划分规则的已配置子网的大小,将需要重建子网和IP地址,这可能导致现有配置损坏。
子网数量
允许减少现有子网划分规则的子网数量可能会在主子网中创建散布的未使用子网片段。允许增加子网数量将破坏每个设备子网的连续分配,也可能破坏设备的配置。
IP数量
允许减少现有子网划分规则的IP数量将导致删除IP地址,这可能会破坏正在使用的设备的配置。允许增加IP数量。
如果您想更改上述任何字段,请删除现有规则并创建一个新的规则。自动化将为所有符合配置标准的现有设备进行配置。警告:设备可能从之前的配置中获得不同的子网和IP地址。
默认警报/通知
通知类型 |
用途 |
config_error |
当设备配置的状态更改为 错误 时触发。 |
device_registered |
当新设备自动注册到网络上时触发。 |
REST API参考
实时文档
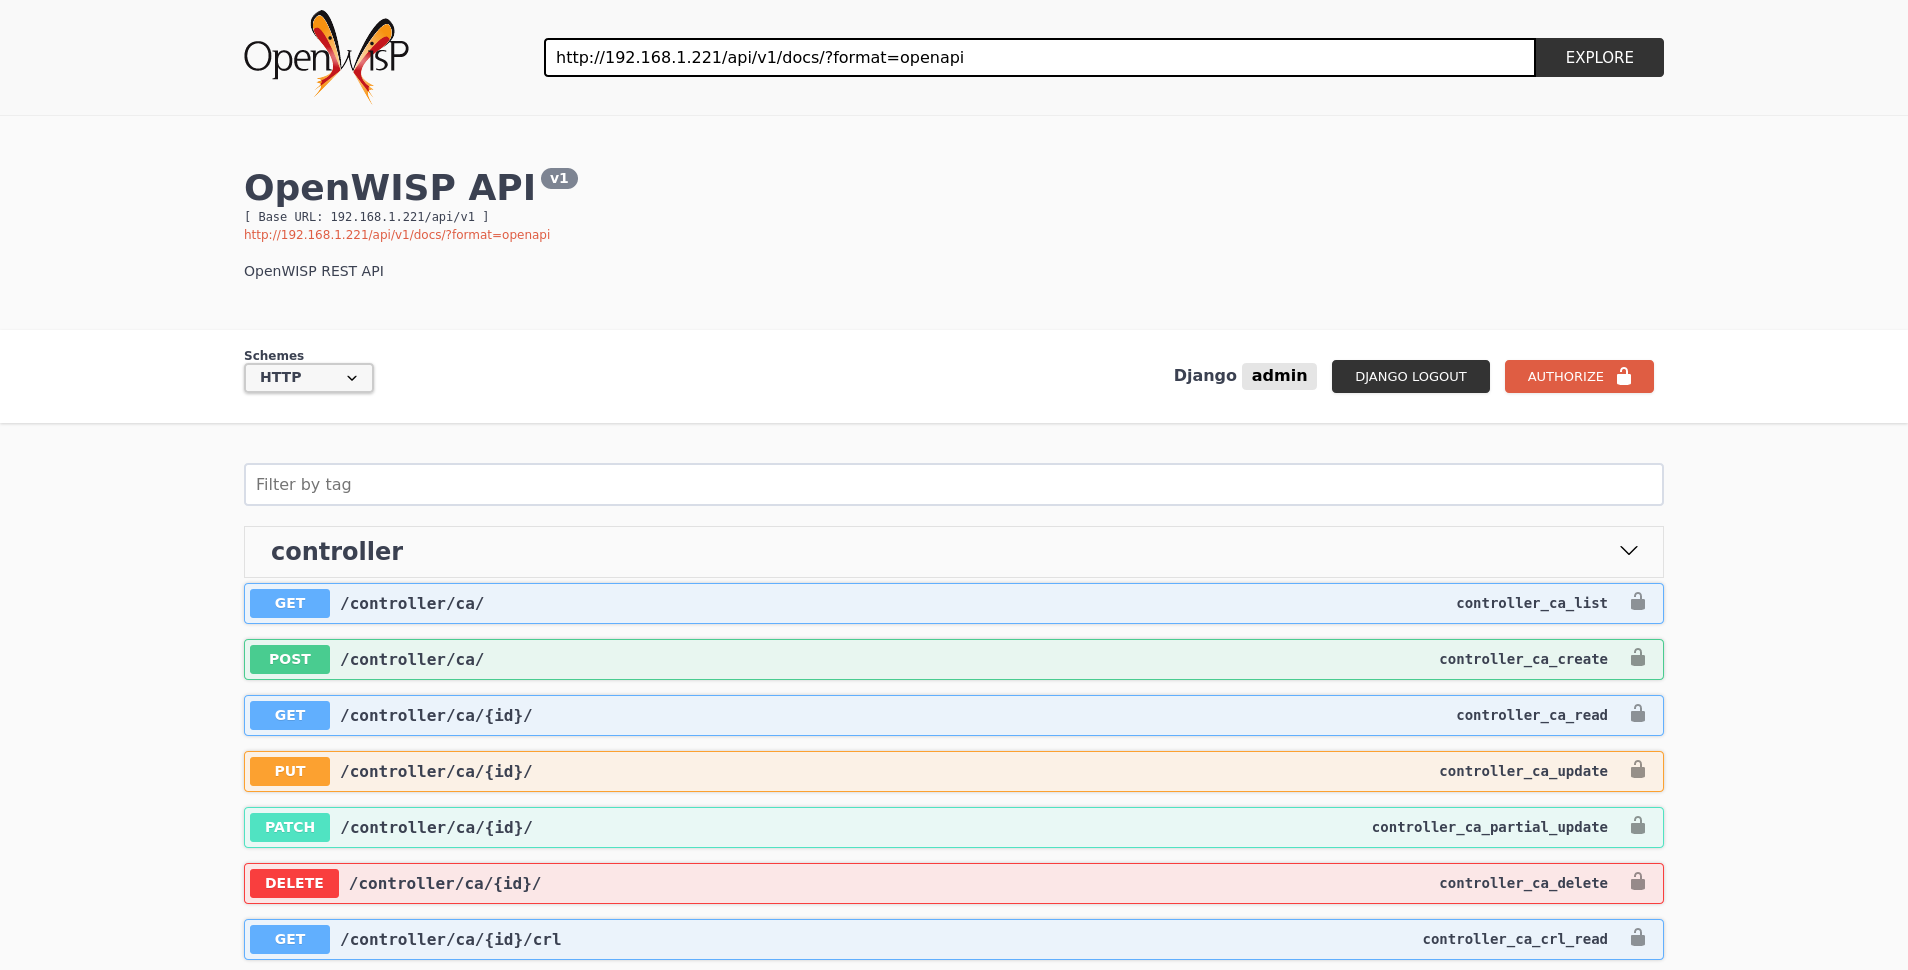
在/api/v1/docs/提供了一个遵循OpenAPI规范的通用实时API文档。
可浏览的Web界面

此外,在浏览器中直接打开以下列出的任何端点,将显示Django-REST-Framework的可浏览API接口,这使得查找每个端点的详细信息更加容易。
身份验证
请参阅openwisp-users: 使用用户令牌进行认证。
分页
所有列表端点都支持page_size参数,允许与page参数结合进行分页。
GET /api/v1/controller/template/?page_size=10
GET /api/v1/controller/template/?page_size=10&page=2
端点列表
由于详细说明包含在每个端点的实时文档和可浏览网页中,因此这里仅提供一个可用的端点列表,有关更多信息,请在浏览器中打开端点的URL。
列出设备
GET /api/v1/controller/device/创建设备
POST /api/v1/controller/device/获取设备详情
GET /api/v1/controller/device/{id}/下载设备配置
GET /api/v1/controller/device/{id}/configuration/上述端点会触发下载包含该特定设备生成配置的tar.gz文件的下载。
更改设备详情
PUT /api/v1/controller/device/{id}/修补设备详情
PATCH /api/v1/controller/device/{id}/注意:要分配、取消分配和更改分配模板的顺序,分别在JSON响应中的config字段下的模板的{id}添加、删除和更改顺序。此外,您还可以在可浏览API的HTML表单中选择和取消选择模板。
设备所属的组织中所需的模板将自动添加到config中,并且不能删除。
示例用法:要分配模板,将/它们的{id}添加到设备的配置中;
curl -X PATCH \
    http://127.0.0.1:8000/api/v1/controller/device/76b7d9cc-4ffd-4a43-b1b0-8f8befd1a7c0/ \
    -H 'authorization: Bearer dc8d497838d4914c9db9aad9b6ec66f6c36ff46b' \
    -H 'content-type: application/json' \
    -d '{
            "config": {
                "templates": ["4791fa4c-2cef-4f42-8bb4-c86018d71bd3"]
            }
}'示例用法:要删除已分配的模板,只需从设备的配置中删除/它们的{id};
curl -X PATCH \
    http://127.0.0.1:8000/api/v1/controller/device/76b7d9cc-4ffd-4a43-b1b0-8f8befd1a7c0/ \
    -H 'authorization: Bearer dc8d497838d4914c9db9aad9b6ec66f6c36ff46b' \
    -H 'content-type: application/json' \
    -d '{
            "config": {
                "templates": []
            }
}'示例用法:要重新排序模板,只需更改设备的配置中的顺序;
curl -X PATCH \
    http://127.0.0.1:8000/api/v1/controller/device/76b7d9cc-4ffd-4a43-b1b0-8f8befd1a7c0/ \
    -H 'authorization: Bearer dc8d497838d4914c9db9aad9b6ec66f6c36ff46b' \
    -H 'cache-control: no-cache' \
    -H 'content-type: application/json' \
    -H 'postman-token: b3f6a1cc-ff13-5eba-e460-8f394e485801' \
    -d '{
            "config": {
                "templates": [
                    "c5bbc697-170e-44bc-8eb7-b944b55ee88f",
                    "4791fa4c-2cef-4f42-8bb4-c86018d71bd3"
                ]
            }
        }'
删除设备
DELETE /api/v1/controller/device/{id}/列出设备连接
GET /api/v1/controller/device/{id}/connection/创建设备连接
POST /api/v1/controller/device/{id}/connection/获取设备连接详情
GET /api/v1/controller/device/{id}/connection/{id}/更改设备连接详情
PUT /api/v1/controller/device/{id}/connection/{id}/修补设备连接详情
PATCH /api/v1/controller/device/{id}/connection/{id}/删除设备连接
DELETE /api/v1/controller/device/{id}/connection/{id}/列出凭证
GET /api/v1/connection/credential/创建凭证
POST /api/v1/connection/credential/获取凭证详情
GET /api/v1/connection/credential/{id}/更改凭证详情
PUT /api/v1/connection/credential/{id}/修补凭证详情
PATCH /api/v1/connection/credential/{id}/删除凭证
DELETE /api/v1/connection/credential/{id}/列出设备的命令
GET /api/v1/controller/device/{id}/command/执行设备的命令
POST /api/v1/controller/device/{id}/command/获取命令详情
GET /api/v1/controller/device/{device_id}/command/{command_id}/列出设备组
GET /api/v1/controller/group/创建设备组
POST /api/v1/controller/group/获取设备组详情
GET /api/v1/controller/group/{id}/根据证书的通用名称获取设备组
GET /api/v1/controller/cert/{common_name}/group/此端点可以用于通过VPN客户端隧道中使用的证书的通用名称检索组信息和元数据,该端点用于防火墙/登录门户的第二层隧道解决方案。
还可以通过提供示例中显示的证书组织slugs来过滤设备组
GET /api/v1/controller/cert/{common_name}/group/?org={org1_slug},{org2_slug}获取设备位置
GET /api/v1/controller/device/{id}/location/创建设备位置
PUT /api/v1/controller/device/{id}/location/您可以使用以下示例中显示的现有Location和FloorPlan对象的主键创建DeviceLocation对象。
{
    "location": "f0cb5762-3711-4791-95b6-c2f6656249fa",
    "floorplan": "dfeb6724-aab4-4533-aeab-f7feb6648acd",
    "indoor": "-36,264"
}
注意: indoor字段表示从左上角放置的点在图像上的坐标。例如,如果您将指针放在楼层平面图像的左上角,其室内坐标将是0,0。
curl -X PUT \
    http://127.0.0.1:8000/api/v1/controller/device/8a85cc23-bad5-4c7e-b9f4-ffe298defb5c/location/ \
    -H 'authorization: Bearer dc8d497838d4914c9db9aad9b6ec66f6c36ff46b' \
    -H 'content-type: application/json' \
    -d '{
        "location": "f0cb5762-3711-4791-95b6-c2f6656249fa",
        "floorplan": "dfeb6724-aab4-4533-aeab-f7feb6648acd",
        "indoor": "-36,264"
}'您还可以直接从此端点创建设备的相关Location和FloorPlan对象。
以下示例演示了在单个请求中创建相关位置对象。
{
    "location": {
        "name": "Via del Corso",
        "address": "Via del Corso, Roma, Italia",
        "geometry": {
            "type": "Point",
            "coordinates": [12.512124, 41.898903]
        },
        "type": "outdoor",
    }
}
curl -X PUT \
http://127.0.0.1:8000/api/v1/controller/device/8a85cc23-bad5-4c7e-b9f4-ffe298defb5c/location/ \
-H 'authorization: Bearer dc8d497838d4914c9db9aad9b6ec66f6c36ff46b' \
-H 'content-type: application/json' \
-d '{
"location": {
"name": "Via del Corso",
"address": "Via del Corso, Roma, Italia",
"geometry": {
"type": "Point",
"coordinates": [12.512124, 41.898903]
},
"type": "outdoor"
}
}'注意: 您还可以指定如下格式的geometry,例如:
{
    "location": {
        "name": "Via del Corso",
        "address": "Via del Corso, Roma, Italia",
        "geometry": "POINT (12.512124 41.898903)",
        "type": "outdoor",
    }
}同样,您可以使用相同的请求创建Floorplan对象。但是请注意,只有当相关的Location对象定义了室内位置时,FloorPlan才能添加到DeviceLocation中。以下示例展示了如何创建Location和FloorPlan对象。
// This is not a valid JSON object. The JSON format is
// only used for showing available fields.
{
    "location.name": "Via del Corso",
    "location.address": "Via del Corso, Roma, Italia",
    "location.geometry.type": "Point",
    "location.geometry.coordinates": [12.512124, 41.898903]
    "location.type": "outdoor",
    "floorplan.floor": 1,
    "floorplan.image": floorplan.png,
}
curl -X PUT \
http://127.0.0.1:8000/api/v1/controller/device/8a85cc23-bad5-4c7e-b9f4-ffe298defb5c/location/ \
-H 'authorization: Bearer dc8d497838d4914c9db9aad9b6ec66f6c36ff46b' \
-H 'content-type: multipart/form-data; boundary=----WebKitFormBoundary7MA4YWxkTrZu0gW' \
-F 'location.name=Via del Corso' \
-F 'location.address=Via del Corso, Roma, Italia' \
-F location.geometry.type=Point \
-F 'location.geometry.coordinates=[12.512124, 41.898903]' \
-F location.type=indoor \
-F floorplan.floor=1 \
-F 'floorplan.image=@floorplan.png'注意:上述示例使用multipart content-type上传楼层平面图。
您还可以使用现有的Location对象,并使用此端点为该位置创建新的楼层平面图。
// This is not a valid JSON object. The JSON format is
// only used for showing available fields.
{
    "location": "f0cb5762-3711-4791-95b6-c2f6656249fa",
    "floorplan.floor": 1,
    "floorplan.image": floorplan.png
}
curl -X PUT \
http://127.0.0.1:8000/api/v1/controller/device/8a85cc23-bad5-4c7e-b9f4-ffe298defb5c/location/ \
-H 'authorization: Bearer dc8d497838d4914c9db9aad9b6ec66f6c36ff46b' \
-H 'content-type: multipart/form-data; boundary=----WebKitFormBoundary7MA4YWxkTrZu0gW' \
-F location=f0cb5762-3711-4791-95b6-c2f6656249fa \
-F floorplan.floor=1 \
-F 'floorplan.image=@floorplan.png'更改设备位置详情
PUT /api/v1/controller/device/{id}/location/注意:此端点可用于更新相关的Location和FloorPlan对象。有关有效负载格式信息,请参阅“创建设备位置”部分的示例。
删除设备位置
DELETE /api/v1/controller/device/{id}/location/获取设备坐标
GET /api/v1/controller/device/{id}/coordinates/注意:此端点旨在由设备使用。
如果将设备key作为query_param传递,则此端点会跳过多租户和权限检查,因为系统假设设备正在更新其位置。
curl -X GET \
    'http://127.0.0.1:8000/api/v1/controller/device/8a85cc23-bad5-4c7e-b9f4-ffe298defb5c/coordinates/?key=10a0cb5a553c71099c0e4ef236435496'
更新设备坐标
PUT /api/v1/controller/device/{id}/coordinates/注意:此端点旨在由设备使用。
如果将设备key作为query_param传递,则此端点会跳过多租户和权限检查,因为系统假设设备正在更新其位置。
{
    "type": "Feature",
    "geometry": {
        "type": "Point",
        "coordinates": [12.512124, 41.898903]
    },
}
curl -X PUT \
'http://127.0.0.1:8000/api/v1/controller/device/8a85cc23-bad5-4c7e-b9f4-ffe298defb5c/coordinates/?key=10a0cb5a553c71099c0e4ef236435496' \
-H 'content-type: application/json' \
-d '{
"type": "Feature",
"geometry": {
"type": "Point",
"coordinates": [12.512124, 41.898903]
},
}'列出位置
GET /api/v1/controller/location/您可以使用organization_slug进行筛选,以获取属于该组织的位置列表。
GET /api/v1/controller/location/?organization_slug=<organization_slug>创建位置
POST /api/v1/controller/location/如果您正在创建一个indoor位置,则可以使用此端点为此位置创建楼层平面图。
以下示例展示了在单个请求中创建楼层平面图和位置。
{
    "name": "Via del Corso",
    "address": "Via del Corso, Roma, Italia",
    "geometry.type": "Point",
    "geometry.location": [12.512124, 41.898903],
    "type": "indoor",
    "is_mobile": "false",
    "floorplan.floor": "1",
    "floorplan.image": floorplan.png,
    "organization": "1f6c5666-1011-4f1d-bce9-fc6fcb4f3a05"
}
curl -X POST \
http://127.0.0.1:8000/api/v1/controller/location/ \
-H 'authorization: Bearer dc8d497838d4914c9db9aad9b6ec66f6c36ff46b' \
-H 'content-type: multipart/form-data; boundary=----WebKitFormBoundary7MA4YWxkTrZu0gW' \
-F 'name=Via del Corso' \
-F 'address=Via del Corso, Roma, Italia' \
-F geometry.type=Point \
-F 'geometry.coordinates=[12.512124, 41.898903]' \
-F type=indoor \
-F is_mobile=false \
-F floorplan.floor=1 \
-F 'floorplan.image=@floorplan.png' \
-F organization=1f6c5666-1011-4f1d-bce9-fc6fcb4f3a05注意: 您还可以指定如下格式的geometry,例如:
{
    "name": "Via del Corso",
    "address": "Via del Corso, Roma, Italia",
    "geometry": "POINT (12.512124 41.898903)",
    "type": "indoor",
    "is_mobile": "false",
    "floorplan.floor": "1",
    "floorplan.image": floorplan.png,
    "organization": "1f6c5666-1011-4f1d-bce9-fc6fcb4f3a05"
}
获取位置详情
GET /api/v1/controller/location/{pk}/更改位置详情
PUT /api/v1/controller/location/{pk}/注意:只能编辑或更改存在的第一个楼层平面图数据。将位置type设置为户外将删除与其关联的所有楼层平面图。
请参阅“创建位置”部分的示例,了解有效负载格式信息。
删除位置
DELETE /api/v1/controller/location/{pk}/列出位置中的设备
GET /api/v1/controller/location/{id}/device/列出部署了设备的地理位置(GeoJSON格式)
注意:此端点将仅列出已分配给设备的Location。
GET /api/v1/controller/location/geojson/您可以使用organization_slug进行筛选,以获取该组织的设备位置列表。
GET /api/v1/controller/location/geojson/?organization_slug=<organization_slug>列出楼层平面图
GET /api/v1/controller/floorplan/您可以使用organization_slug进行筛选,以获取该组织的楼层平面图列表。
GET /api/v1/controller/floorplan/?organization_slug=<organization_slug>创建楼层平面图
POST /api/v1/controller/floorplan/获取楼层平面图详情
GET /api/v1/controller/floorplan/{pk}/更改楼层平面图详情
PUT /api/v1/controller/floorplan/{pk}/删除楼层平面图
DELETE /api/v1/controller/floorplan/{pk}/列出模板
GET /api/v1/controller/template/创建模板
POST /api/v1/controller/template/获取模板详情
GET /api/v1/controller/template/{id}/下载模板配置
GET /api/v1/controller/template/{id}/configuration/上述端点将触发下载包含特定模板生成配置的tar.gz文件。
更改模板详情
PUT /api/v1/controller/template/{id}/修补模板详情
PATCH /api/v1/controller/template/{id}/删除模板
DELETE /api/v1/controller/template/{id}/列出VPN
GET /api/v1/controller/vpn/创建VPN
POST /api/v1/controller/vpn/获取VPN详情
GET /api/v1/controller/vpn/{id}/下载VPN配置
GET /api/v1/controller/vpn/{id}/configuration/上述端点将触发下载包含特定VPN生成配置的tar.gz文件。
更改VPN详情
PUT /api/v1/controller/vpn/{id}/修补VPN详情
PATCH /api/v1/controller/vpn/{id}/删除VPN
DELETE /api/v1/controller/vpn/{id}/列出CA
GET /api/v1/controller/ca/创建新的CA
POST /api/v1/controller/ca/导入现有的CA
POST /api/v1/controller/ca/注意:要导入现有的CA,只需在HTML表单中填写或包含JSON格式的name、certificate和private_key字段。
获取CA详情
GET /api/v1/controller/ca/{id}/更改CA详情
PUT /api/v1/controller/ca/{id}/修补CA详情
PATCH /api/v1/controller/ca/{id}/下载CA(crl)
GET /api/v1/controller/ca/{id}/crl/上述端点将触发下载包含特定CA最新CRL的{id}.crl文件。
删除CA
DELETE /api/v1/controller/ca/{id}/续签CA
POST /api/v1/controller/ca/{id}/renew/列出证书
GET /api/v1/controller/cert/创建新的证书
POST /api/v1/controller/cert/导入现有的证书
POST /api/v1/controller/cert/注意:要导入现有的证书,只需在HTML表单中填写或包含JSON格式的name、ca、certificate和private_key字段。
获取证书详情
GET /api/v1/controller/cert/{id}/更改证书详情
PUT /api/v1/controller/cert/{id}/修补证书详情
PATCH /api/v1/controller/cert/{id}/删除证书
DELETE /api/v1/controller/cert/{id}/续签证书
POST /api/v1/controller/cert/{id}/renew/撤销证书
POST /api/v1/controller/cert/{id}/revoke/设置
您可以在settings.py中更改以下变量的值以配置openwisp-controller实例。
OPENWISP_SSH_AUTH_TIMEOUT
type: |
int |
default: |
2 |
unit: |
seconds |
配置建立SSH连接时等待认证响应的超时时间。
OPENWISP_SSH_COMMAND_TIMEOUT
type: |
int |
default: |
30 |
unit: |
seconds |
配置在SSH连接中执行命令时,对阻塞读写操作的超时时间。
OPENWISP_SSH_CONNECTION_TIMEOUT
type: |
int |
default: |
5 |
unit: |
seconds |
配置建立SSH连接时TCP连接的超时时间。
OPENWISP_CONNECTORS
type: |
元组 |
default: |
|
可用的连接器类。连接器是Python类,用于指定OpenWISP连接到设备并执行命令的方式。
OPENWISP_UPDATE_STRATEGIES
type: |
元组 |
default: |
|
可用的更新策略。更新策略是连接器类的子类,它定义了一个负责更新设备配置的update_config方法。
当设备配置发生变化时,此操作在后台工作进程中被启动。
可以编写自定义更新策略并将其添加到此设置中,以便在OpenWISP中可用。
OPENWISP_CONFIG_UPDATE_MAPPING
type: |
字典 |
default: |
|
一个将配置后端映射到更新策略的字典,以便在用户留空更新策略字段时自动确定设备连接的更新策略。
OPENWISP_CONTROLLER_BACKENDS
type: |
元组 |
default: |
|
可用的配置后端。更多信息,请参阅netjsonconfig后端。
OPENWISP_CONTROLLER_VPN_BACKENDS
type: |
元组 |
default: |
|
用于VPN服务器对象的可用VPN后端。更多信息,请参阅netjsonconfig VPN后端。
VPN后端必须遵循一些基本规则才能与openwisp-controller兼容
它必须至少允许一个VPN实例,最多一个VPN实例
主NetJSON属性必须与类名的小写版本匹配,例如:使用OpenVpn后端时,系统将查找config['openvpn']
它应该专注于所使用的VPN软件的服务器功能
OPENWISP_CONTROLLER_DEFAULT_BACKEND
type: |
字符串 |
default: |
OPENWISP_CONTROLLER_BACKENDS[0][0] |
首选后端,当在管理员中添加新的Config或Template对象时用作初始值。
此设置的默认值是OPENWISP_CONTROLLER_BACKENDS设置中第一个项目的原始值,即netjsonconfig.OpenWrt。
将其设置为None将强制用户显式选择。
OPENWISP_CONTROLLER_DEFAULT_VPN_BACKEND
type: |
字符串 |
default: |
OPENWISP_CONTROLLER_VPN_BACKENDS[0][0] |
首选后端,当在管理员中添加新的Vpn对象时用作初始值。
此设置的默认值是OPENWISP_CONTROLLER_VPN_BACKENDS设置中第一个项目的原始值,即openwisp_controller.vpn_backends.OpenVpn。
将其设置为None将强制用户显式选择。
OPENWISP_CONTROLLER_REGISTRATION_ENABLED
type: |
布尔值 |
default: |
True |
设备是否可以通过控制器自动注册。
此功能默认启用。
要正常工作,设备必须支持自动注册,有关更多信息,请参阅openwisp-config自动注册。
OPENWISP_CONTROLLER_CONSISTENT_REGISTRATION
type: |
布尔值 |
default: |
True |
当重置或刷新时,是否识别已注册的设备。
此功能默认启用。
为了正常工作,设备上也必须启用自动注册,有关更多信息,请参阅openwisp-config一致性密钥生成。
OPENWISP_CONTROLLER_REGISTRATION_SELF_CREATION
type: |
布尔值 |
default: |
True |
是否允许尚未存在于系统中的设备注册。
如果您仍然想使用自动注册以避免在配置文件中手动设置设备UUID和密钥,但同时又想避免未经明确许可的新设备无差别注册,请关闭此功能。
OPENWISP_CONTROLLER_CONTEXT
type: |
字典 |
default: |
{} |
传递给每个设备对象默认上下文的附加上下文。
OPENWISP_CONTROLLER_CONTEXT可用于定义系统范围内的配置变量。
有关如何在OpenWISP中使用配置变量的更多信息,请参阅如何使用配置变量。
有关 OpenWISP 低级别如何处理变量的技术信息,请参阅 netjsonconfig 上下文:配置变量。
OPENWISP_CONTROLLER_DEFAULT_AUTO_CERT
type: |
布尔值 |
default: |
True |
新 Template 对象 auto_cert 字段的默认值。
auto_cert 字段仅对类型设置为 VPN 的模板有效,表示是否将有关 VPN 隧道的配置自动提供给使用模板的每个设备,例如
当使用 OpenVPN 时,将自动生成与相关 VPN 对象分配的相同 CA 关联的新的 x509 证书
当使用 WireGuard 时,将生成新的私钥和公钥对(使用 Curve25519),以及分配给相关 VPN 对象的子网 IP 地址
当使用 Wireguad 上的 VXLAN 隧道时,除了为 WireGuard 生成的配置外,如果 VPN 对象中启用了配置选项“auto VNI”,将为每个设备自动生成一个新的 VID
所有这些自动生成的配置选项都将作为模板变量可用。
当不再需要时(例如,当从配置对象中删除 VPN 模板时),将自动创建的对象也将被删除。
OPENWISP_CONTROLLER_CERT_PATH
type: |
字符串 |
default: |
/etc/x509 |
当使用 auto_cert(默认启用)时,在路由器上下载 x509 证书的文件系统路径。
OPENWISP_CONTROLLER_COMMON_NAME_FORMAT
type: |
字符串 |
default: |
{mac_address}-{name} |
定义在使用将 auto_cert 设置为 True 的 VPN 模板时自动创建的 VPN 客户端证书的 common_name 属性的格式。使用 shortuuid 生成的唯一短标识符附加到 common_name 以引入唯一性。因此,结果 common_name 将具有 {OPENWISP_CONTROLLER_COMMON_NAME_FORMAT}-{unique-slug} 格式。
注意:如果设备的 name 和 mac 地址 相同,则将从 common_name 中省略设备的 name 以避免冗余。
OPENWISP_CONTROLLER_MANAGEMENT_IP_DEVICE_LIST
type: |
布尔值 |
default: |
True |
在设备列表页面上,如果可用,则列 IP 将显示 management_ip,否则默认为 last_ip。
如果将此设置设置为 False,则即使在设备列表页面上存在,也不会显示 management_ip,它仅在设备详细信息页面上显示。
如果出于某种原因,大多数用户不关心管理 IP 地址,则可以将此设置为 False。
OPENWISP_CONTROLLER_CONFIG_BACKEND_FIELD_SHOWN
type: |
布尔值 |
default: |
True |
此设置切换设备配置和模板配置中的添加/编辑页面上的 backend 字段,以及设备列表和模板列表中的 backend 字段/过滤器。
如果将此设置设置为 False,则将从 UI 中删除这些项目。
注意:此设置仅影响配置后端,不影响 VPN 后端。
OPENWISP_CONTROLLER_DEVICE_NAME_UNIQUE
type: |
布尔值 |
default: |
True |
此设置有条件地强制在组织中对设备名称唯一。强制此约束的查询不区分大小写。
注意:为了使此约束可选,它在应用级别强制执行,而不是在数据库级别。
OPENWISP_CONTROLLER_HARDWARE_ID_ENABLED
type: |
布尔值 |
default: |
False |
可以使用字段 hardware_id 来存储唯一的硬件 ID,例如序列号。
如果此设置设置为 True,则此字段将首先在设备列表页面和在添加/编辑设备页面上显示。
此功能默认禁用。
OPENWISP_CONTROLLER_HARDWARE_ID_OPTIONS
type: |
字典 |
default: |
|
hardware_id 字段模型的选项。
blank:字段是否允许为空
null:空值是否会在数据库中存储为 NULL
max_length:字段的长度限制
unique:字段值是否必须是唯一的
verbose_name:字段的用户可读标签文本
help_text:与字段一起显示的帮助文本
OPENWISP_CONTROLLER_HARDWARE_ID_AS_NAME
type: |
布尔值 |
default: |
True |
当启用硬件ID功能时,设备将使用其硬件ID而不是名称来引用。
如果您仍然想按名称引用设备,请将此设置为 False。
OPENWISP_CONTROLLER_DEVICE_VERBOSE_NAME
type: |
元组 |
default: |
('设备', '设备们') |
定义了 Device 模型的 verbose_name 属性,该属性在管理网站上显示。元组的第一个和第二个元素表示单数和复数形式。
例如,如果我们想将详细名称更改为“热点”,我们可以编写
OPENWISP_CONTROLLER_DEVICE_VERBOSE_NAME = ('Hotspot', 'Hotspots')OPENWISP_CONTROLLER_HIDE_AUTOMATICALLY_GENERATED_SUBNETS_AND_IPS
type: |
布尔值 |
default: |
False |
将此设置为 True 将隐藏由 子网划分规则 生成的子网和IP,使其不在子网和IP管理器的更改列表视图中显示。
OPENWISP_CONTROLLER_SUBNET_DIVISION_TYPES
type: |
元组 |
default: |
|
主题划分规则对象的可选类型。有关如何编写自己的类型的更多信息,请参阅本文档的 “自定义子网划分规则类型”部分
OPENWISP_CONTROLLER_API
type: |
布尔值 |
default: |
True |
表示是否启用了 Openwisp Controller 的 API。要在 settings.py 文件中默认禁用 API,请添加 OPENWISP_CONTROLLER_API = False。
OPENWISP_CONTROLLER_API_HOST
type: |
字符串 |
default: |
None |
允许指定 API 请求的后端 URL,如果前端是单独托管的话。
OPENWISP_CONTROLLER_USER_COMMANDS
type: |
list |
default: |
[] |
允许指定一个 list,其中包含元组,用于添加命令,如 “如何定义自定义命令” 部分所述。
OPENWISP_CONTROLLER_DEVICE_GROUP_SCHEMA
type: |
字典 |
default: |
{'type': 'object', 'properties': {}} |
允许指定用于验证 设备组 元数据的 JSONSchema。
OPENWISP_CONTROLLER_DSA_OS_MAPPING
type: |
字典 |
default: |
{} |
OpenWISP Controller 可以通过读取 Device 对象的 os 字段来确定是否应该使用 OpenWrt 21 中引入的新 DSA 接口(分布式交换架构)语法。然而,如果您正在使用的固件具有自定义固件标识符,系统将无法确定是否应该使用新语法,它将默认使用 OPENWISP_CONTROLLER_DSA_DEFAULT_FALLBACK。
如果您想确保系统可以正确解析您的自定义固件标识符,您可以遵循以下示例。
为了示例,操作系统标识符 MyCustomFirmware 2.0 对应于 OpenWrt 19.07,而 MyCustomFirmware 2.1 对应于 OpenWrt 21.02。按照以下指示配置此设置将允许 OpenWISP 自动提供正确的语法。
示例
OPENWISP_CONTROLLER_DSA_OS_MAPPING = {
    'netjsonconfig.OpenWrt': {
        # OpenWrt >=21.02 configuration syntax will be used for
        # these OS identifiers.
        '>=21.02': [r'MyCustomFirmware 2.1(.*)'],
        # OpenWrt <=21.02 configuration syntax will be used for
        # these OS identifiers.
        '<21.02': [r'MyCustomFirmware 2.0(.*)']
    }
}注意:操作系统标识符应该与上述示例中所示的正规表达式相同。
OPENWISP_CONTROLLER_DSA_DEFAULT_FALLBACK
type: |
布尔值 |
default: |
True |
此设置的值决定当 openwisp-controller 无法自动做出决定时是否使用 DSA 语法(OpenWrt >=21 配置语法)。
信号
config_modified
路径: openwisp_controller.config.signals.config_modified
参数:
instance:修改了其 config 的 Config 实例
previous_status:指示在发出信号之前配置对象的状况
action:发出信号的行动,可以是以下列表中的任何一个:- config_changed:配置对象的配置已更改 - related_template_changed:相关模板的配置已更改 - m2m_templates_changed:分配的模板已更改(添加、删除模板或更改其顺序)
每次修改设备配置时都会发出此信号。
即使 Config.status 已经被修改,此信号也会发出,因为它是设备配置已更改的信号。
当启用推送功能(需要设备凭据)时,此信号用于触发配置在设备上的更新。
当设备使用的模板被修改或分配给设备的模板被更改时,也会发出此信号。
在以下特殊情况下config_modified不会被触发
当设备第一次创建时不会发出此信号。
当分配给配置对象的模板被清除(post_clear m2m 信号)时,也不会发出此信号,这是必要的,因为 sortedm2m,我们用来实现有序模板的包,使用清除操作来重新排序模板(m2m 关系首先被清除然后重新添加),因此我们忽略 post_clear 以避免发出信号两次(一次用于清除操作,一次用于添加操作)。如果您计划使用 m2m 管理器的清除方法,请记住这一点。
config_status_changed
路径: openwisp_controller.config.signals.config_status_changed
参数:
instance:其 status 发生变化的 Config 实例
只有当设备配置状态发生更改时才会发出此信号。
当配置对象的 m2m 模板关系发生更改时,也会发出此信号,但仅在实际添加或删除操作上(post_add 或 post_remove),如前所述,忽略 post_clear 的原因相同。
checksum_requested
路径: openwisp_controller.config.signals.checksum_requested
参数:
instance:请求其配置校验和的 Device 实例
request:HTTP 请求对象
当设备通过控制器视图请求校验和时,会发出此信号。
在返回成功响应之前会发出此信号,如果响应未成功则不会发送。
config_download_requested
路径: openwisp_controller.config.signals.config_download_requested
参数:
instance:请求下载其配置的 Device 实例
request:HTTP 请求对象
当设备请求通过控制器视图下载其配置时,会发出此信号。
在返回成功响应之前会发出此信号,如果响应未成功则不会发送。
is_working_changed
路径: openwisp_controller.connection.signals.is_working_changed
参数:
实例: DeviceConnection 的实例
is_working: DeviceConnection.is_working 的值
old_is_working: DeviceConnection.is_working 的前一个值,对于新连接可能是 None(对于新连接)、True 或 False
failure_reason: 建立连接失败原因的错误信息
old_failure_reason: DeviceConnection.failure_reason 的前一个值
每次 DeviceConnection.is_working 发生变化时都会发出此信号。
当设备第一次创建时不会触发。
management_ip_changed
路径: openwisp_controller.config.signals.management_ip_changed
参数:
实例: Device 的实例
management_ip: Device.management_ip 的值
old_management_ip: Device.management_ip 的前一个值
每次 Device.management_ip 发生变化时都会发出此信号。
当设备第一次创建时不会触发。
device_registered
路径: openwisp_controller.config.signals.device_registered
参数:
实例: 已注册的 Device 的实例
is_new: 布尔值,当设备为新设备时为 True,当设备已存在时(例如,经过工厂重置的设备将再次注册)为 False
当设备通过控制器 HTTP API 自动注册时发出此信号。
device_name_changed
路径: openwisp_controller.config.signals.device_name_changed
参数:
实例: Device 的实例
当设备名称更改时发出此信号。
当设备创建时不会发出。
device_group_changed
路径: openwisp_controller.config.signals.device_group_changed
参数:
实例: Device 的实例
group_id: Device 的 DeviceGroup 的主键
old_group_id: Device 之前 DeviceGroup 的主键
当设备组更改时发出此信号。
当设备创建时不会发出。
subnet_provisioned
路径: openwisp_controller.subnet_division.signals.subnet_provisioned
参数:
实例: VpnClient 的实例
provisioned: 已分配的 Subnet 和 IpAddress 的字典,如果没有分配则为 None
为具有子网划分规则的 VPN 服务器上的 VpnClient 分配子网和 IP 地址时发出此信号。
vpn_server_modified
路径: openwisp_controller.config.signals.vpn_server_modified
参数:
实例: Vpn 的实例
修改 VPN 服务器时发出此信号。
vpn_peers_changed
路径: openwisp_controller.config.signals.vpn_peers_changed
参数:
实例: Vpn 的实例
当 VPN 服务器对端发生变化时发出此信号。
仅对具有 WireGuard 或 WireGuard 上 VXLAN 后端的 Vpn 对象发出。
扩展openwisp-controller
OpenWISP 项目的核心价值之一是 软件可重用性,因此 openwisp-controller 提供了一组基类,这些类可以被导入、扩展和重用以创建衍生应用程序。
为了实现您自定义版本的 openwisp-controller,您需要执行本节中描述的步骤。
如有疑问,测试项目 中的代码将为您提供真实来源:只需复制并修改该代码,即可使 openwisp-controller 的基本衍生版本正常运行。
如果您想添加新的用户字段,请按照 教程扩展 openwisp-users。例如,我们将 openwisp-users 扩展到 sample_users 应用程序,并在 sample_users/models.py 中添加了一个字段 social_security_number。
前提:如果您计划使用此模块的自定义版本,我们建议从开始就使用它,因为将您的数据从默认模块迁移到扩展版本可能会耗费时间。
1. 初始化你的项目 & 自定义应用
首先,为了开始,您需要创建一个 django 项目
django-admin startproject mycontroller
现在,您需要做的是创建一些新的 django 应用程序,这些应用程序将包含您自定义的 openwisp-controller 版本。
一个 django 项目是一组 django 应用程序。openwisp_controller 项目中有 4 个 django 应用程序,分别是 config、pki、connection 和 geo。您需要在您的项目中为 openwisp_controller 中的每个应用程序创建 4 个应用程序。
django 应用程序不过是一个 python 包(python 脚本目录),在以下示例中,我们将这些 django 应用程序称为 sample_config、sample_pki、sample_connection、sample_geo 以及 sample_subnet_division。但您可以命名它们。
django-admin startapp sample_config
django-admin startapp sample_pki
django-admin startapp sample_connection
django-admin startapp sample_geo
django-admin startapp sample_subnet_division
请记住,上述命令必须在您的 PYTHON_PATH 可用的目录中调用,这样您就可以将结果导入到您的项目中。
有关如何使用 django 项目和 django 应用程序的信息,请参阅 django 文档。
2. 安装openwisp-controller
安装(并将 openwisp-controller 添加到您项目的需求中)
pip install openwisp-controller
3. 在INSTALLED_APPS中添加你的应用
现在,您需要将 mycontroller.sample_config、mycontroller.sample_pki、mycontroller.sample_connection、mycontroller.sample_geo 以及 mycontroller.sample_subnet_division 添加到您 settings.py 中的 INSTALLED_APPS,并确保已经删除了 openwisp_controller.config、openwisp_controller.geo、openwisp_controller.pki、openwisp_controller.connnection 以及 openwisp_controller.subnet_division。
# Remember: Order in INSTALLED_APPS is important.
INSTALLED_APPS = [
    # other django installed apps
    'openwisp_utils.admin_theme',
    # all-auth
    'django.contrib.sites',
    'allauth',
    'allauth.account',
    'allauth.socialaccount',
    # openwisp2 module
    # 'openwisp_controller.config', <-- comment out or delete this line
    # 'openwisp_controller.pki', <-- comment out or delete this line
    # 'openwisp_controller.geo', <-- comment out or delete this line
    # 'openwisp_controller.connection', <-- comment out or delete this line
    # 'openwisp_controller.subnet_division', <-- comment out or delete this line
    'mycontroller.sample_config',
    'mycontroller.sample_pki',
    'mycontroller.sample_geo',
    'mycontroller.sample_connection',
    'mycontroller.sample_subnet_division',
    'openwisp_users',
    # admin
    'django.contrib.admin',
    # other dependencies
    'sortedm2m',
    'reversion',
    'leaflet',
    # rest framework
    'rest_framework',
    'rest_framework_gis',
    # channels
    'channels',
]
将 mycontroller、sample_config、sample_pki、sample_connection、sample_geo 以及 sample_subnet_division 替换为步骤 1 中您选择的名字。
4. 添加EXTENDED_APPS
将以下内容添加到您的 settings.py
EXTENDED_APPS = (
    'django_x509',
    'django_loci',
    'openwisp_controller.config',
    'openwisp_controller.pki',
    'openwisp_controller.geo',
    'openwisp_controller.connection',
    'openwisp_controller.subnet_division',
)
5. 添加openwisp_utils.staticfiles.DependencyFinder
将 openwisp_utils.staticfiles.DependencyFinder 添加到您的 settings.py 中的 STATICFILES_FINDERS
STATICFILES_FINDERS = [
    'django.contrib.staticfiles.finders.FileSystemFinder',
    'django.contrib.staticfiles.finders.AppDirectoriesFinder',
    'openwisp_utils.staticfiles.DependencyFinder',
]
6. 添加openwisp_utils.loaders.DependencyLoader
将 openwisp_utils.loaders.DependencyLoader 添加到您的 settings.py 中的 TEMPLATES,但确保它位于 django.template.loaders.app_directories.Loader 之前
TEMPLATES = [
    {
        'BACKEND': 'django.template.backends.django.DjangoTemplates',
        'OPTIONS': {
            'loaders': [
                'django.template.loaders.filesystem.Loader',
                'openwisp_utils.loaders.DependencyLoader',
                'django.template.loaders.app_directories.Loader',
            ],
            'context_processors': [
                'django.template.context_processors.debug',
                'django.template.context_processors.request',
                'django.contrib.auth.context_processors.auth',
                'django.contrib.messages.context_processors.messages',
                'openwisp_utils.admin_theme.context_processor.menu_items',
                'openwisp_notifications.context_processors.notification_api_settings',
            ],
        },
    }
]
5. 初始数据库设置
确保您使用的是可用的 geodjango 后端之一,例如
DATABASES = {
    'default': {
        'ENGINE': 'django.contrib.gis.db.backends.spatialite',
        'NAME': 'openwisp-controller.db',
    }
}
有关 GeoDjango 的更多信息,请参阅 geodjango 文档。
6. Django Channels设置
在您的项目文件夹中创建 asgi.py 并添加以下行
from channels.auth import AuthMiddlewareStack
from channels.routing import ProtocolTypeRouter, URLRouter
from channels.security.websocket import AllowedHostsOriginValidator
from django.core.asgi import get_asgi_application

from openwisp_controller.routing import get_routes
# You can also add your routes like this
from my_app.routing import my_routes

application = ProtocolTypeRouter(
    {   "http": get_asgi_application(),
        'websocket': AllowedHostsOriginValidator(
            AuthMiddlewareStack(URLRouter(get_routes() + my_routes))
        )
    }
)
7. 其他设置
将以下设置添加到 settings.py
FORM_RENDERER = 'django.forms.renderers.TemplatesSetting'

ASGI_APPLICATION = 'my_project.asgi.application'
CHANNEL_LAYERS = {
    'default': {
        'BACKEND': 'channels.layers.InMemoryChannelLayer'
    },
}
有关 FORM_RENDERER 设置的更多信息,请参阅FORM_RENDERER 文档。有关 ASGI_APPLICATION 设置的更多信息,请参阅ASGI_APPLICATION 文档。有关 CHANNEL_LAYERS 设置的更多信息,请参阅CHANNEL_LAYERS 文档。
6. 继承AppConfig类
请参阅测试项目示例应用程序中的以下文件
- sample_config
- sample_geo
- sample_pki
- sample_connection
- sample_subnet_division
您必须在您的项目中复制并修改该代码。
有关 AppConfig 概念的更多信息,请参阅Django 文档中的“应用程序”部分。
7. 创建你的自定义模型
为了展示示例,我们在测试项目中的示例应用程序的模型中添加了一个简单的“详细信息”字段。
您可以在类似的models.py文件中添加字段。
注意:有关如何使用、扩展或开发模型的问题,请参阅Django 文档中的“模型”部分。
8. 添加交换器配置
创建模型后,将以下内容添加到您的settings.py
# Setting models for swapper module
CONFIG_DEVICE_MODEL = 'sample_config.Device'
CONFIG_DEVICEGROUP_MODEL = 'sample_config.DeviceGroup'
CONFIG_CONFIG_MODEL = 'sample_config.Config'
CONFIG_TEMPLATETAG_MODEL = 'sample_config.TemplateTag'
CONFIG_TAGGEDTEMPLATE_MODEL = 'sample_config.TaggedTemplate'
CONFIG_TEMPLATE_MODEL = 'sample_config.Template'
CONFIG_VPN_MODEL = 'sample_config.Vpn'
CONFIG_VPNCLIENT_MODEL = 'sample_config.VpnClient'
CONFIG_ORGANIZATIONCONFIGSETTINGS_MODEL = 'sample_config.OrganizationConfigSettings'
DJANGO_X509_CA_MODEL = 'sample_pki.Ca'
DJANGO_X509_CERT_MODEL = 'sample_pki.Cert'
GEO_LOCATION_MODEL = 'sample_geo.Location'
GEO_FLOORPLAN_MODEL = 'sample_geo.FloorPlan'
GEO_DEVICELOCATION_MODEL = 'sample_geo.DeviceLocation'
CONNECTION_CREDENTIALS_MODEL = 'sample_connection.Credentials'
CONNECTION_DEVICECONNECTION_MODEL = 'sample_connection.DeviceConnection'
CONNECTION_COMMAND_MODEL = 'sample_connection.Command'
SUBNET_DIVISION_SUBNETDIVISIONRULE_MODEL = 'sample_subnet_division.SubnetDivisionRule'
SUBNET_DIVISION_SUBNETDIVISIONINDEX_MODEL = 'sample_subnet_division.SubnetDivisionIndex'将sample_config、sample_pki、sample_connection、sample_geo & sample_subnet_division替换为步骤1中选择的名称。
9. 创建数据库迁移
创建数据库迁移
./manage.py makemigrations
现在,为了使用与 openwisp_controller 模块中使用的默认管理员和操作员用户组,您需要手动创建一个迁移文件,其外观如下
sample_connection/migrations/0002_default_group_permissions.py
sample_subnet_division/migrations/0002_default_group_permissions.py
创建数据库迁移
./manage.py migrate
有关更多信息,请参阅Django 文档中的“迁移”部分。
10. 创建管理员
参阅示例应用程序的admin.py文件。
要向管理界面引入更改,您可以采用以下两种主要方式之一。
注意:有关 Django 管理员如何工作或如何自定义的更多信息,请参阅Django 文档中的“Django 管理站”部分。
1. 模拟补丁
如果您需要添加的更改相对较小,可以求助于猴子补丁。
例如
sample_config
from openwisp_controller.config.admin import (
    DeviceAdmin,
    DeviceGroupAdmin,
    TemplateAdmin,
    VpnAdmin,
)

# DeviceAdmin.fields += ['example'] <-- monkey patching example
sample_connection
from openwisp_controller.connection.admin import CredentialsAdmin

# CredentialsAdmin.fields += ['example'] <-- monkey patching example
sample_geo
from openwisp_controller.geo.admin import FloorPlanAdmin, LocationAdmin

# FloorPlanAdmin.fields += ['example'] <-- monkey patching example
sample_pki
from openwisp_controller.pki.admin import CaAdmin, CertAdmin

# CaAdmin.fields += ['example'] <-- monkey patching example
sample_subnet_division
from openwisp_controller.subnet_division.admin import SubnetDivisionRuleInlineAdmin

# SubnetDivisionRuleInlineAdmin.fields += ['example'] <-- monkey patching example
2. 继承管理员类
如果您需要引入重大更改并且/或者不想求助于猴子补丁,您可以按照以下步骤进行
sample_config
from django.contrib import admin
from openwisp_controller.config.admin import (
    DeviceAdmin as BaseDeviceAdmin,
    TemplateAdmin as BaseTemplateAdmin,
    VpnAdmin as BaseVpnAdmin,
    DeviceGroupAdmin as BaseDeviceGroupAdmin,
from swapper import load_model

Vpn = load_model('openwisp_controller', 'Vpn')
Device = load_model('openwisp_controller', 'Device')
DeviceGroup = load_model('openwisp_controller', 'DeviceGroup')
Template = load_model('openwisp_controller', 'Template')

admin.site.unregister(Vpn)
admin.site.unregister(Device)
admin.site.unregister(DeviceGroup)
admin.site.unregister(Template)

@admin.register(Vpn)
class VpnAdmin(BaseVpnAdmin):
    # add your changes here

@admin.register(Device)
class DeviceAdmin(BaseDeviceAdmin):
    # add your changes here

@admin.register(DeviceGroup)
class DeviceGroupAdmin(BaseDeviceGroupAdmin):
    # add your changes here

@admin.register(Template)
class TemplateAdmin(BaseTemplateAdmin):
    # add your changes here
sample_connection
from openwisp_controller.connection.admin import CredentialsAdmin as BaseCredentialsAdmin
from django.contrib import admin
from swapper import load_model

Credentials = load_model('openwisp_controller', 'Credentials')

admin.site.unregister(Credentials)

@admin.register(Device)
class CredentialsAdmin(BaseCredentialsAdmin):
    # add your changes here
sample_geo
from openwisp_controller.geo.admin import (
    FloorPlanAdmin as BaseFloorPlanAdmin,
    LocationAdmin as BaseLocationAdmin
)
from django.contrib import admin
from swapper import load_model

Location = load_model('openwisp_controller', 'Location')
FloorPlan = load_model('openwisp_controller', 'FloorPlan')

admin.site.unregister(FloorPlan)
admin.site.unregister(Location)

@admin.register(FloorPlan)
class FloorPlanAdmin(BaseFloorPlanAdmin):
    # add your changes here

@admin.register(Location)
class LocationAdmin(BaseLocationAdmin):
    # add your changes here
sample_pki
from openwisp_controller.geo.admin import (
    CaAdmin as BaseCaAdmin,
    CertAdmin as BaseCertAdmin
)
from django.contrib import admin
from swapper import load_model

Ca = load_model('openwisp_controller', 'Ca')
Cert = load_model('openwisp_controller', 'Cert')

admin.site.unregister(Ca)
admin.site.unregister(Cert)

@admin.register(Ca)
class CaAdmin(BaseCaAdmin):
    # add your changes here

@admin.register(Cert)
class CertAdmin(BaseCertAdmin):
    # add your changes here
sample_subnet_division
from openwisp_controller.subnet_division.admin import (
    SubnetAdmin as BaseSubnetAdmin,
    IpAddressAdmin as BaseIpAddressAdmin,
    SubnetDivisionRuleInlineAdmin as BaseSubnetDivisionRuleInlineAdmin,
)
from django.contrib import admin
from swapper import load_model

Subnet = load_model('openwisp_ipam', 'Subnet')
IpAddress = load_model('openwisp_ipam', 'IpAddress')
SubnetDivisionRule = load_model('subnet_division', 'SubnetDivisionRule')

admin.site.unregister(Subnet)
admin.site.unregister(IpAddress)
admin.site.unregister(SubnetDivisionRule)

@admin.register(Subnet)
class SubnetAdmin(BaseSubnetAdmin):
    # add your changes here

@admin.register(IpAddress)
class IpAddressAdmin(BaseIpAddressAdmin):
    # add your changes here

@admin.register(SubnetDivisionRule)
class SubnetDivisionRuleInlineAdmin(BaseSubnetDivisionRuleInlineAdmin):
    # add your changes here
11. 创建根URL配置
from django.contrib import admin
from openwisp_controller.config.utils import get_controller_urls
from openwisp_controller.geo.utils import get_geo_urls
# from .sample_config import views as config_views
# from .sample_geo import views as geo_views

urlpatterns = [
    # ... other urls in your project ...
    # Use only when changing controller API views (discussed below)
    # url(r'^controller/', include((get_controller_urls(config_views), 'controller'), namespace='controller'))

    # Use only when changing geo API views (discussed below)
    # url(r'^geo/', include((get_geo_urls(geo_views), 'geo'), namespace='geo')),

    # openwisp-controller urls
    url(r'', include(('openwisp_controller.config.urls', 'config'), namespace='config')),
    url(r'', include('openwisp_controller.urls')),
]
有关 Django 中 URL 配置的更多信息,请参阅Django 文档中的“URL 分派器”部分。
12. 导入自动测试
当基于此模块开发自定义应用程序时,导入并运行基本测试也是一个好主意,这样您可以确保引入的更改不会破坏openwisp-controller的一些现有功能。
如果您需要添加破坏性更改,可以覆盖基本类中定义的测试来测试您自己的行为。
请参阅sample_app中的测试以了解如何进行此操作。
运行测试时,您还需要复制固定值
将sample_config更改为您的配置应用名称,在sample_config fixtures中,并将其粘贴到sample_config/fixtures/目录中。
然后您可以使用以下命令运行测试
# the --parallel flag is optional
./manage.py test --parallel mycontroller
将mycontroller替换为步骤1中选择的名称。
有关django中自动化测试的更多信息,请参阅“Django中的测试”。
可继承和扩展的其他基类
以下步骤不是必需的,而是针对更高级的定制。
1. 扩展控制器API视图
当您想更改控制器API时,才需要扩展sample_config/views.py,记得在步骤11中更改config_views的位置以扩展视图。
有关django视图的更多信息,请参阅django文档中的视图部分。
2. 扩展地理API视图
当您想更改地理API时,才需要扩展sample_geo/views.py,记得在步骤11中更改geo_views的位置以扩展视图。
有关django视图的更多信息,请参阅django文档中的视图部分。
自定义子网划分规则类型
您可以创建自己的子网划分规则类型。规则类型决定了何时提供子网和IP,何时销毁它们。
您可以通过扩展openwisp_controller.subnet_division.rule_types.base.BaseSubnetDivisionRuleType来创建自定义规则类型。
以下是一个示例,创建一个子网划分规则类型,当创建新设备时提供子网和IP,并在删除该设备时删除它们。
# In mycontroller/sample_subnet_division/rules_types/custom.py

from django.db.models.signals import post_delete, post_save
from swapper import load_model

from openwisp_controller.subnet_division.rule_types.base import (
    BaseSubnetDivisionRuleType,
)

Device = load_model('config', 'Device')

class CustomRuleType(BaseSubnetDivisionRuleType):
    # The signal on which provisioning should be triggered
    provision_signal = post_save
    # The sender of the provision_signal
    provision_sender = Device
    # Dispatch UID for connecting provision_signal to provision_receiver
    provision_dispatch_uid = 'some_unique_identifier_string'

    # The signal on which deletion should be triggered
    destroyer_signal = post_delete
    # The sender of the destroyer_signal
    destroyer_sender = Device
    # Dispatch UID for connecting destroyer_signal to destroyer_receiver
    destroyer_dispatch_uid = 'another_unique_identifier_string'

    # Attribute path to organization_id
    # Example 1: If organization_id is direct attribute of provision_signal
    #            sender instance, then
    #   organization_id_path = 'organization_id'
    # Example 2: If organization_id is indirect attribute of provision signal
    #            sender instance, then
    #   organization_id_path = 'some_attribute.another_intermediate.organization_id'
    organization_id_path = 'organization_id'

    # Similar to organization_id_path but for the required subnet attribute
    subnet_path = 'subnet'

    # An intermediate method through which you can specify conditions for provisions
    @classmethod
    def should_create_subnets_ips(cls, instance, **kwargs):
        # Using "post_save" provision_signal, the rule should be only
        # triggered when a new object is created.
        return kwargs['created']

    # You can define logic to trigger provisioning for existing objects
    # using following classmethod. By default, BaseSubnetDivisionRuleType
    # performs no operation for existing objects.
    @classmethod
    def provision_for_existing_objects(cls, rule_obj):
        for device in Device.objects.filter(
            organization=rule_obj.organization
        ):
cls.provision_receiver(device, created=True)创建自定义规则类型的类后,您需要按以下方式设置OPENWISP_CONTROLLER_SUBNET_DIVISION_TYPES设置
OPENWISP_CONTROLLER_SUBNET_DIVISION_TYPES = (                                                                                           |
   ('openwisp_controller.subnet_division.rule_types.vpn.VpnSubnetDivisionRuleType', 'VPN'),
   ('openwisp_controller.subnet_division.rule_types.device.DeviceSubnetDivisionRuleType', 'Device'),
   ('mycontroller.sample_subnet_division.rules_types.custom.CustomRuleType', 'Custom Rule'),
)
注册新通知类型
您可以使用OpenWISP Notifications中的register_notification_type函数定义自己的通知类型。
有关更多信息,请参阅有关在openwisp-notifications中注册通知类型的相关文档部分。
一旦注册了新的通知类型,您就必须使用openwisp-notifications中提供的“notify”信号来发送此类通知。
贡献
请参阅OpenWISP贡献指南。
变更日志
请参阅变更日志。
许可证
请参阅许可协议。
支持
请参阅OpenWISP支持渠道。


下载文件
下载适用于您平台的文件。如果您不确定选择哪个,请了解有关安装包的更多信息。
源分发
构建分发
哈希值 for openwisp_controller-1.0.3-py2.py3-none-any.whl
| 算法 | 哈希摘要 | |
|---|---|---|
| SHA256 | 5dfaeb3176328e3cc41d34ac2274e19c28923ddb40cba34292ad5f97251847b2 |
|
| MD5 | a8668491b6df3cc910842b61d3a8084e |
|
| BLAKE2b-256 | 6f0e89ebf6ebc30813519d7dfa01953d04a284cbc0b0f663ca4dff4042622a93 |