快速且免费的代码通知:Python封装的ntfy.sh通知服务。

项目描述

ntfy-wrapper 是一个免费且无烦恼的自定义Python通知器。无需登录、API令牌、费用,无需麻烦。
它实际上是一个简单的Python封装,围绕 ntfy。向他们致以敬意 ❤️
您现在可以从Python代码中 发送 通知,并通过 Web应用 或 CLI 或通过专用应用 在手机上 接收 这些通知!
再次,所有荣誉都归 ntfy。
安装
使用 pip 安装 ntfy-wrapper
pip install ntfy-wrapper
依赖项
requests用于轻松的HTTP请求和与ntfy.shAPI交互typer用于强大的美观CLIxkcdpass用于生成既安全又易于理解的主题[^1]
为什么?
想象一下你在共享集群上执行作业。它们在一个队列中。当它们开始时你会收到通知。如果出现错误,你会收到通知。你会收到模型最终性能的通知,如果你点击通知,你可以访问来自wandb或comet.ml的在线日志。
这只是从我在AI工作中学到的一个场景,但事实上你可以在任何场景中使用它!
入门指南
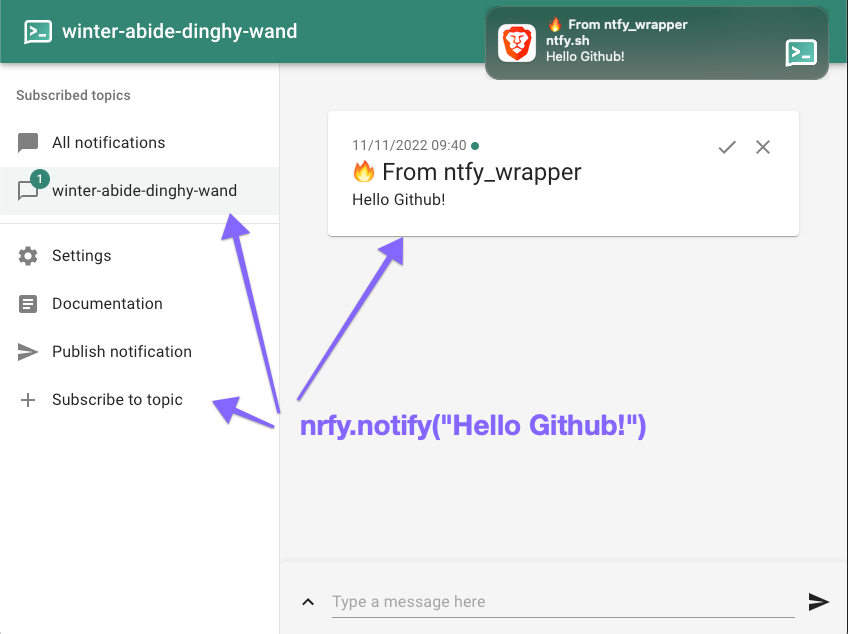
from ntfy_wrapper import Notifier

if __name__ == "__main__":

    ntfy = Notifier(notify_defaults={"title": "Your Project Name"})
    # IFF this is the first call to `ntfy_wrapper` in your project, this line ^
    # will print a topic id.
    # It will also write the topic id to `.ntfy.conf` so this only happens once!
    #
    # Use one of those methods (from the print or the conf file) to copy the topic id
    # and use it to subscribe to notifications from the web or mobile apps.
    #
    # You can also use the command-line `$ py-ntfy init` before executing your code
    # and the same process will happen (new topic + conf file)
    #
    # Note: anyone with your topic id can subscribe to your notification. It's probably
    # best to *exclude* the configuration file from version control.

    ntfy("Job has been allocated, starting Model training")

    try:
        results = do_some_stuff()
        if results["metric"] > threshold:
            ntfy(
                f"Great model! Its metric is {results['metric']:.3f}",
                tags="white_check_mark",  # this is the ✅ emoji
                click=results["online_run_url"],
            )
        else:
            ntfy(f"Done, but not great ({results['metric']:.3f})", tags="disappointed")
    except Exception as e:
        ntfy.notify(f"Error! -> {str(e)}", priority=4, emails="you@foo.bar")
注意 ntfy(message) 等同于 ntfy.notify(message),前者是后者的别名。
如果你在确认你已经订阅了与你的 Notifier 使用的确切主题之后仍未收到通知,这很可能是由于发送的请求格式不正确。请在 notify() 调用中使用 debug=True 来调查(例如: ntfy(message, debug=True))。
用户指南
核心概念是"主题"。它基本上是一个用于发布/订阅通知的ID。你应该将其保密,不易被猜测,因为任何拥有主题ID的人都可以订阅你的通知。特别是,你应该将.ntfy.conf添加到.gitignore中。
简而言之,ntfy-wrapper将发布到主题,你必须订阅该主题才能接收通知。你可以通过以下方式接收你的通知
使用方法
- 以下方式之一创建主题
- 手动配置
- 在Python控制台中,使用
ntfy_wrapper.utils.generate_topic()获取一个安全、唯一且易于阅读的主题(例如:冬天-忍受-小船-手杖) - 从命令行使用
$ py-ntfy new-topic获取类似的主题。添加--save以将其添加到配置中。
- 以以下方式之一通知
Notifier使用此主题- 在您的代码中使用
Notifier(topics=your_topic)或Notifier(topics=[topic1, topic2]) - 使用配置文件
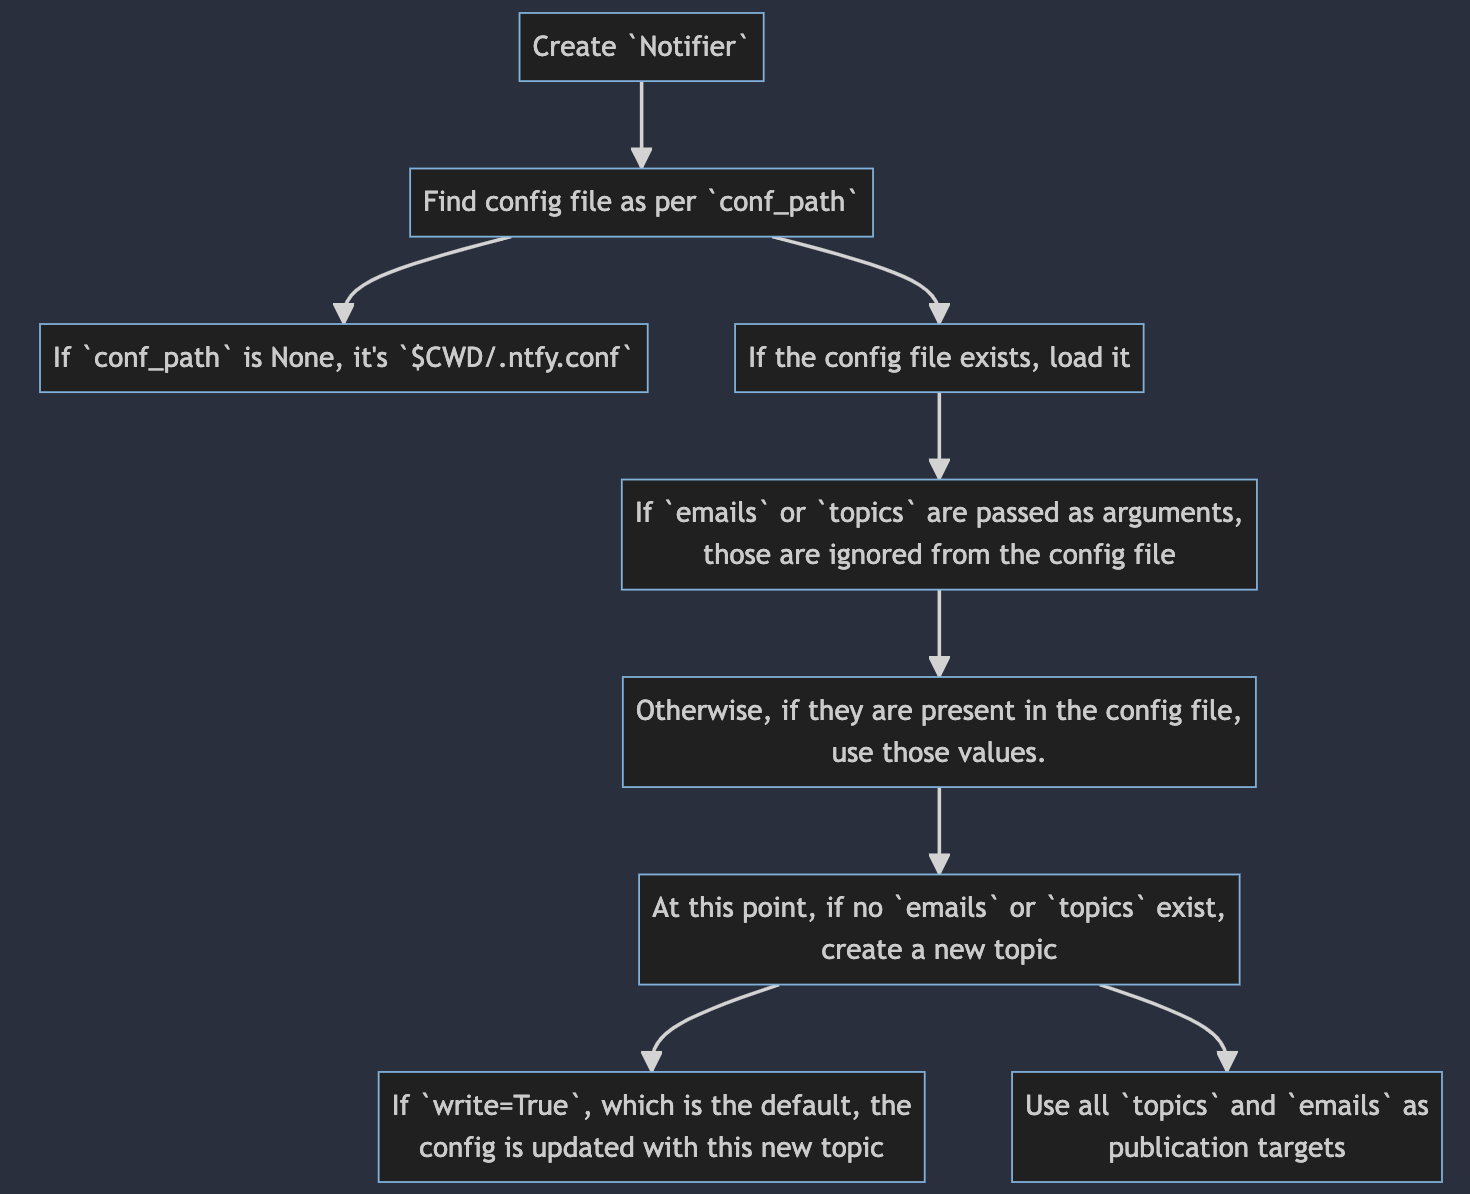
- 当构造
Notifier时,将默认创建一个配置文件,除非您在Notifier.__init__参数中添加write=False - 配置文件用于存储以下默认值
targets,即用逗号分隔的topics列表和用逗号分隔的emails列表message_defaults,即调用.notify(...)时使用的默认值
- 您还可以使用
$ py-ntfy init初始化您的ntfy-wrapper配置
- 当构造
- 从命令行使用
$ py-ntfy add topic your-topic
- 在您的代码中使用
- 以下方式之一设置默认值
- 通过编辑配置文件
- 通过使用
py-ntfy命令行工具
- 通过参考原始的
ntfy文档来探索通知选项
配置文件
ntfy-wrapper使用INI标准以及configparser来解析配置文件。它期望有两个部分
[notifier_init],包含可选字段emails =、topics =和base_url =,用于定义通知的系统目标,而不是将它们放在Python代码中。`base_url`允许将推送到与默认的`https://ntfy.sh`不同的`ntfy`服务器。[notify_defaults],包含以下列出的可选字段,这些字段将定义Notifier.notify(...)使用的默认参数。例如,您可以为代码的.notify(...)调用设置默认的title和tags,并在特定位置使用关键字参数.notify(title="非默认标题")来覆盖它们。title、priority、tags、click、attach、actions和icon键的行为在ntfy文档中有描述
# For Notifier(emails=..., topics=...)
[notifier_init]
topics = my-secret-topic-1, mysecrettopic2
emails = you@foo.bar
base_url = https://custom-ntfy-instance.io

# For Notifier.notify(title=..., priority=..., etc.)
[notify_defaults]
title = Message from ntfy-wrapper
priority = 0
tags = fire
click =
attach =
actions =
icon = https://raw.githubusercontent.com/vict0rsch/ntfy-wrapper/main/assets/logo.png
命令行
ntfy_wrapper附带一个名为py-ntfy的命令行界面。它使用优秀的Python CLI工具Typer。其目标是以用户友好的方式与ntfy-wrapper的配置进行交互。在这方面,它与原始的ntfy命令行工具不同,后者更加通用。
-
获取帮助
$ py-ntfy --help
Usage: py-ntfy [OPTIONS] COMMAND [ARGS]...

╭─ Options ────────────────────────────────────────────────────────────────────────────────╮
│ --install-completion          Install completion for the current shell.                  │
│ --show-completion             Show completion for the current shell, to copy it or       │
│                               customize the installation.                                │
│ --help                        Show this message and exit.                                │
╰──────────────────────────────────────────────────────────────────────────────────────────╯
╭─ Commands ───────────────────────────────────────────────────────────────────────────────╮
│ add        [command sub-group] Add a new notification target or a default notification   │
│            value. Run `$ py-ntfy add --help` for more info.                              │
│ clean      Removes the configuration file. Use --conf-path to specify a path to the      │
│            configuration file. Use --force to skip the confirmation prompt.              │
│ init       Initializes the configuration file. It should NOT be tracked by version       │
│            control in order to protect the topic ID. Use --conf-path to specify a path   │
│            to the configuration file. Use --force to overwrite an existing configuration │
│            file.                                                                         │
│ new-topic  Generates a random topic name and saves it to the config file if you use the  │
│            --save option.                                                                │
│ remove     [command sub-group] Remove a notification target or a default notification    │
│            value. Run `$ py-ntfy remove --help` for more info.                           │
│ send       Sends a notification to the given emails and topics. Optional command-line    │
│            arguments can be passed to override the defaults in the config file and       │
│            customize the message options. Refer to https://ntfy.sh/docs/publish to       │
│            understand the options. Run `py-ntfy send --help` to see the available        │
│            options.                                                                      │
╰──────────────────────────────────────────────────────────────────────────────────────────╯

$ py-ntfy add --help
(similar output)

$ py-ntfy add default --help
(similar output)

$ py-ntfy remove --help
(similar output)
-
初始化配置文件
$ py-ntfy init
🔑 Your first topic is `aloe-corset-stream-alto`. Use it to subscribe to notifications!
🎉 Config file created at /path/to/repo/.ntfy.conf
-
添加主题或电子邮件
$ py-ntfy add topic some-secret-string-for-your-topic
🎉 Topic `some-secret-string-for-your-topic` added to /path/to/repo/.ntfy.conf

$ py-ntfy add email you@foo.bar
🎉 Email you@foo.bar added to /Users/.../vict0rsch/ntfy-wrapper/.ntfy.conf
-
添加
.notify(...)调用的默认值$ py-ntfy add default key value 🎉 Default key=value added to /Users/.../vict0rsch/ntfy-wrapper/.ntfy.conf
-
通过简单地用
remove替换add来删除项目$ py-ntfy remove default key 🎉 Default key=value removed from /Users/.../vict0rsch/ntfy-wrapper/.ntfy.conf $ py-ntfy remove email hello@you.com Email hello@you.com does not exist. Ignoring.
-
使用
new-topic创建一个新的主题,并使用--save将其添加到您的配置中$ py-ntfy new-topic --save 🎉 Topic nutty-tiling-clear-parlor added to /Users/.../vict0rsch/ntfy-wrapper/.ntfy.conf
-
使用
send从命令行发送通知$ py-ntfy send "hello" --topics frays-errant-acting-huddle --title "This is Victor" --click "https://9gag.com" 🎉 Notification sent to frays-errant-acting-huddle, you@foo.bar
-
使用选项
--conf-path更改任何命令的默认配置路径- 指定一个目录
--conf-path path/to/conf/directory,并将创建.ntfy.conf文件到该目录 - 指定一个文件
--conf-path path/to/file.conf,该文件将被用作配置文件
- 指定一个目录
待办事项
- 更好的README和文档
- 命令行界面
- 屏幕截图
-
requests超时或非阻塞
[^1]: cf xkcd936


下载文件
下载适合您平台的应用程序。如果您不确定选择哪个,请了解有关安装包的更多信息。


