用于连接Drosophila的GUI和3D姿态估计管道。

项目描述
无标记的多视图运动捕捉技术用于连接Drosophila。


DeepFly3D是2D-3D连接Drosophila姿态估计的PyTorch和PyQT5实现。它的目标是提供一个姿态估计的接口,并允许进一步纠正自动转换为3D姿态的2D姿态估计。
DeepFly3D不需要校准图案,它使用图结构强制实施几何约束,这纠正了大部分错误,剩余的错误可以自动检测并通过GUI手动处理。
我们之前在eLife期刊上发布了我们的DeepFly3D工作。您可以在这里阅读出版物。
目录
安装
使用pip安装
创建一个新的Anaconda环境,并使用pip安装nely-df3d软件包。
conda create -n df3d python=3.6
conda activate df3d
pip install nely-df3d
奇特的CUDA驱动器
仅当您的CUDA驱动程序不是最新版本,或者不被主流PyTorch支持时,您可能需要在使用pip安装nely-df3d之前显式安装cudatoolkit
conda install pytorch torchvision torchaudio cudatoolkit="YOUR_CUDA_VERSION" -c pytorch
例如,对于RTX 3080 Ti GPU,您需要进行以下操作
conda create -n df3d python=3.6
conda activate df3d
conda install pytorch torchvision cudatoolkit=11 -c pytorch-nightly
pip install nely-df3d
从源安装
DeepFly3D需要Python3、Anaconda环境和CUDA驱动程序进行安装。它仅在Ubuntu和MacOS上进行了测试。首先,克隆存储库
git clone https://github.com/NeLy-EPFL/DeepFly3D
cd DeepFly3D
然后,使用以下命令创建conda环境
conda create -n df3d python=3.6
这将创建一个新的Python环境。然后,激活该环境。
conda activate df3d
完成此操作后,您可以使用以下命令安装df3d软件包
pip install -e .
该命令使用setup.py函数创建软件包。
请确保已安装与您的GPU兼容的CUDA驱动程序,否则无法进行2D预测。您可以在以下链接中检查如何安装CUDA驱动程序:https://developer.nvidia.com/cuda-downloads
数据结构
DeepFly3D的预期使用方式是通过命令行界面(CLI)。df3d-cli假定在当前文件夹下有视频或图像。如果您的路径/your/image/path包含图像或视频,df3d-cli将运行2D姿态估计、校准和三角测量,并将2D姿态、3D姿态和校准参数保存到/your/image/path/df3d文件夹下。
理想情况下,您应该在images/文件夹下有图像或视频,并遵循特定的命名约定
.
+-- images/
|   +-- camera_0_img_0.jpg
|   +-- camera_1_img_0.jpg
|   +-- camera_2_img_0.jpg
|   +-- camera_3_img_0.jpg
|   +-- camera_4_img_0.jpg
|   +-- camera_5_img_0.jpg
|   +-- camera_6_img_0.jpg
...
或者
.
+-- images
|   +-- camera_0.mp4
|   +-- camera_1.mp4
|   +-- camera_2.mp4
|   +-- camera_3.mp4
|   +-- camera_4.mp4
|   +-- camera_5.mp4
|   +-- camera_6.mp4
对于mp4文件,df3d将首先使用ffmpeg将其扩展为图像。请检查示例数据以获取真实示例:https://github.com/NeLy-EPFL/DeepFly3D/tree/master/sample/test
基本用法
基本用法如下。
df3d-cli /your/image/path \
         --order 0 1 2 3 4 5 6
相机顺序表示相机选择。默认相机顺序(0 1 2 3 4 5 6)代表此顺序。如果您有其他顺序,则需要说明哪个顺序。
最初。

然后,如果您有以下顺序,那么您的顺序应该是6 5 4 3 2 1 0。
因此,例如,如果您的数据看起来像这样,那么您的顺序应该是6 5 4 3 2 1 0。
高级用法
usage: df3d-cli [-h] [-v] [-vv] [-d] [--output-folder OUTPUT_FOLDER] [-r] [-f]
                [-o] [-n NUM_IMAGES_MAX]
                [-order [CAMERA_IDS [CAMERA_IDS ...]]] [--video-2d]
                [--video-3d] [--skip-pose-estimation]
                INPUT

DeepFly3D pose estimation

positional arguments:
  INPUT                 Without additional arguments, a folder containing
                        unlabeled images.

optional arguments:
  -h, --help            show this help message and exit
  -v, --verbose         Enable info output (such as progress bars)
  -vv, --verbose2       Enable debug output
  -d, --debug           Displays the argument list for debugging purposes
  --output-folder OUTPUT_FOLDER
                        The name of subfolder where to write results
  -r, --recursive       INPUT is a folder. Successively use its subfolders
                        named 'images/'
  -f, --from-file       INPUT is a text-file, where each line names a folder.
                        Successively use the listed folders.
  -o, --overwrite       Rerun pose estimation and overwrite existing pose
                        results
  -n NUM_IMAGES_MAX, --num-images-max NUM_IMAGES_MAX
                        Maximal number of images to process.
  -order [CAMERA_IDS [CAMERA_IDS ...]], --camera-ids [CAMERA_IDS [CAMERA_IDS ...]]
                        Ordering of the cameras provided as an ordered list of
                        ids. Example: 0 1 4 3 2 5 6.
  --video-2d            Generate pose2d videos
  --video-3d            Generate pose3d videos
  --skip-pose-estimation
                        Skip 2D and 3D pose estimation
因此,您可以在df3d-cli中创建高级查询,例如
df3d-cli -f /path/to/text.txt    \  # process each line from the text file
         -r                      \  # recursively search for images folder under each line of the text line
         --order 0 1 2 3 4 5 6   \  # set the camera order
         -n 100                  \  # process only the first 100 images
         --output-folder results \  # write results under  /your/image/path/results instead of  /your/image/path/df3d
         --vv                    \  # will print agressivelly, for debugging purposes
         --skip-pose-estimation  \  # will not run 2d pose estimation, instead will do calibration, triangulation and will save results
         --video-2d              \  # will make 2d video for each folder
         --video-3d              \  # will make 3d video for each folder
要测试df3d-cli,您可以在仅包含100张图像的文件夹上运行它,制作视频,并积极打印以进行调试
df3d-cli /path/to/images/ -n 100 -vv -order 0 1 2 3 4 5 6
Python接口
可选地,您也可以直接在Python中使用df3d。
from df3d.core import Core
from df3d import video

core = Core(input_folder='../sample/test/', num_images_max=100, output_subfolder='df3d_py', camera_ordering=[0,1,2,3,4,5,6])
core.pose2d_estimation()
core.calibrate_calc(min_img_id=0, max_img_id=100)

# save df3d_resultt  file under '../sample/test/df3d_py'
core.save()

# make videos
video.make_pose2d_video(
    core.plot_2d, core.num_images, core.input_folder, core.output_folder
)
video.make_pose3d_video(
    core.get_points3d(),
    core.plot_2d,
    core.num_images,
    core.input_folder,
    core.output_folder,
)
通常,以下功能可用于核心模块
class Core:
    def __init__(self, input_folder, num_images_max):  # 9 lines
	def setup_cameras(self):  # 38 lines

    # attribute access
    @property def input_folder(self):  # 2 lines
    @property def output_folder(self):  # 2 lines
    @property def image_shape(self):  # 2 lines
    @property def number_of_joints(self):  # 3 lines
    def has_pose(self):  # 1 lines
    def has_heatmap(self):  # 1 lines
    def has_calibration(self):  # 4 lines

    # interactions with pose-estimation
    def update_camera_ordering(self, cidread2cid):  # 12 lines
    def pose2d_estimation(self):  # 14 lines
    def next_error(self, img_id):  # 1 lines
    def prev_error(self, img_id):  # 1 lines
    def calibrate_calc(self, min_img_id, max_img_id):  # 35 lines
    def nearest_joint(self, cam_id, img_id, x, y):  # 10 lines
    def move_joint(self, cam_id, img_id, joint_id, x, y):  # 10 lines

    def save_calibration(self):  # 3 lines
    def save_pose(self):  # 63 lines
    def save_corrections(self):  # 1 line

    # visualizations
    def plot_2d(self, cam_id, img_id, with_corrections=False, joints=[]):  # 33 lines
    def plot_heatmap(self, cam_id, img_id, joints=[]):  # 5 lines
    def get_image(self, cam_id, img_id):  # 4 lines

    # private helper methods
    def next_error_in_range(self, range_of_ids):  # 6 lines
    def get_joint_reprojection_error(self, img_id, joint_id, camNet):  # 11 lines
    def joint_has_error(self, img_id, joint_id):  # 4 lines
    def solve_bp_for_camnet(self, img_id, camNet):  # 29 lines
视频
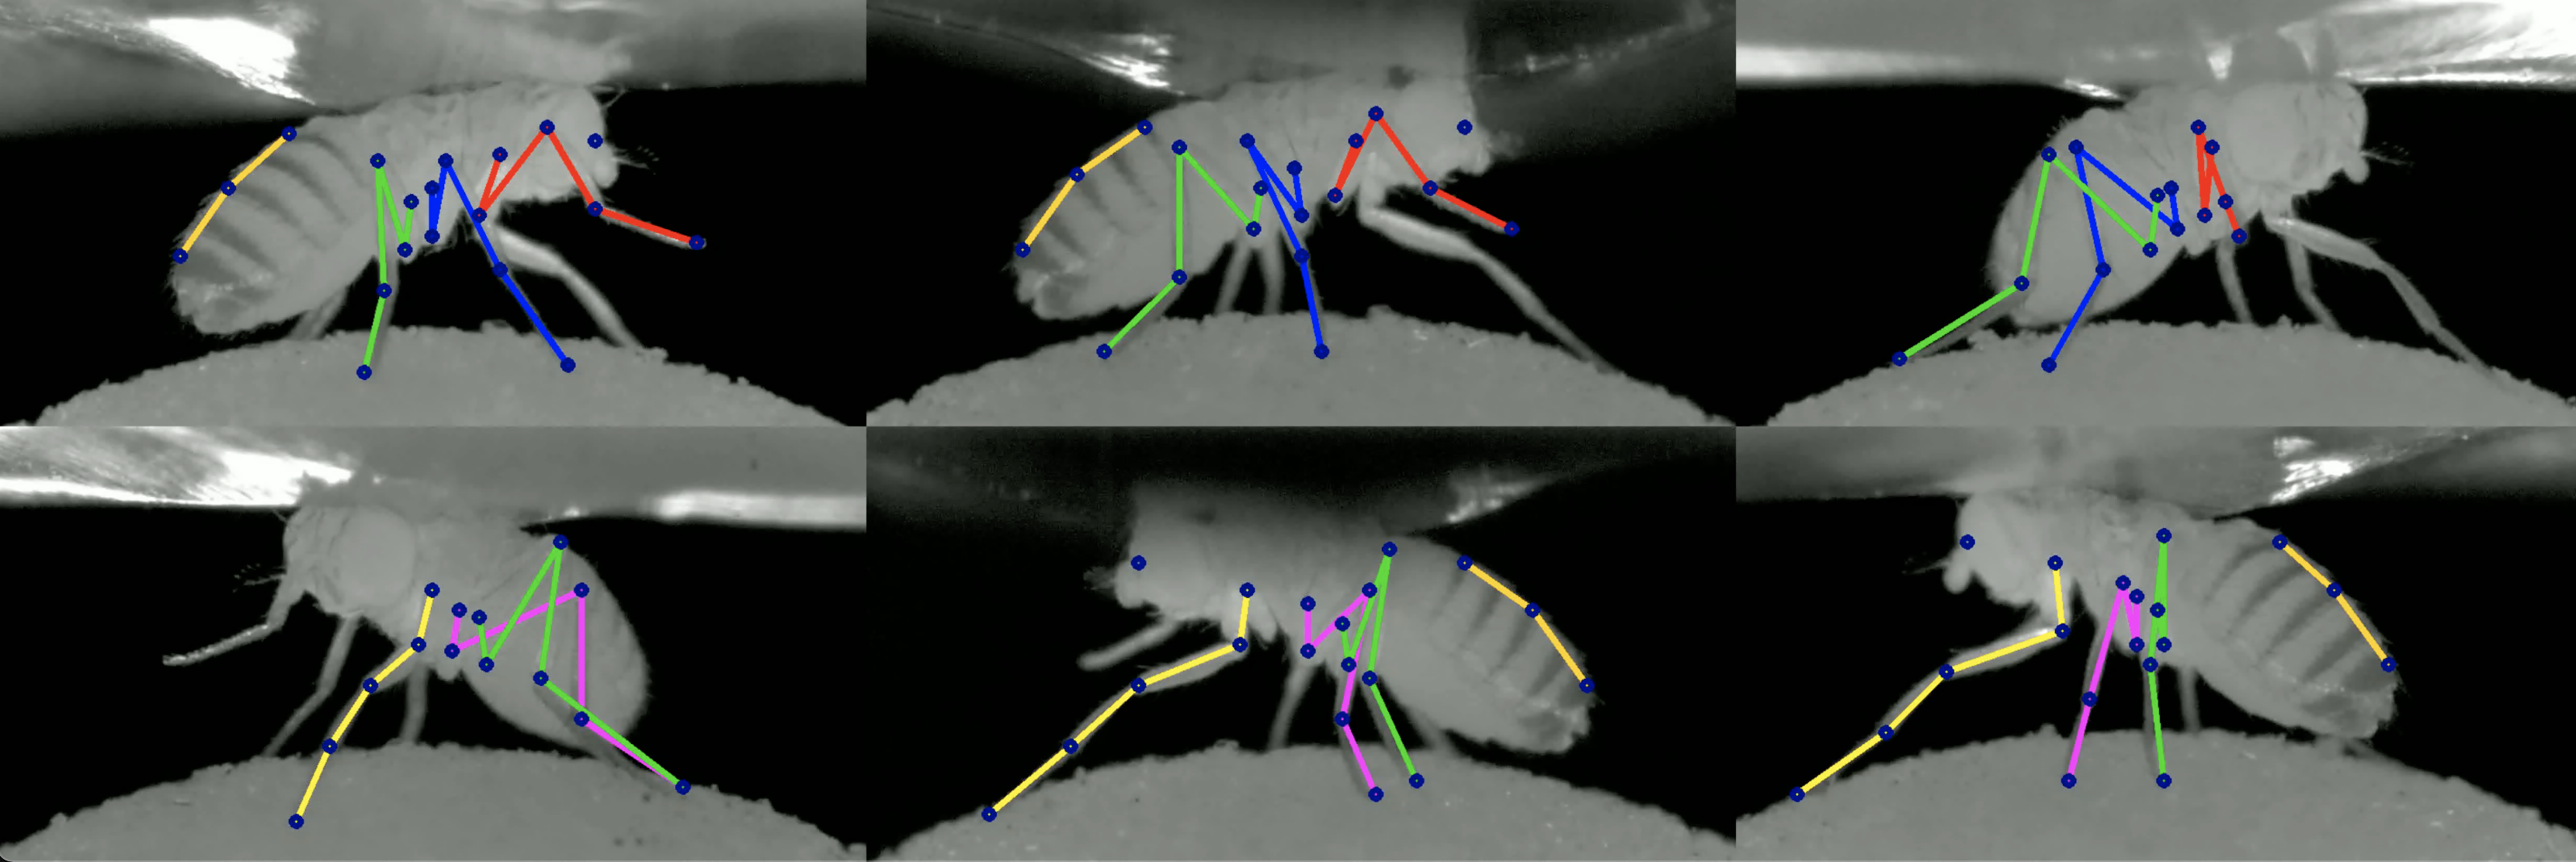
使用df3d-cli的--video-2d标志将创建以下视频:

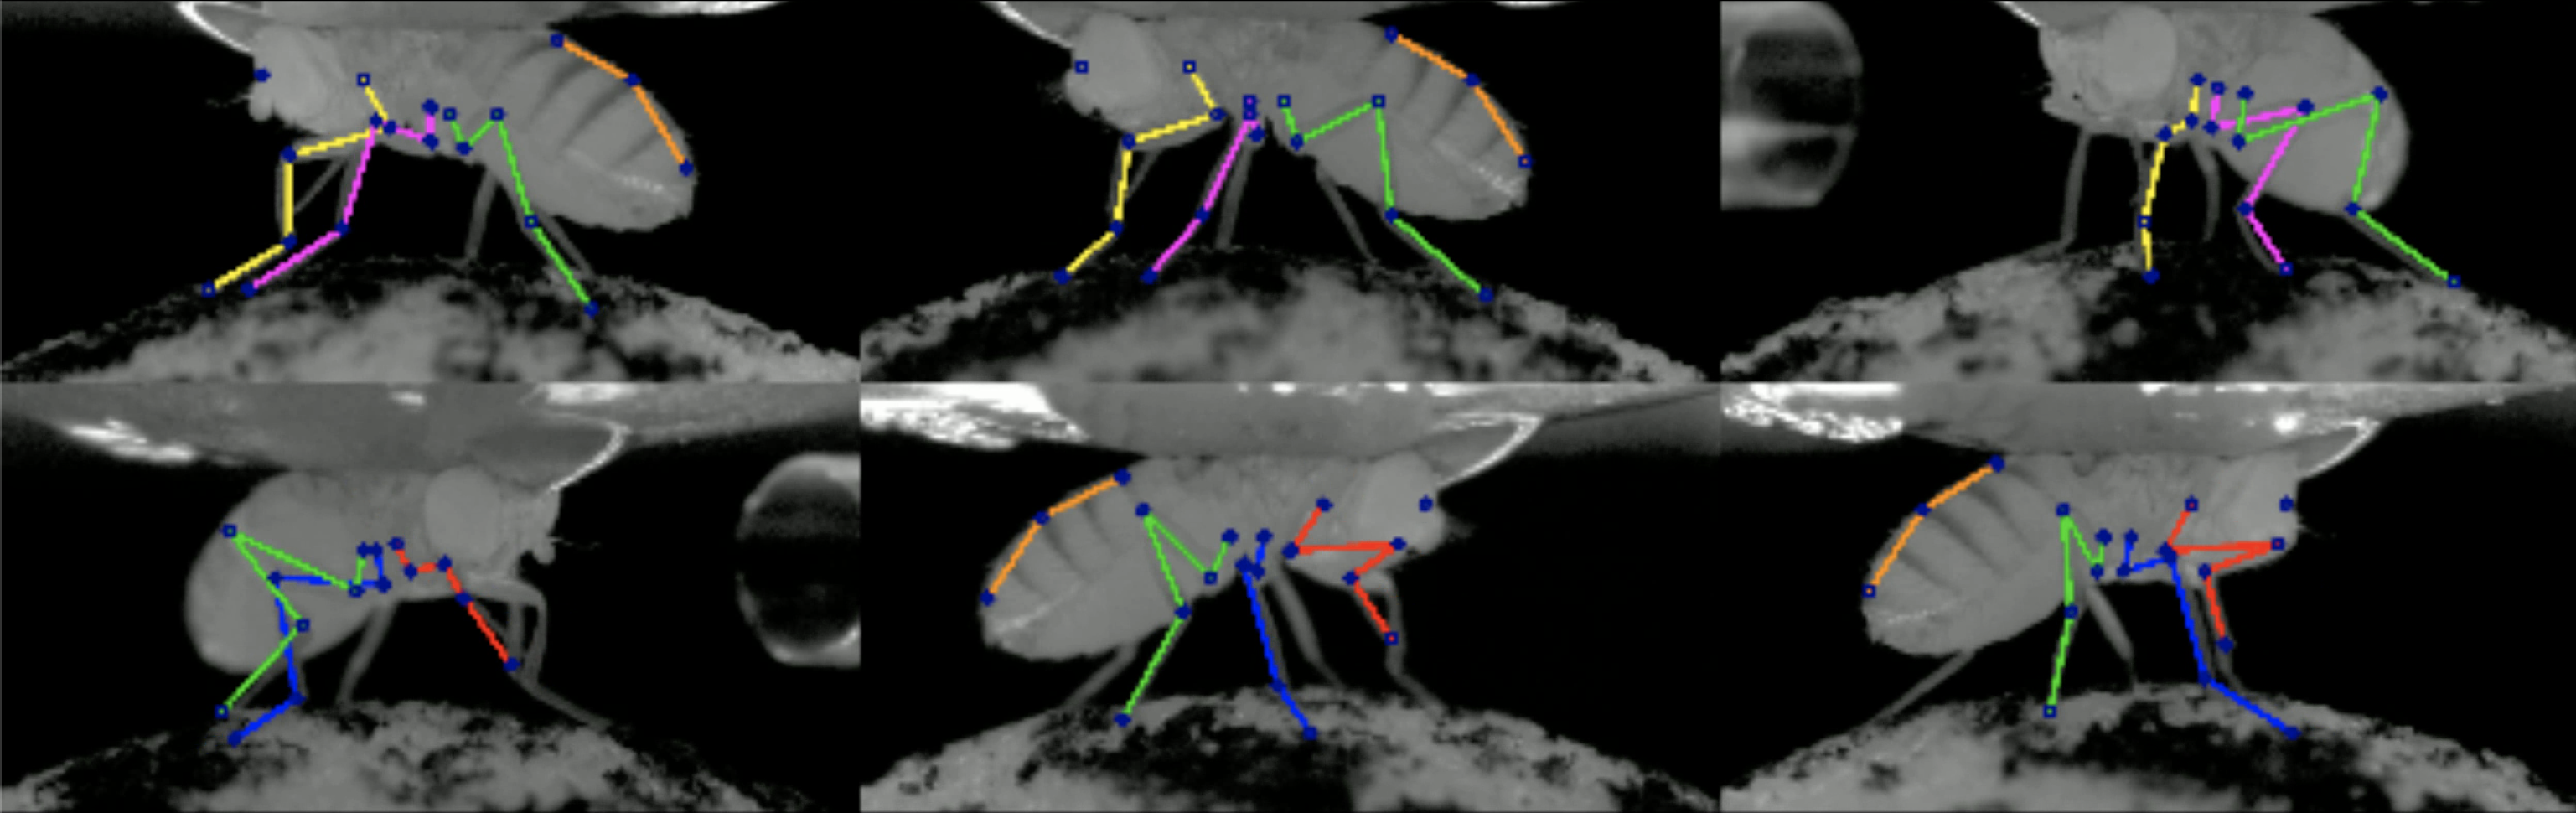
使用df3d-cli的--video-3d标志将创建以下视频:

输出
df3d-cli将结果保存到df3d_result.pk文件中。您可以使用以下方式读取它:
result_path = '../sample/test/df3d/df3d_result*.pkl'
d = pickle.load(open(glob.glob(pr_path)[0], 'rb'))
这将读取具有以下键的字典
d.keys()
>>> dict_keys([0, 1, 2, 3, 4, 5, 6, 'points3d', 'points2d', 'points3d_wo_procrustes', 'camera_ordering', 'heatmap_confidence'])
Points2D
检测到的2D关键点存储在d['points2d']中,它是一个四维张量。
d['points2d'].shape
>>> (7, 15, 38, 2) # [CAMERAS, TIMES, JOINTS, 2D]
您可以使用以下方式从特定时间从特定相机读取相应的2D点:
row, column = d['points2d'][CAMERA, TIME, JOINT]
点以(行,列)格式表示。
您还可以可视化结果中的哪些关键点属于动物上的哪些关键点
import matplotlib.pyplot as plt

image_path = '../sample/test/camera_{cam_id}_img_{img_id}.jpg'
pr_path = '../sample/test/df3d/df3d_result*.pkl'

cam_id, time = 0, 0

plt.imshow(plt.imread(image_path.format(cam_id=0,img_id=0)))
plt.axis('off')
for joint_id in range(19):
    x, y = d['points2d'][cam_id, time][joint_id, 1] * 960, d['points2d'][cam_id, time][joint_id, 0] * 480
    plt.scatter(x, y, c='blue', s=5)
    plt.text(x, y, f'{i}', c='red')


Points3D
您可以根据2D点和校准参数重新计算3D点
from pyba.CameraNetwork import CameraNetwork
import pickle
import glob

image_path = './sample/test/camera_{cam_id}_img_{img_id}.jpg'
pr_path = './sample/test/df3d/df3d_result*.pkl'

d = pickle.load(open(glob.glob(pr_path)[0], 'rb'))
points2d = d['points2d']

# df3d points2d are saved in normalized into [0,1], rescale them into image shape
camNet = CameraNetwork(points2d=points2d*[480, 960], calib=d, image_path=image_path)

points3d = camNet.triangulate()
相机0对应于原点。它的相机中心(不是平移向量)对应于0点。

相机排序
与通过CLI中的--order标志提供的输入相同的相机顺序。
d["camera_ordering"]
>>> array([0, 1, 2, 3, 4, 5, 6])
热图置信度
堆叠的hourglass置信值用于预测每个关节。给定一个未归一化的后验分布热图H,我们取argmax_{h, w} H作为最终预测,H[h, w]作为置信水平。

校准
df3d_result文件还包含每个相机的计算校准参数。每个校准部分包括
- 旋转矩阵R
- 平移向量tvec,
- 内禀矩阵intr,
- 畸变参数distort。
calib = {0: {'R': array([[ 0.90885957,  0.006461  , -0.41705219],
         [ 0.01010426,  0.99924554,  0.03750006],
         [ 0.41697983, -0.0382963 ,  0.90810859]]),
  'tvec': array([1.65191596e+00, 2.22582670e-02, 1.18353733e+02]),
  'intr': array([[1.60410e+04, 0.00000e+00, 2.40000e+02],
         [0.00000e+00, 1.59717e+04, 4.80000e+02],
         [0.00000e+00, 0.00000e+00, 1.00000e+00]]),
  'distort': array([0., 0., 0., 0., 0.])},
 1: {'R': array([[ 0.59137248,  0.02689833, -0.80594979],
         [-0.00894927,  0.9996009 ,  0.02679478],
         [ 0.80634887, -0.00863303,  0.59137718]]),
  'tvec': array([ 1.02706542e+00, -9.25820468e-02,  1.18251732e+02]),
  'intr': array([[1.60410e+04, 0.00000e+00, 2.40000e+02],
         [0.00000e+00, 1.59717e+04, 4.80000e+02],
         [0.00000e+00, 0.00000e+00, 1.00000e+00]]),
  'distort': array([0., 0., 0., 0., 0.])},
}
坐标系与OpenCV兼容,其中z轴对应于离开相机的轴。
运行GUI
GUI主要用于在“校正”模式下纠正错误的2D姿态估计结果。您的更改将被保存在df3d文件夹中,并用于最终的df3d_result文件。
目前,您只能在同一文件夹中在cli上运行df3d之后使用GUI。
在安装依赖项后,我们可以使用命令行入口点初始化GUI。

df3d ./data/test/ 15
第二个参数设置图像文件夹,第三个参数设置图像的上限,如果您只想处理图像子集。
这应该会启动GUI。

您可以可选地删除/FULL/PATH_FOLDER和NUM_IMAGES,在这种情况下,将弹出应用程序选择文件夹。

在cli中完成姿态估计后,您可以打开姿态模式。

开发
DeepFly3D由3个pip包组成
- DeepFly3D: https://pypi.ac.cn/project/df3d/
- PyBundleAdjustment: https://pypi.ac.cn/project/pyba/
- Drosophila2D Pose: https://pypi.ac.cn/project/df2d/
DeepFly3D包的主分支与pip包的最后一个版本保持更新。开发是在dev分支下进行的。在将更改推送到主分支之前,请确保所有测试用例都通过。您可以使用python test.py运行测试。单元测试确保可以通过cli处理多个场景而不会失败。
参考文献
如果您觉得我们的论文有用,您可以引用我们的论文。
@inproceedings{Gunel19DeepFly3D,
  author    = {Semih G{\"u}nel and
               Helge Rhodin and
               Daniel Morales and
               João Compagnolo and
               Pavan Ramdya and
               Pascal Fua},
  title     = {DeepFly3D, a deep learning-based approach for 3D limb and appendage tracking in tethered, adult Drosophila},
  bookTitle = {eLife},
  doi       = {10.7554/eLife.48571},
  year      = {2019}
}
版本历史
0.5版本中的更改
- 主要的内部重写。
0.4版本中的更改
- 使用CLI,可以使用
--output-folder标志更改输出文件夹。 - CLI和GUI现在使用相同的姿态估计代码,因此更改将自动传播到两者。
- GUI布局进行了轻微调整,功能保持不变。
0.3版本中的更改
- 结果保存到df3d文件夹,而不是图像文件夹。
- 启动时间更快。
- 使用正则表达式自动对相机进行排序。
- CLI改进。现在包括3D姿态。
0.2版本中的更改
- 将名称从deepfly3d更改为df3d
- 添加cli接口df3d-cli
- 删除numpy和scipy的特定依赖项
- 删除L/R按钮,这样您就可以一次性看到所有数据
- 删除前摄像头
- 启动时间更快,搜索图像文件夹的时间更少
- 更好的绘图笔记本
- 添加procrustes支持。现在所有输出都注册到模板骨骼。
- CameraNetwork中的错误修复。现在可以使用任意相机序列进行校准。
额外内容
- 如果您对在线注释工具感兴趣: DeepFly3DAnnotation
- 查看论文中使用的数据集:Dataverse


下载文件
下载您平台的文件。如果您不确定选择哪个,请了解更多关于安装包的信息。