创建语言服务器的库
项目描述
lsp-tree-sitter
支持语言服务器的核心库。
我编写了许多语言服务器,它们共享一些相同的代码,所以我将共享的代码提取到这个库中。
我在编辑器中编写了许多没有LSP支持(自动完成、悬停等)的DSL,我已经受够了。所以我决定牺牲我的时间来做这项工作。
语言服务器
- termux-language-server:用于一些特定的bash脚本
- mutt-language-server:用于(neo)mutt's (neo)muttrc
- 更多
使用方法
模式
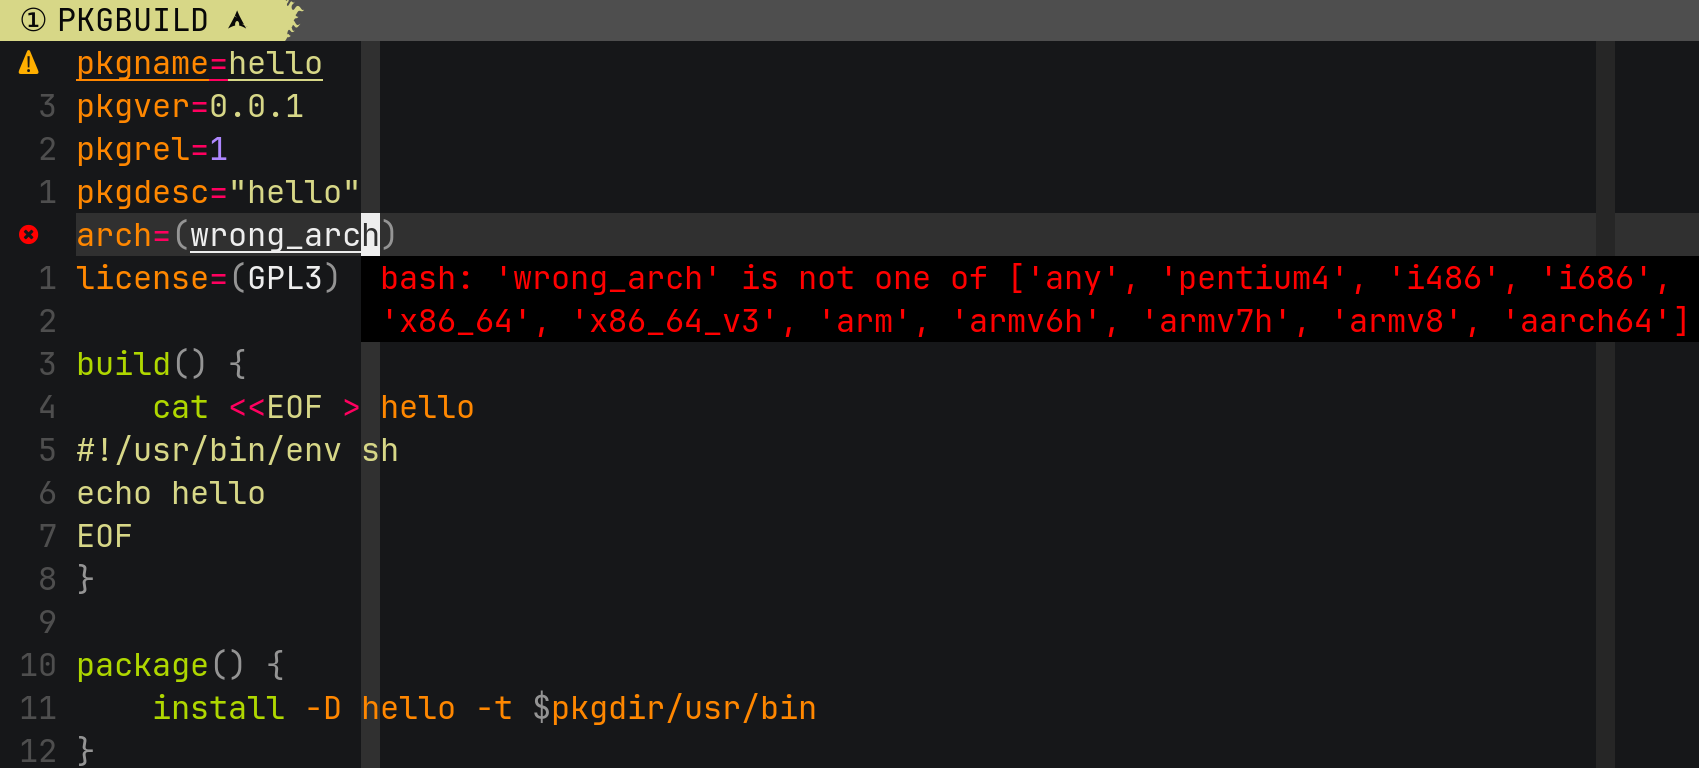
将文件转换为json的Trie,然后你可以使用json模式来验证它以获取诊断。
PKGBUILD:
pkgname=hello
pkgver=0.0.1
pkgrel=1
pkgdesc="hello"
arch=(wrong_arch)
license=(GPL3)

build() {
    cat <<EOF > hello
#!/usr/bin/env sh
echo hello
EOF
}

package() {
    install -D hello -t $pkgdir/usr/bin
}
termux-language-server --convert PKGBUILD
{
  "pkgname": "hello",
  "pkgver": "0.0.1",
  "pkgrel": "1",
  "pkgdesc": "hello",
  "arch": [
    "wrong_arch"
  ],
  "license": [
    "GPL3"
  ],
  "build": 0,
  "package": 0
}
因此,我们可以通过一个json模式来验证json。
$ termux-language-server --check PKGBUILD
PKGBUILD:5:7-5:17:error: 'wrong_arch' is not one of ['any', 'pentium4', 'i486', 'i686', 'x86_64', 'x86_64_v3', 'arm', 'armv6h', 'armv7h', 'armv8', 'aarch64']
有时可能会更复杂
neomuttrc:
set allow_ansi=yes sleep_time = no ispell = aspell
set query_command = 'mutt_ldap_query.pl %s'
mutt-language-server --convert neomuttrc
{
  "set": {
    "allow_ansi": "yes",
    "sleep_time": "no",
    "ispell": "aspell",
    "query_command": "mutt_ldap_query.pl %s"
  }
}
$ mutt-language-server --check neomuttrc
neomuttrc:1:33-1:35:error: 'no' is not of type 'number'
我们将结果存入json的.set而不是.,仅仅是为了保留其他键供其他用途。
查找器
一些查找器用于在tree-sitter的AST中找到所需的节点。例如,如果您想获取光标下的节点
@self.feature(TEXT_DOCUMENT_COMPLETION)
def completions(params: CompletionParams) -> CompletionList:
    document = self.workspace.get_document(params.text_document.uri)
    uni = PositionFinder(params.position, right_equal=True).find(
        document.uri, self.trees[document.uri]
    )
    # ...
UNI(通用节点标识符)是URI + 节点。
工具函数
这个库还提供了许多工具函数。例如,将手册页转换为markdown并对其进行标记化,以便生成json模式。
mutt-language-server --generate-schema neomuttrc
{
  "$id": "https://github.com/neomutt/mutt-language-server/blob/main/src/termux_language_server/assets/json/neomuttrc.json",
  "$schema": "https://schema.json.js.cn/draft-07/schema#",
  "$comment": "Don't edit this file directly! It is generated by `mutt-language-server --generate-schema=neomuttrc`.",
  "type": "object",
  "properties": {
    "account-hook": {
      "description": "```neomuttrc\naccount-hook regex command\n```\nThis hook is executed whenever you access a remote mailbox. Useful to adjust configuration settings to different IMAP or POP servers."
    },
    "$comment": "..."
  }
}
模板
本项目为copier提供了一个模板。
例如,您想为名为zathurarc的文件类型创建一个语言服务器。请按照以下步骤操作
创建tree-sitter解析器
- 从模板创建tree-sitter-parser。
- 发布到PYPI
您可以在py-tree-sitter-languages中查看是否支持您想要创建语言服务器的语言。
复制模板
$ copier copy -rHEAD gh:neomutt/lsp-tree-sitter /path/to/your/XXX-language-server
🎤 What is your language name?
zathurarc
🎤 What is your file patterns? split by " "
*.zathurarc zathurarc
🎤 What is your project name?
zathura-language-server
🎤 What is your Python module name?
zathura_language_server
🎤 What is your Python class name?
ZathuraLanguageServer
🎤 What is your tree-sitter parser name?
tree-sitter-zathurarc
🎤 What is your user name?
wzy
🎤 What is your email?
32936898+Freed-Wu@users.noreply.github.com
Copying from template version None
create .
...
$ cd /path/to/your/XXX-language-server
$ tree .
.
├── docs # documents
│ ├── api
│ │ └── zathura-language-server.md
│ ├── conf.py
│ ├── index.md
│ ├── requirements.txt
│ └── resources
│ ├── configure.md
│ ├── install.md
│ └── requirements.md
├── LICENSE
├── pyproject.toml
├── README.md
├── requirements # optional dependencies
│ ├── colorize.txt
│ ├── dev.txt
│ └── misc.txt
├── requirements.txt
├── src
│ └── zathura_language_server
│ ├── __init__.py
│ ├── __main__.py
│ ├── _shtab.py
│ ├── assets
│ │ ├── json # json schemas generated by misc/XXX.py
│ │ │ └── zathurarc.json
│ │ └── queries # tree-sitter queries
│ │ └── import.scm
│ ├── finders.py # project specific finders
│ ├── misc
│ │ ├── __init__.py
│ │ └── zathurarc.py
│ ├── py.typed
│ ├── schema.py # project specific schemas
│ ├── server.py # main file for server
│ └── utils.py
├── templates
│ ├── class.txt
│ ├── def.txt
│ ├── metainfo.py.j2
│ └── noarg.txt
└── tests
└── test_utils.py
- 编辑
schema.py,将tree-sitter的树转换为json,这是XXX-langauge-server --convert的核心功能 - 编辑
misc/XXX.py生成json模式,这是XXX-languageserver --generate-schema的核心功能 - 编辑
server.py确保LSP功能可以为特定的tree-sitter解析器工作。 - 编辑
queries/XXX.scm确保如果您使用它们,LSP功能可以为特定的tree-sitter解析器工作。 - 编辑
finders.py为XXX-languageserver --check和XXX-languageserver --format添加语言特定的查找器
测试是否可以工作
$ git init
$ pip install -e .
$ which zathura-language-server
~/.local/bin/zathura-language-server
- 参考
docs/resources/configure.md配置您的语言服务器以供您的编辑器使用。 - 参考
README.md查看您的语言服务器提供的LSP功能。
vi /path/to/zathurarc
您可以测试LSP功能。
参考https://docs.readthedocs.io了解如何发布文档。
参考文献
以下语言服务器可以作为初学者的良好示例
zathura-language-server
zathurarc的语法只有4个指令
设置选项值包含/路径映射键函数取消映射键
如此少的指令使得创建tree-sitter-zathurarc和编辑schema.py变得非常容易。因此,我强烈建议从这里开始。
tmux-language-server
tmux.conf比zathurarc更复杂。它不仅包含set option = value和source /the/path,还有170多个其他指令。
mutt-language-server
muttrc或neomuttrc有如下指令
设置选项值从/路径源- 80多个其他指令
然而,其set语法非常灵活。以下语法是合法的
设置选项2 = 值1 选项2 = 值2 ...设置选项:set option = yes的快捷方式设置无选项:set option = no的快捷方式设置反选项设置无选项1 反选项2 选项3 ...- ...
所以,我认为实际上它比tmux.conf更难。
termux-language-server
build.sh、PKGBUILD、*.ebuild使用与bash相同的语法。但是,它们使用不同的json模式。如果您想要创建语言服务器的语言,可以参考它了解如何处理这种情况。
其他参考文献
一些对想要开发语言服务器的初学者有用的URL
- 一些关于如何编写这些语言服务器的中文博客
- tree-sitter
- 语言服务器协议
- json模式
项目详情
下载文件
下载适用于您平台的文件。如果您不确定该选择哪一个,请了解更多关于 安装包 的信息。
源代码发行版
构建发行版
lsp_tree_sitter-0.0.16.tar.gz 的哈希值
| 算法 | 哈希摘要 | |
|---|---|---|
| SHA256 | 6e11d66629ed31b4c829ee87a6669468a6a952b9e84b56e5898234e6a599cf62 |
|
| MD5 | 9fc2e27d1066e9bfc03d11db99692bb0 |
|
| BLAKE2b-256 | 59f2d5c9001f09dbfb21bc28287b377ad0d02f7e8800666001fb761b37976ca4 |
lsp_tree_sitter-0.0.16-py3-none-any.whl 的哈希值
| 算法 | 哈希摘要 | |
|---|---|---|
| SHA256 | 45724b45b786cabf2d17ee8135fa6caacb9a5631f5c41d51980229cfa589fcf6 |
|
| MD5 | 59cc60764f710cee047bd81527eb18ba |
|
| BLAKE2b-256 | 63376fcb1683dc3d8d99846211458e79a4cd772f2e43205d8262efdbdc6a8335 |


