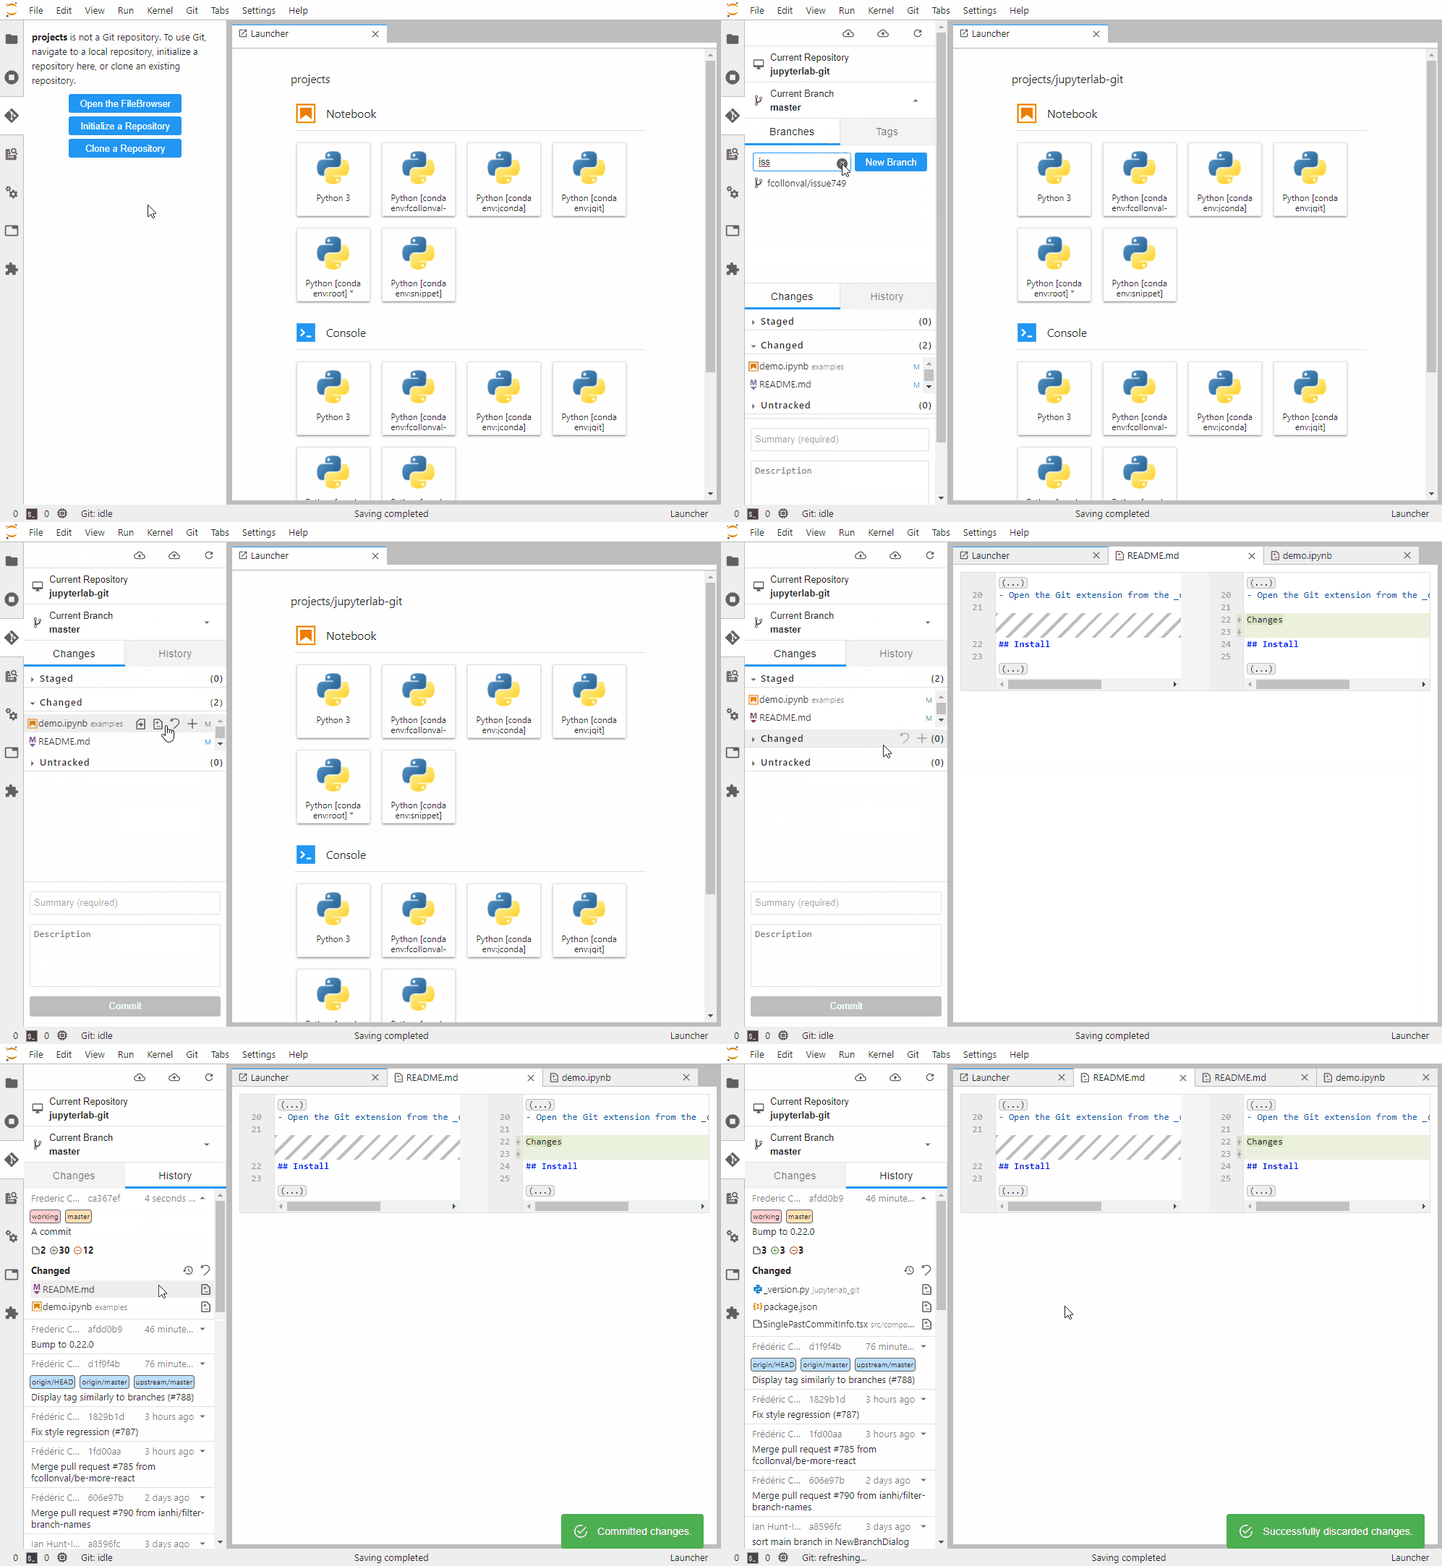
使用Git进行版本控制的JupyterLab扩展
项目描述
jupyterlab-git
一个使用Git进行版本控制的JupyterLab扩展
要查看扩展的示例,请打开包含在Binder中的示例笔记本demo。
需求
- JupyterLab >= 4.0 ([较旧版本] 可供2.x和3.x使用)
- Git (版本 >=2.x)
对于较旧的JupyterLab版本,请访问
用法
- 从左侧面板上的“Git”标签打开Git扩展
- 设置认证
安装
要安装,请按照以下步骤操作,使用 pip
pip install --upgrade jupyterlab jupyterlab-git
或使用 conda
conda install -c conda-forge jupyterlab jupyterlab-git
卸载
要删除扩展,执行
pip uninstall jupyterlab_git
或使用 conda
conda remove jupyterlab-git
设置
远程仓库主机的认证
如果您在运行JupyterLab服务器的控制台上看到类似于 [E yyyy-mm-dd hh:mm:ss ServerApp] 500 POST /git/<clone|push|pull|status> 的错误,您可能需要为您的本地Git仓库设置凭据存储。
此扩展尝试处理HTTP(S)连接的凭据(如果您尚未设置凭据管理器)。但不是SSH连接。
对于Windows用户,建议安装 git for windows。它将自动设置凭据管理器。为了连接到远程主机,建议使用SSH。
HTTP(S)协议
该扩展可以暂时缓存凭据(默认为1小时)。要使用缓存,您需要在请求凭据的对话框中检查“暂时保存我的登录信息”选项。
您可以设置更长的缓存超时时间;请参阅服务器设置。
这是自v0.37.0版本以来的新功能
SSH协议
以下是为设置SSH身份验证要遵循的步骤(跳过您项目中已完成的任何步骤)
- 创建一个SSH密钥
- 将其公钥部分注册到您的Git服务器上
- 可选地,如果您管理着由ssh代理管理的多个密钥:请参阅为ssh-agent创建一个配置文件
- 告诉您的本地Git仓库通过ssh连接到远程仓库
现在您应该可以使用扩展面板顶部的相应按钮将提交更改从远程仓库拉取和推送
UI设置
安装后,可以通过以下设置修改扩展行为,这些设置可以在JupyterLab的高级设置编辑器中设置
- blockWhileCommandExecutes:在Git命令(如
commit、pull、reset、revert)执行完毕之前挂起JupyterLab用户交互。将此设置为true有助于减轻可能导致数据丢失、冲突和Git历史记录损坏的潜在竞争条件。除非网络速度较慢,否则UI挂起不应干扰标准工作流程。将此设置为false允许触发多个并发Git操作。 - cancelPullMergeConflict:如果存在合并冲突,取消从远程仓库拉取更改。如果设置为
true,在检索和集成远程仓库的更改时,冲突的合并会被取消,工作树保持不变。 - commitAndPush:是否对每个提交触发推送;默认为
false。 - disableBranchWithChanges:当存在更改/暂存文件时禁用所有分支操作,例如创建新分支或切换到不同分支。当设置为
true时,此设置可防止覆盖和/或丢失未提交的更改。 - displayStatus:在JupyterLab状态栏中显示Git扩展状态更新。如果
true,扩展将在JupyterLab状态栏中显示状态更新,例如在拉取和推送更改、切换分支和轮询更改时。根据扩展活动程度,一些用户可能觉得状态更新很烦人。在这种情况下,将此设置为false可以减少视觉噪音。 - doubleClickDiff:双击Git扩展面板中的文件以打开文件的差异而不是打开文件进行编辑。
- historyCount:显示在历史记录日志中的提交数,从最近的开始。显示更多提交可能导致性能下降,因此在修改此设置时要小心。
- promptUserIdentity:是否在每次提交时提示用户名和电子邮件。
- refreshIfHidden:即使Git选项卡被隐藏也刷新;默认为
false(即如果Git选项卡被隐藏,则关闭刷新)。 - refreshInterval:在轮询文件系统以查找更改之间的毫秒数。为了确保UI正确显示当前仓库状态,扩展必须轮询文件系统以查找更改。更长的轮询时间会增加UI不反映当前状态的可能性;然而,更长的轮询时间也会产生更少的功能开销。
- simpleStaging:启用简化的暂存概念。当此设置为
true时,所有有更改的文件都会自动暂存。当我们在JupyterLab中开发时,我们通常只关心哪些文件已更改(在广义上)而无需区分“已跟踪”和“未跟踪”文件。相应地,此设置允许我们简化更改的视觉表示,这对于不太熟悉Git的用户特别有用。
服务器设置
JupyterLabGit.actions.post_init:设置在初始化为Git仓库后执行的post git init 动作。可以在文件夹初始化后提供一个要执行的命令列表。JupyterLabGit.credential_helper:Git凭据辅助程序,用于缓存凭据。默认值为cache --timeout=3600,用于缓存凭据一小时。如果您想缓存10小时,请设置为cache --timeout=36000。JupyterLabGit.excluded_paths:设置要从此扩展中排除的路径模式。您可以使用通配符和问号分别代表模式和模式中的任何单个字符。JupyterLabGit.git_command_timeout_s:设置git操作的超时时间。默认为20秒。
如何设置服务器设置?
在$HOME/.jupyter/jupyter_notebook_config.py(在Windows中%USERPROFILE%/.jupyter/jupyter_notebook_config.py)
c.JupyterLabGit.actions = {"post_init": ["touch dummy_init.dat"]}
c.JupyterLabGit.credential_helper = 'cache --timeout=3600'
或等效于在$HOME/.jupyter/jupyter_notebook_config.json(在Windows中%USERPROFILE%/.jupyter/jupyter_notebook_config.json)
{
  "JupyterLabGit": {
    "actions": {
      "post_init": ["touch dummy_init.dat"]
    },
    "credential_helper": "cache --timeout=3600"
  }
}
故障排除
如果您看到前端扩展,但无法正常工作,请检查服务器扩展是否启用
jupyter server extension list
如果服务器扩展已安装并启用,但您看不到前端扩展,请检查前端扩展是否已安装
jupyter labextension list
如果它们不匹配或其中一个缺失,请重新安装包。
Git面板没有识别出您处于Git仓库中。
可能的解决方案
-
请确保在文件浏览器标签中处于Git仓库中
-
检查服务器日志。如果您看到一个包含404代码的警告,类似于:
[W 00:27:41.800 LabApp] 404 GET /git/settings?version=0.20.0通过运行来显式启用服务器扩展
jupyter server extension enable --py jupyterlab_git
-
如果您使用JupyterHub或其他需要初始化脚本(其中包含jupyterlab-git扩展)的技术,请确保在启动JupyterLab之前安装前端和服务器扩展 之前。
Git面板不可见。
可能的解决方案
-
请确保已安装JupyterLab扩展
```bash
jupyter labextension list
```

If you don't see `@jupyterlab/git v... enabled OK` in the list, explicitly install the jupyter labextension by running:

```bash
jupyter labextension install @jupyterlab/git
```

If you see `@jupyterlab/git` under `Uninstalled core extensions: `, your installation may have been corrupted. You can run `jupyter lab clean --all` and
reinstall all your extensions.
贡献
如果您想为此项目做出贡献,请阅读我们的贡献者文档。
JupyterLab遵循官方的Jupyter行为准则。
开发安装
注意:您将需要NodeJS来构建扩展包。
jlpm命令是JupyterLab的yarn的固定版本,它是与JupyterLab一起安装的。您可以使用yarn或npm代替下面的jlpm。
# Clone the repo to your local environment
git clone https://github.com/jupyterlab/jupyterlab-git.git
# Change directory to the jupyterlab-git directory
cd jupyterlab-git
# Install package in development mode
pip install -e ".[dev,test]"
pre-commit install
# Link your development version of the extension with JupyterLab
jupyter labextension develop . --overwrite
# Server extension must be manually installed in develop mode
jupyter server extension enable jupyterlab_git
# Rebuild extension Typescript source after making changes
jlpm run build
您可以在不同的终端中同时监视源目录并运行JupyterLab,以监视扩展源的变化并自动重新构建扩展。
# Watch the source directory in one terminal, automatically rebuilding when needed
jlpm run watch
# Run JupyterLab in another terminal
jupyter lab
在监视命令运行时,每次保存的更改都将立即在本地构建并可供正在运行的JupyterLab使用。刷新JupyterLab以在浏览器中加载更改(您可能需要等待几秒钟以重建扩展)。
默认情况下,jlpm run build命令为此扩展生成源映射,以便使用浏览器开发工具进行调试。要同时为JupyterLab核心扩展生成源映射,请运行以下命令
jupyter lab build --minimize=False
开发卸载
# Server extension must be manually disabled in develop mode
jupyter server extension disable jupyterlab_git
pip uninstall jupyterlab_git
在开发模式下,您还需要删除由jupyter labextension develop命令创建的符号链接。要找到其位置,您可以运行jupyter labextension list以确定labextensions文件夹的位置。然后您可以在该文件夹中删除名为@jupyterlab/git的符号链接。
测试扩展
服务器测试
此扩展使用Pytest进行Python代码测试。
安装测试依赖关系(仅需要一次)
pip install -e ".[test]"
# Each time you install the Python package, you need to restore the front-end extension link
jupyter labextension develop . --overwrite
要执行它们,请运行
pytest -vv -r ap --cov jupyterlab_git
前端测试
此扩展使用Jest进行JavaScript代码测试。
要执行它们,请执行以下操作:
jlpm
jlpm test
集成测试
此扩展使用Playwright进行集成测试(即用户级测试)。更确切地说,JupyterLab助手Galata用于处理在JupyterLab中对扩展的测试。
更多信息请参阅ui-tests的README。
打包扩展
请参阅RELEASE
贡献者✨
Jupyter Git扩展是Jupyter项目的一部分,由一个开放的贡献者社区开发。要查看近期活跃的贡献者,请查看“贡献者”标签。以下列出为项目以不同方式做出贡献的个人和实体(emoji键)
本项目遵循all-contributors规范。欢迎各种形式的贡献!
要将自己或他人添加到这份名单,您可以使用机器人(@all-contributors please add <username> for <contributions>)或命令行界面(jlpm all-contributors add <username> <contributions>)。
如果您手动编辑.all-contributorsrc配置文件,请运行yarn run contributors:generate。


