JupyterHub SLURM Spawner带特定启动页面


项目描述
jupyterhub_moss: JupyterHub MOdular Slurm Spawner
jupyterhub_moss是一个Python包,提供
- 一个JupyterHub Slurm Spawner,可以通过设置可用的分区进行配置。它是
batchspawner.SlurmSpawner的扩展。 - 一个相关的启动页面,根据Spawner中设置的分区进行更改,并允许用户选择要使用的Slurm资源。
安装
pip install jupyterhub_moss
使用方法
分区设置
要使用jupyterhub_moss,您首先需要一个工作JupyterHub实例。然后,您需要将jupyterhub_moss导入到您的JupyterHub配置文件中(通常命名为jupyterhub_conf.py)
import batchspawner
import jupyterhub_moss

c = get_config()

# ...your config

# Init JupyterHub configuration to use this spawner
jupyterhub_moss.set_config(c)
一旦配置了 jupyterhub_moss,您可以通过在相同文件中设置 c.MOSlurmSpawner.partitions 来定义 Slurm 上可用的分区。
# ...

# Partition descriptions
c.MOSlurmSpawner.partitions = {
    "partition_1": {  # Partition name     # (See description of fields below for more info)
        "architecture": "x86_86",          # Nodes architecture
        "description": "Partition 1",      # Displayed description
        "gpu": None,                       # --gres= template to use for requesting GPUs
        "max_ngpus": 0,                    # Maximum number of GPUs per node
        "max_nprocs": 28,                  # Maximum number of CPUs per node
        "max_runtime": 12*3600,            # Maximum time limit in seconds (Must be at least 1hour)
        "simple": True,                    # True to show in Simple tab
        "jupyter_environments": {
            "default": {                   # Jupyter environment identifier, at least "path" or "modules" is mandatory
                "description": "Default",  # Text displayed for this environment select option
                "path": "/env/path/bin/",  # Path to Python environment bin/ used to start Jupyter server on the Slurm nodes
                "modules": "",             # Space separated list of environment modules to load before starting Jupyter server
                "add_to_path": True,       # Toggle adding the environment to shell PATH (optional, default: True)
                "prologue": "",            # Shell commands to execute before starting the Jupyter server (optional, default: "")
            },
        },
    },
    "partition_2": {
        "architecture": "ppc64le",
        "description": "Partition 2",
        "gpu": "gpu:V100-SXM2-32GB:{}",
        "max_ngpus": 2,
        "max_nprocs": 128,
        "max_runtime": 1*3600,
        "simple": True,
        "jupyter_environments": {
            "default": {
                "description": "Default",
                "path": "",
                "modules": "JupyterLab/3.6.0",
                "add_to_path": True,
                "prologue": "echo 'Starting default environment'",
            },
        },
    },
    "partition_3": {
        "architecture": "x86_86",
        "description": "Partition 3",
        "gpu": None,
        "max_ngpus": 0,
        "max_nprocs": 28,
        "max_runtime": 12*3600,
        "simple": False,
        "jupyter_environments": {
            "default": {
                "description": "Partition 3 default",
                "path": "/path/to/jupyter/env/for/partition_3/bin/",
                "modules": "JupyterLab/3.6.0",
                "add_to_path": True,
                "prologue": "echo 'Starting default environment'",
        },
    },
}
对于最小化工作演示,请检查 demo/jupyterhub_conf.py 配置文件。
字段描述
architecture:分区的架构。这仅用于外观,将在启动页面生成字幕。description:分区的描述。这仅用于外观,将在启动页面生成字幕。gpu:[可选] 用于通过--gres请求 GPU 资源的模板字符串。因此,模板应包含一个{},该{}将由请求的 GPU 数量替换,并遵循--gres期望的格式。如果此分区没有可用的 GPU,则设置为""。如果没有提供,则从 SLURM 获取。max_ngpus:[可选] 可以为此分区请求的最大 GPU 数量。启动页面将使用此信息为用户输入生成适当的界限。如果此分区没有可用的 GPU,则设置为0。如果没有提供,则从 SLURM 获取。max_nprocs:[可选] 可以为此分区请求的最大处理器数量。启动页面将使用此信息为用户输入生成适当的界限。如果没有提供,则从 SLURM 获取。max_runtime:[可选] 此分区作业的最大运行时间(以秒为单位)。它应该是至少 1 小时,因为 Simple 选项卡仅显示大于 1 小时的运行时间按钮。如果没有提供,则从 SLURM 获取。simple:是否应在 Simple 选项卡中提供分区。生成的启动页面分为两个选项卡:一个 Simple 选项卡,具有最小设置,足以满足大多数用户的需求,以及一个 Advanced 选项卡,其中几乎可以设置所有 Slurm 作业设置。某些分区可以通过将simple设置为False来从 Simple 选项卡中隐藏。jupyter_environments:标识符名称到在 Slurm 节点上运行 Jupyter 的 Python 环境信息的映射。应定义path或modules(或两者),该信息是包含以下内容的映射:description:用于在选择选项中显示的文本。path:用于在 Slurm 节点上启动 Jupyter 的 Python 环境的 bin/ 路径。 jupyterhub_moss 需要使用虚拟(或 conda)环境来启动 Jupyter。此路径可以根据分区进行更改。modules:在启动 Jupyter 服务器之前加载的环境模块的空格分隔列表。环境模块将使用module命令加载。add_to_path:是否将环境path预先添加到 shellPATH中。prologue:在启动 Jupyter 单用户服务器之前在 Slurm 节点上执行的 Shell 命令。默认情况下,不运行任何命令。
启动页面
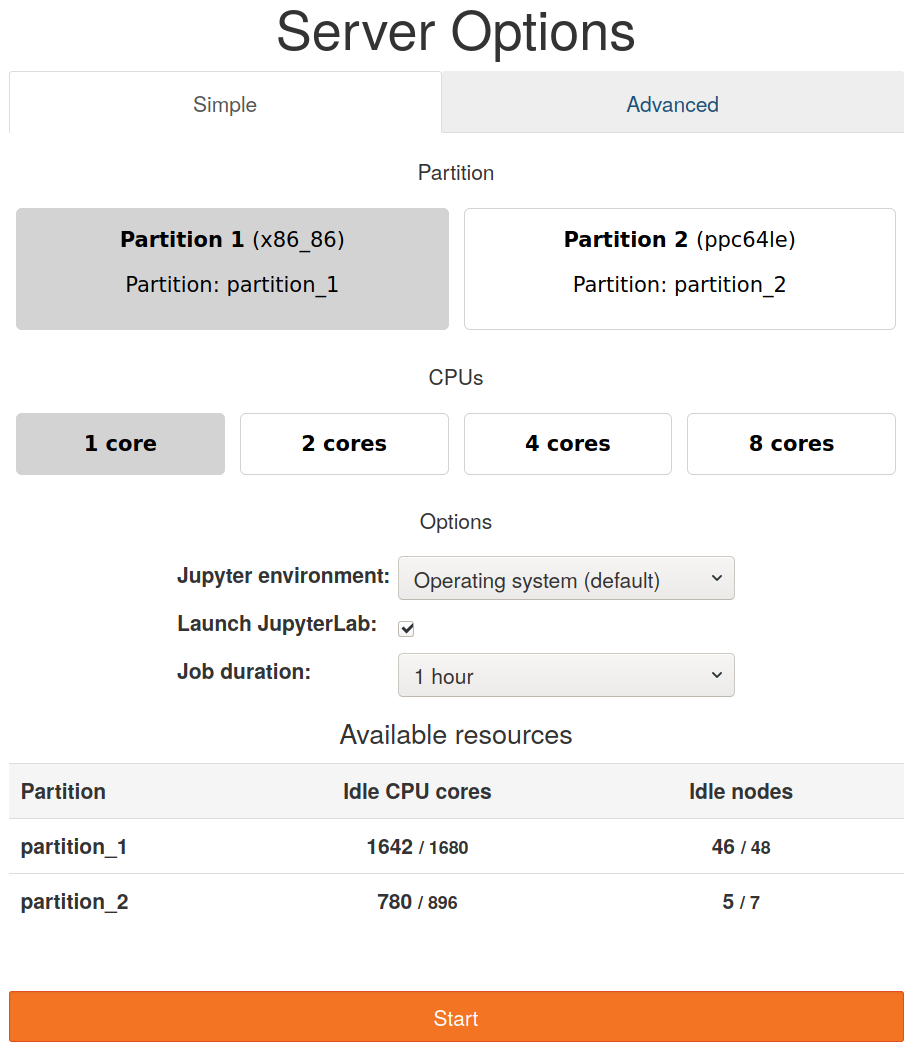
启动页面(在 /hub/spawn 上可用)将根据分区设置生成。例如,这是根据上述分区设置生成的启动页面
此启动页面分为两个选项卡:一个 Simple 选项卡和一个 Advanced 选项卡。在 Simple 选项卡中,用户可以在通过 simple: True 设置的分区之间选择(在这种情况下为 partition_1 和 partition_2),选择接受最小、一半或最大数量的核心,并选择作业持续时间。可用的资源使用 sinfo 检查并显示在下面的表中。单击 启动 按钮将请求作业。
启动页面会根据选择的分区进行调整。这是选择 partition_2 时的页面
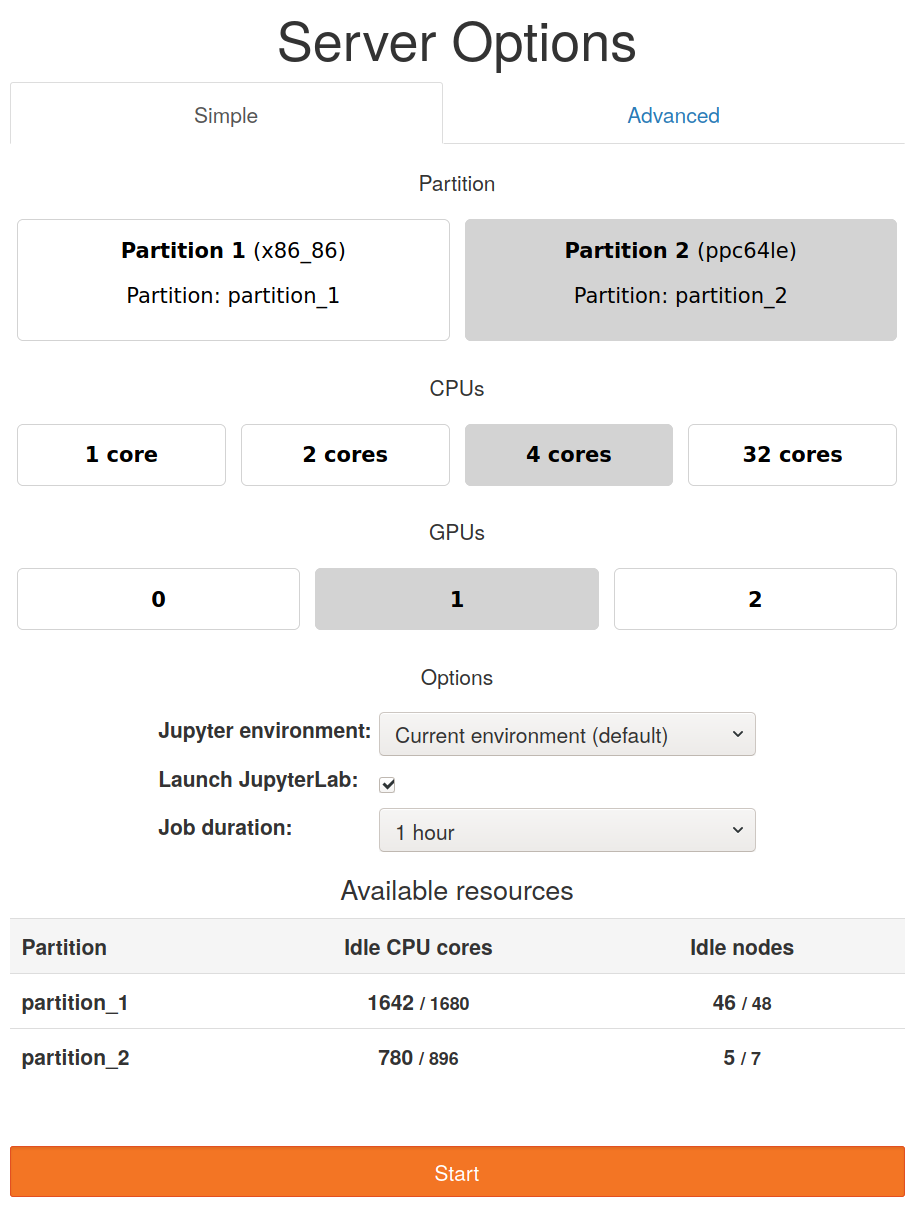
由于最大核心数不同,CPU 行相应地更改。此外,由于为 partition_2 设置了 gpu,因此出现了一个新的按钮行,用于启用 GPU 请求。
《高级》选项卡允许对请求的资源进行更精细的控制。
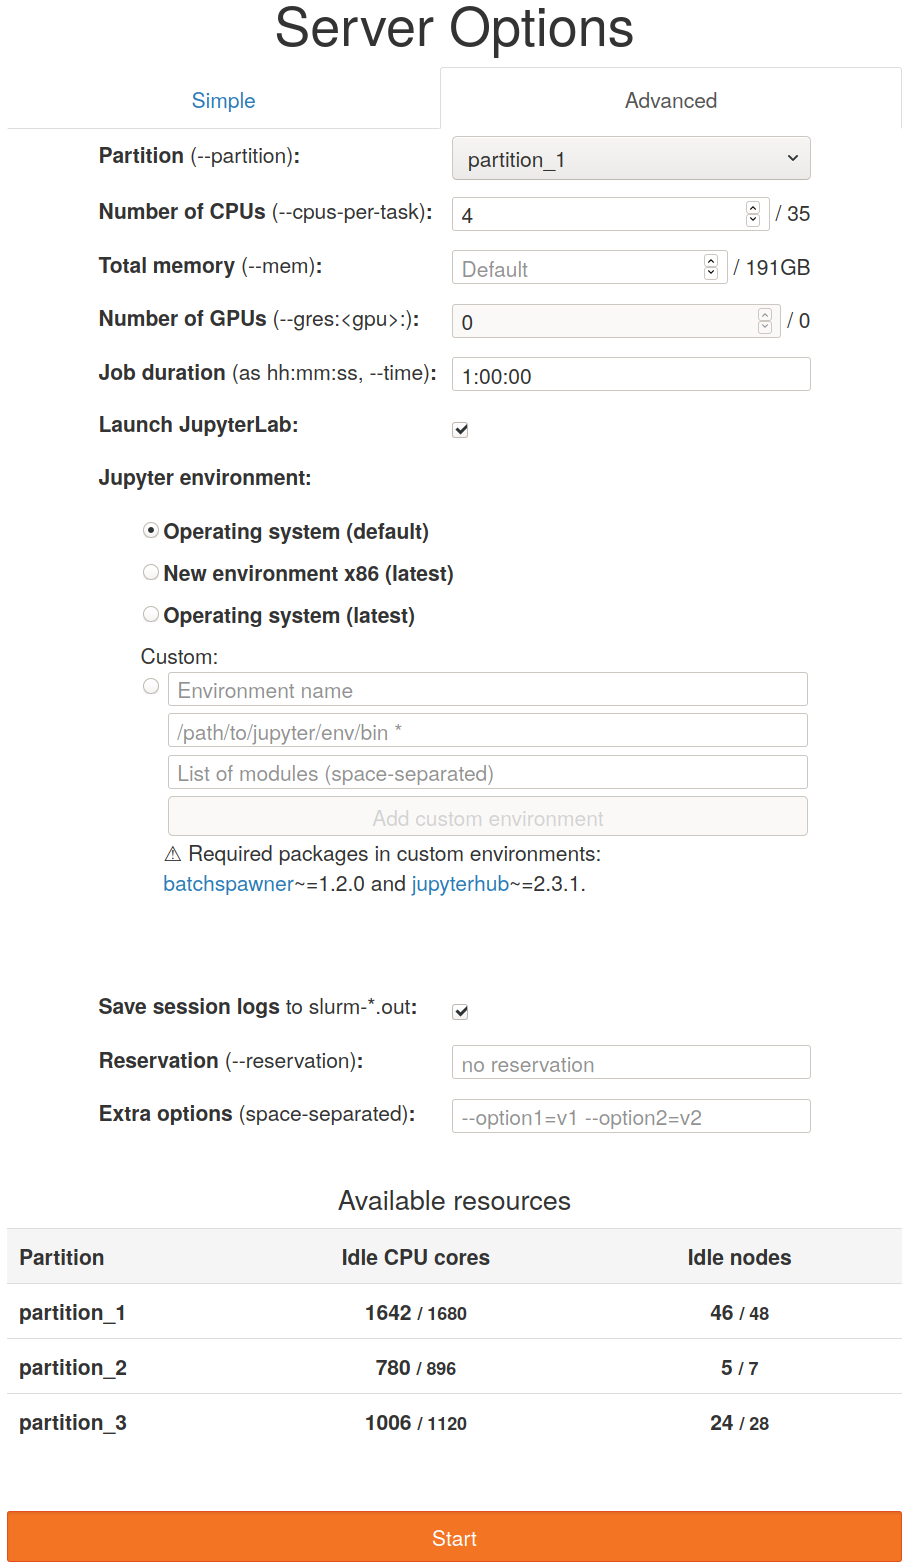
用户可以选择任何分区(在这种情况下添加了partition_3),可用的资源表也会相应地反映出来。用户还可以选择任意数量的节点(最大数量由max_nprocs给出)、GPU(最大:max_gpus)并更灵活地控制作业时长(最大:max_runtime)。
通过URL启动
还可以将启动选项作为查询参数传递给启动URL:https://<服务器:端口>/hub/spawn。例如,https://<服务器:端口>/hub/spawn?partition=partition_1&nprocs=4将直接在partition_1上启动一个具有4个核心的Jupyter服务器。
以下查询参数是必需的
partition:要使用的SLURM分区的名称。
以下可选查询参数可用
-
SLURM配置
memory:每个节点总内存量(--mem)ngpus:GPU数量(--gres:)nprocs:每个任务CPU数量(--cpus-per-task)options:额外的SLURM选项output:设置为true将日志保存到slurm-*.out文件中。reservation:SLURM预留名称(--reservation)runtime:作业时长(hh:mm:ss)(--time)
-
Jupyter(Lab)配置
default_url:打开Jupyter环境的URL:使用/lab启动JupyterLab或使用JupyterLab URLsenvironment_id:启动Jupyter时使用的配置中定义的Python环境的名称environment_path:启动Jupyter时使用的Python环境bin/的路径environment_modules:在启动Jupyter之前加载的环境模块名称的空格分隔列表root_dir:从Jupyter(Lab)可浏览的“root”文件夹的路径(如果没有提供,则为用户的主目录)
要使用配置中定义的Jupyter环境,只需提供其environment_id,例如:https://<服务器:端口>/hub/spawn?partition=partition_1&environment_id=default。
要使用自定义Jupyter环境,请提供相应的environment_path和/或environment_modules,例如:
https://<服务器:端口>/hub/spawn?partition=partition_1&environment_path=/path/to/jupyter/bin,或https://<服务器:端口>/hub/spawn?partition=partition_1&environment_modules=myjupytermodule.
开发
请参阅CONTRIBUTING.md。
致谢
我们希望感谢以下资源,它们为该项目提供了基础,并感谢其作者
- 此gist用于初始启动器实现。
- DESY JupyterHub Slurm服务DESY JupyterHub Slurm服务提供了可用的资源表。
- TUDresden JupyterHub Slurm服务TUDresden JupyterHub Slurm服务提供了启动页面的设计。


下载文件
下载适用于您平台的文件。如果您不确定选择哪个,请了解更多关于安装包的信息。
源分布
构建版本
jupyterhub_moss-9.0.0.tar.gz 的哈希值
| 算法 | 哈希摘要 | |
|---|---|---|
| SHA256 | f1bb05d68c72e186a847b86c349e14034bb22fa779c3378710ad948d41e5f93d |
|
| MD5 | 3851d9395d49b76a6d9e028d05869df0 |
|
| BLAKE2b-256 | b823ed9b6a978852c5ba44f0ccd1234c0be84f3dbb62ef34bbc9c97eadad8610 |
jupyterhub_moss-9.0.0-py3-none-any.whl 的哈希值
| 算法 | 哈希摘要 | |
|---|---|---|
| SHA256 | de6b6e971a924e9ee1b0f1b6c934cfe4a11c031d6a7be93531425309b5f3153a |
|
| MD5 | 2959b83054334a0fc25da08a4a1d0a6c |
|
| BLAKE2b-256 | 87ed9c742bdaef2229736d89f51e205f24d7f4b6a6f3afd0e54f77c084f5d4a4 |


