从Deye微型逆变器获取信息

项目描述
逆变器


从Deye微型逆变器获取信息
目前这只是一个学习练习。我们将拭目以待。
快速入门
概述
- 克隆源代码
- 通过调用
./cli.py edit-settings来初始化和创建默认用户设置 - 根据您的需求更改设置
- ...使用命令... ;)
- 设置systemd服务以通过MQTT将逆变器值发布到Home Assistant实例
目前仅克隆项目并启动cli(这将创建虚拟环境并安装所有依赖项)
注意:如果您在Raspberry Pi上,请启用https://www.piwheels.org/!
例如:
~$ git clone https://github.com/jedie/inverter-connect.git
~$ cd inverter-connect
~/inverter-connect$ ./cli.py --help
./cli.py --help 的输出看起来像
Usage: ./cli.py [OPTIONS] COMMAND [ARGS]...

╭─ Options ────────────────────────────────────────────────────────────────────────────────────────╮
│ --help      Show this message and exit.                                                          │
╰──────────────────────────────────────────────────────────────────────────────────────────────────╯
╭─ Commands ───────────────────────────────────────────────────────────────────────────────────────╮
│ debug-settings        Display (anonymized) MQTT server username and password                     │
│ edit-settings         Edit the settings file. On first call: Create the default one.             │
│ inverter-version      Print all version information of the inverter                              │
│ print-at-commands     Print one or more AT command values from Inverter.                         │
│ print-values          Print all known register values from Inverter, e.g.:                       │
│ publish-loop          Publish current data via MQTT for Home Assistant (endless loop)            │
│ read-register         Read register(s) from the inverter                                         │
│ set-time              Set current date time in the inverter device.                              │
│ systemd-debug         Print Systemd service template + context + rendered file content.          │
│ systemd-remove        Write Systemd service file, enable it and (re-)start the service. (May     │
│                       need sudo)                                                                 │
│ systemd-setup         Write Systemd service file, enable it and (re-)start the service. (May     │
│                       need sudo)                                                                 │
│ systemd-status        Display status of systemd service. (May need sudo)                         │
│ systemd-stop          Stops the systemd service. (May need sudo)                                 │
│ test-mqtt-connection  Test connection to MQTT Server                                             │
│ version               Print version and exit                                                     │
╰──────────────────────────────────────────────────────────────────────────────────────────────────╯
为Home Assistant设置systemd服务
通过 ./cli.py edit-settings 更新您的设置,并在 [mqtt] 部分插入MQTT凭证
检查配置部分 [systemd] 和 [systemd.template_context],但通常它们不需要更改;)
要验证您的设置,请调用: ./cli.py debug-settings
要查看systemd服务文件内容,请调用: ./cli.py systemd-debug
注意:一些systemd命令需要sudo,因为普通用户无法更改systemd服务!您将看到权限错误,并提示使用sudo调用cli;)
如果一切正常,请使用 sudo ./cli.py systemd-setup 设置并启动systemd服务
使用 sudo ./cli.py systemd-status 检查服务
最重要的命令
publish-loop
从 ./cli.py print-values --help 获取的帮助看起来像
Usage: ./cli.py publish-loop [OPTIONS]

 Publish current data via MQTT for Home Assistant (endless loop)
 The "Daily Production" count will be cleared in the night, by set the current date time via
 AT-command.

╭─ Options ────────────────────────────────────────────────────────────────────────────────────────╮
│ *  --ip             TEXT                                  IP address of your inverter [required] │
│ *  --port           INTEGER                               Port of inverter services              │
│                                                           [default: 48899]                       │
│                                                           [required]                             │
│ *  --inverter       [deye_2mppt|deye_4mppt|deye_sg04lp3]  Prefix of yaml config files in         │
│                                                           inverter/definitions/                  │
│                                                           [default: deye_2mppt]                  │
│                                                           [required]                             │
│    --verbosity  -v  INTEGER RANGE [0<=x<=3]               Verbosity level; Accepts integer value │
│                                                           e.g.: "--verbose 2" or can be count    │
│                                                           e.g.: "-vv"                            │
│                                                           [default: 0; 0<=x<=3]                  │
│    --help                                                 Show this message and exit.            │
╰──────────────────────────────────────────────────────────────────────────────────────────────────╯
print-values
从 ./cli.py print-values --help 获取的帮助看起来像
Usage: ./cli.py print-values [OPTIONS]

 Print all known register values from Inverter, e.g.:
 .../inverter-connect$ ./cli.py print-values

╭─ Options ────────────────────────────────────────────────────────────────────────────────────────╮
│ *  --ip             TEXT                                  IP address of your inverter [required] │
│ *  --port           INTEGER                               Port of inverter services              │
│                                                           [default: 48899]                       │
│                                                           [required]                             │
│ *  --inverter       [deye_2mppt|deye_4mppt|deye_sg04lp3]  Prefix of yaml config files in         │
│                                                           inverter/definitions/                  │
│                                                           [default: deye_2mppt]                  │
│                                                           [required]                             │
│    --verbosity  -v  INTEGER RANGE [0<=x<=3]               Verbosity level; Accepts integer value │
│                                                           e.g.: "--verbose 2" or can be count    │
│                                                           e.g.: "-vv"                            │
│                                                           [default: 0; 0<=x<=3]                  │
│    --compact    -c                                        Only show the values concerning power  │
│                                                           generation                             │
│    --help                                                 Show this message and exit.            │
╰──────────────────────────────────────────────────────────────────────────────────────────────────╯
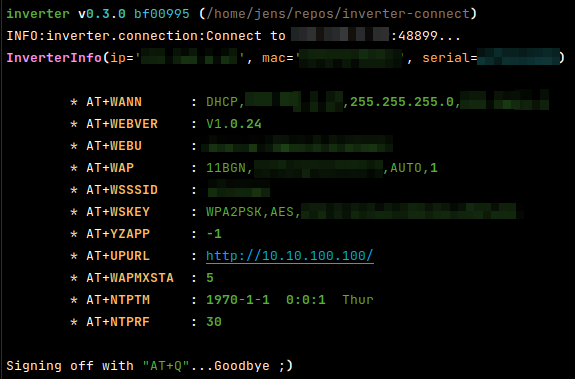
print-values 调用的示例输出

print-at-commands
从 ./cli.py print-at-commands --help 获取的帮助看起来像
Usage: ./cli.py print-at-commands [OPTIONS] [COMMANDS]...

 Print one or more AT command values from Inverter.
 Use all known AT commands, if no one is given, e.g.:
 .../inverter-connect$ ./cli.py print-at-commands
 Or specify one or more AT-commands, e.g.:
 .../inverter-connect$ ./cli.py print-at-commands WEBVER .../inverter-connect$ ./cli.py
 print-at-commands WEBVER WEBU
 e.g.: Set NTP server, enable NTP and check the values:
 .../inverter-connect$ ./cli.py print-at-commands NTPSER=192.168.1.1 NTPEN=on NTPSER NTPEN
 wait a while and request the current date time:
 .../inverter-connect$ ./cli.py print-at-commands NTPTM
 (Note: The prefix "AT+" will be added to every command)

╭─ Options ────────────────────────────────────────────────────────────────────────────────────────╮
│ *  --ip             TEXT                     IP address of your inverter [required]              │
│ *  --port           INTEGER                  Port of inverter services [default: 48899]          │
│                                              [required]                                          │
│    --verbosity  -v  INTEGER RANGE [0<=x<=3]  Verbosity level; Accepts integer value e.g.:        │
│                                              "--verbose 2" or can be count e.g.: "-vv"           │
│                                              [default: 0; 0<=x<=3]                               │
│    --help                                    Show this message and exit.                         │
╰──────────────────────────────────────────────────────────────────────────────────────────────────╯
print-at-commands 调用的示例输出
read-register
从 ./cli.py read-register --help 获取的帮助看起来像
Usage: ./cli.py read-register [OPTIONS] REGISTER LENGTH

 Read register(s) from the inverter
 e.g.: read 3 registers starting from 0x16:
 .../inverter-connect$ ./cli.py read-register 0x16 3
 e.g.: read the first 32 registers:
 .../inverter-connect$ ./cli.py read-register 0 32
 The start address can be pass as decimal number or as hex string, e.g.: 0x123

╭─ Options ────────────────────────────────────────────────────────────────────────────────────────╮
│ *  --ip             TEXT                     IP address of your inverter [required]              │
│ *  --port           INTEGER                  Port of inverter services [default: 48899]          │
│                                              [required]                                          │
│    --verbosity  -v  INTEGER RANGE [0<=x<=3]  Verbosity level; Accepts integer value e.g.:        │
│                                              "--verbose 2" or can be count e.g.: "-vv"           │
│                                              [default: 0; 0<=x<=3]                               │
│    --help                                    Show this message and exit.                         │
╰──────────────────────────────────────────────────────────────────────────────────────────────────╯
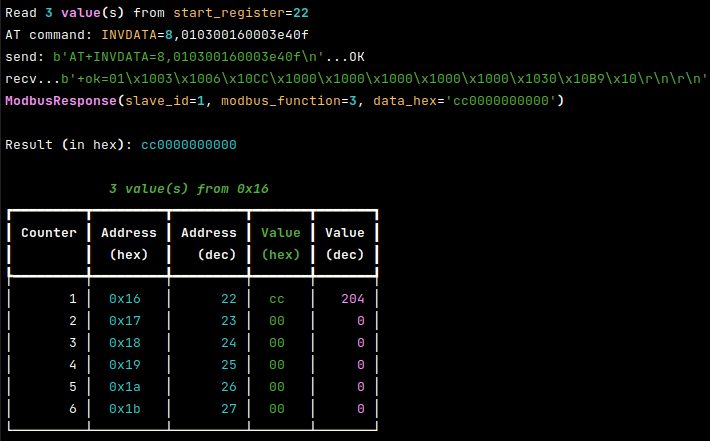
示例输出为 read-register 调用
开始开发
为了开发,我们有一个单独的 CLI,只需调用它
~/inverter-connect$ ./dev-cli.py --help
./dev-cli.py --help 的输出如下
Usage: ./dev-cli.py [OPTIONS] COMMAND [ARGS]...

╭─ Options ────────────────────────────────────────────────────────────────────────────────────────╮
│ --help      Show this message and exit.                                                          │
╰──────────────────────────────────────────────────────────────────────────────────────────────────╯
╭─ Commands ───────────────────────────────────────────────────────────────────────────────────────╮
│ check-code-style            Check code style by calling darker + flake8                          │
│ coverage                    Run and show coverage.                                               │
│ create-default-settings     Create a default user settings file. (Used by CI pipeline ;)         │
│ fix-code-style              Fix code style of all inverter source code files via darker          │
│ install                     Run pip-sync and install 'inverter' via pip as editable.             │
│ mypy                        Run Mypy (configured in pyproject.toml)                              │
│ publish                     Build and upload this project to PyPi                                │
│ safety                      Run safety check against current requirements files                  │
│ test                        Run unittests                                                        │
│ tox                         Run tox                                                              │
│ update                      Update "requirements*.txt" dependencies files                        │
│ update-test-snapshot-files  Update all test snapshot files (by remove and recreate all snapshot  │
│                             files)                                                               │
│ version                     Print version and exit                                               │
╰──────────────────────────────────────────────────────────────────────────────────────────────────╯
致谢
在我之前,其他人已经做了很好的工作。特别是,我从以下项目中学到了很多
- https://github.com/s10l/deye-logger-at-cmd
- https://github.com/kbialek/deye-inverter-mqtt
- https://github.com/StephanJoubert/home_assistant_solarman
包含的定义 yaml 文件来自
各种链接


下载文件
下载您平台上的文件。如果您不确定选择哪个,请了解有关 安装包 的更多信息。
源分发
构建分发
inverter-connect-0.13.0.tar.gz 的散列
| 算法 | 散列摘要 | |
|---|---|---|
| SHA256 | c4515afa1aae3e1078fe58eaedcb74eb1fb614eb38c31a8db9e143b6b6a738c2 |
|
| MD5 | d415f25bfedb73ffb1d5345bab5f73a7 |
|
| BLAKE2b-256 | 22fc938266cdb52adea6015586d1458631b7d74489ec345780b17ae059581606 |
inverter_connect-0.13.0-py3-none-any.whl 的散列
| 算法 | 散列摘要 | |
|---|---|---|
| SHA256 | 5cda6b545d898b156cb8479feb52031a0cfbb2e2bb38e839384e9176a727c38d |
|
| MD5 | a554c13c70f796f81a55056aec1c50e1 |
|
| BLAKE2b-256 | 920e459a138014790ca9a51f9b111c7556ce0422d3c018897a5dbe07d4aee097 |


