InfluxDB 2.0 Python客户端库


项目描述
influxdb-client-python


此存储库包含用于InfluxDB 2.x和Flux的Python客户端库。InfluxDB 3.x用户应改用轻量级的v3客户端库。InfluxDB 1.x用户应使用v1客户端库。
为了便于迁移以及保持查询和写入的一致性体验,v2用户应考虑使用InfluxQL和v1客户端库。
influxdb-client-python的API与旧版的不兼容 - influxdb-python。
文档
本节包含指向客户端库文档的链接。
InfluxDB 2.0客户端功能
- 查询数据
- 使用Flux语言
- 输出到csv、原始数据、flux_table结构、Pandas DataFrame
- 如何查询
- 使用
- 行协议
- 数据点
- RxPY可观察对象
- Pandas DataFrame
- 如何写入
- InfluxDB 2.0 API客户端用于管理
- 客户端是通过使用openapi-generator从swagger生成的
- 组织与用户管理
- 桶管理
- 任务管理
- 授权
- 健康检查
- ...
- InfluxDB 1.8 API兼容性
- 示例
- 高级使用
安装
InfluxDB Python库使用RxPY - Python的响应式扩展(RxPY)。
Python 3.7或更高版本是必需的。
:warning
建议使用客户端解析日期的
ciso8601。与内置Python datetime相比,ciso8601要快得多。由于它是一个C模块,最佳方式是从源代码构建它
Windows:
您必须安装Visual C++ Build Tools 2015以使用pip构建ciso8601。
conda:
从源代码安装:conda install -c conda-forge/label/cf202003 ciso8601。
pip安装
Python包托管在PyPI上,您可以直接安装最新版本
pip install 'influxdb-client[ciso]'
然后导入包
import influxdb_client
如果您的应用程序在Python中使用async/await,则可以使用async扩展安装
$ pip install influxdb-client[async]
有关更多信息,请参阅如何使用Asyncio。
Setuptools
通过Setuptools安装。
python setup.py install --user
(或使用sudo python setup.py install为所有用户安装包)
入门指南
请按照安装说明进行操作,然后运行以下命令
from influxdb_client import InfluxDBClient, Point
from influxdb_client.client.write_api import SYNCHRONOUS

bucket = "my-bucket"

client = InfluxDBClient(url="https://:8086", token="my-token", org="my-org")

write_api = client.write_api(write_options=SYNCHRONOUS)
query_api = client.query_api()

p = Point("my_measurement").tag("location", "Prague").field("temperature", 25.3)

write_api.write(bucket=bucket, record=p)

## using Table structure
tables = query_api.query('from(bucket:"my-bucket") |> range(start: -10m)')

for table in tables:
    print(table)
    for row in table.records:
        print (row.values)


## using csv library
csv_result = query_api.query_csv('from(bucket:"my-bucket") |> range(start: -10m)')
val_count = 0
for row in csv_result:
    for cell in row:
        val_count += 1
客户端配置
通过文件
客户端可以通过位于段influx2中的*.ini文件进行配置。
以下选项受支持
url- 连接到InfluxDB的URLorg- 默认写入和查询目标组织token- 用于授权的令牌timeout- 以毫秒为单位的套接字超时(默认值为10000)verify_ssl- 将此设置为false以在从https服务器调用API时跳过验证SSL证书ssl_ca_cert- 将此设置为自定义用于验证对等方的证书文件cert_file- 将用于mTLS身份验证的证书的路径cert_key_file- 包含mTLS证书私钥的文件的路径cert_key_password- 字符串或函数,它返回用于解密mTLS私钥的密码connection_pool_maxsize- 设置可由 urllib3 重新使用的连接保存数量auth_basic- 当与未进行身份验证的 InfluxDB 1.8.x 通信但通过带有基本身份验证的反向代理访问时,启用 HTTP 基本身份验证(默认为 false)profilers- 设置启用 Flux 分析器 的列表
self.client = InfluxDBClient.from_config_file("config.ini")
[influx2]
url=https://:8086
org=my-org
token=my-token
timeout=6000
verify_ssl=False
通过环境属性
客户端可以通过环境属性进行配置。
支持以下属性
INFLUXDB_V2_URL- 连接到 InfluxDB 的 URLINFLUXDB_V2_ORG- 写入和查询的默认目标组织INFLUXDB_V2_TOKEN- 用于授权的令牌INFLUXDB_V2_TIMEOUT- 端口超时(毫秒,默认值是 10000)INFLUXDB_V2_VERIFY_SSL- 设置为 false 以在从 https 服务器调用 API 时跳过验证 SSL 证书INFLUXDB_V2_SSL_CA_CERT- 设置此值以自定义用于验证对等方的证书文件INFLUXDB_V2_CERT_FILE- 将用于 mTLS 身份验证的证书的路径INFLUXDB_V2_CERT_KEY_FILE- 包含 mTLS 证书私钥的文件的路径INFLUXDB_V2_CERT_KEY_PASSWORD- 字符串或函数,返回用于解密 mTLS 私钥的密码INFLUXDB_V2_CONNECTION_POOL_MAXSIZE- 设置可由 urllib3 重新使用的连接保存数量INFLUXDB_V2_AUTH_BASIC- 当与未进行身份验证的 InfluxDB 1.8.x 通信但通过带有基本身份验证的反向代理访问时,启用 HTTP 基本身份验证(默认为 false)INFLUXDB_V2_PROFILERS- 设置启用 Flux 分析器 的列表
self.client = InfluxDBClient.from_env_properties()
分析查询
Flux 分析器包 为 Flux 查询和操作提供性能分析工具。
您可以通过以下方式在客户端库中启用 Flux 查询的分析器信息打印
- 在 QueryApi 中设置 QueryOptions.profilers,
- 设置
INFLUXDB_V2_PROFILERS环境变量, - 在配置文件中设置
profilers选项。
当分析器启用时,flux 查询的结果包含额外的 "profiler/" 表。为了与启用/禁用分析器的行为保持一致,FluxCSVParser 从结果中排除 "profiler/" 测量值。
使用 API 启用分析器的示例
q = '''
    from(bucket: stringParam)
      |> range(start: -5m, stop: now())
      |> filter(fn: (r) => r._measurement == "mem")
      |> filter(fn: (r) => r._field == "available" or r._field == "free" or r._field == "used")
      |> aggregateWindow(every: 1m, fn: mean)
      |> pivot(rowKey:["_time"], columnKey: ["_field"], valueColumn: "_value")
'''
p = {
    "stringParam": "my-bucket",
}

query_api = client.query_api(query_options=QueryOptions(profilers=["query", "operator"]))
csv_result = query_api.query(query=q, params=p)
分析器输出的示例
===============
Profiler: query
===============

from(bucket: stringParam)
  |> range(start: -5m, stop: now())
  |> filter(fn: (r) => r._measurement == "mem")
  |> filter(fn: (r) => r._field == "available" or r._field == "free" or r._field == "used")
  |> aggregateWindow(every: 1m, fn: mean)
  |> pivot(rowKey:["_time"], columnKey: ["_field"], valueColumn: "_value")

========================
Profiler: profiler/query
========================
result              : _profiler
table               : 0
_measurement        : profiler/query
TotalDuration       : 8924700
CompileDuration     : 350900
QueueDuration       : 33800
PlanDuration        : 0
RequeueDuration     : 0
ExecuteDuration     : 8486500
Concurrency         : 0
MaxAllocated        : 2072
TotalAllocated      : 0
flux/query-plan     :

digraph {
  ReadWindowAggregateByTime11
  // every = 1m, aggregates = [mean], createEmpty = true, timeColumn = "_stop"
  pivot8
  generated_yield

  ReadWindowAggregateByTime11 -> pivot8
  pivot8 -> generated_yield
}


influxdb/scanned-bytes: 0
influxdb/scanned-values: 0

===========================
Profiler: profiler/operator
===========================
result              : _profiler
table               : 1
_measurement        : profiler/operator
Type                : *universe.pivotTransformation
Label               : pivot8
Count               : 3
MinDuration         : 32600
MaxDuration         : 126200
DurationSum         : 193400
MeanDuration        : 64466.666666666664

===========================
Profiler: profiler/operator
===========================
result              : _profiler
table               : 1
_measurement        : profiler/operator
Type                : *influxdb.readWindowAggregateSource
Label               : ReadWindowAggregateByTime11
Count               : 1
MinDuration         : 940500
MaxDuration         : 940500
DurationSum         : 940500
MeanDuration        : 940500.0
您还可以使用回调函数来获取分析器输出。此回调函数的返回值类型为 FluxRecord。
使用回调使用分析器的示例
class ProfilersCallback(object):
   def __init__(self):
       self.records = []

   def __call__(self, flux_record):
       self.records.append(flux_record.values)

callback = ProfilersCallback()

query_api = client.query_api(query_options=QueryOptions(profilers=["query", "operator"], profiler_callback=callback))
tables = query_api.query('from(bucket:"my-bucket") |> range(start: -10m)')

for profiler in callback.records:
   print(f'Custom processing of profiler result: {profiler}')
此回调的输出示例
Custom processing of profiler result: {'result': '_profiler', 'table': 0, '_measurement': 'profiler/query', 'TotalDuration': 18843792, 'CompileDuration': 1078666, 'QueueDuration': 93375, 'PlanDuration': 0, 'RequeueDuration': 0, 'ExecuteDuration': 17371000, 'Concurrency': 0, 'MaxAllocated': 448, 'TotalAllocated': 0, 'RuntimeErrors': None, 'flux/query-plan': 'digraph {\r\n  ReadRange2\r\n  generated_yield\r\n\r\n  ReadRange2 -> generated_yield\r\n}\r\n\r\n', 'influxdb/scanned-bytes': 0, 'influxdb/scanned-values': 0}
Custom processing of profiler result: {'result': '_profiler', 'table': 1, '_measurement': 'profiler/operator', 'Type': '*influxdb.readFilterSource', 'Label': 'ReadRange2', 'Count': 1, 'MinDuration': 3274084, 'MaxDuration': 3274084, 'DurationSum': 3274084, 'MeanDuration': 3274084.0}
如何使用
写入
WriteApi 支持将数据同步、异步和批量写入 InfluxDB 2.0。数据应以 InfluxDB 行协议、数据点 或可观察流的形式传递。
:warning
在批处理模式下(默认模式)的
WriteApi应作为单例运行。为了刷新所有数据,您应该使用with client.write_api(...) as write_api:语句包装执行,或在与脚本结束时调用write_api.close()。
默认的 WriteApi 实例使用批处理。
数据可以写成以下形式
string或bytes,格式化为 InfluxDB 的行协议- 数据点 结构
- 具有键:
measurement、tags、fields和time或自定义结构的字典样式映射 - 命名元组
- 数据类
- Pandas DataFrame
- 上述项的列表
- 批处理类型的写入还支持生成上述项之一的
Observable
您可以在GitHub上找到写入示例:[influxdb-client-python/examples](https://github.com/influxdata/influxdb-client-python/tree/master/examples#writes)。
批处理
可以通过write_options来配置批处理。
| 属性 | 描述 | 默认值 |
|---|---|---|
| batch_size | 每个批次收集的数据点的数量 | 1000 |
| flush_interval | 在写入批次之前等待的毫秒数 | 1000 |
| jitter_interval | 通过随机量增加批次刷新间隔的毫秒数 | 0 |
| retry_interval | 重试第一次未成功写入的毫秒数。下一个重试延迟使用指数随机退避计算。在InfluxDB服务器未指定"Retry-After"头时使用重试间隔。 | 5000 |
| max_retry_time | 最大总重试超时时间(毫秒)。 | 180_000 |
| max_retries | 写入失败时的最大重试次数 | 5 |
| max_retry_delay | 每次重试尝试之间的最大延迟(毫秒) | 125_000 |
| max_close_wait | 当调用.close()时,等待批次刷新的最大时间 |
300_000 |
| exponential_base | 指数重试延迟的基数,下一个延迟使用随机指数退避计算,值在区间retry_interval * exponential_base^(attempts-1)和retry_interval * exponential_base^(attempts)之间。例如,对于retry_interval=5_000, exponential_base=2, max_retry_delay=125_000, total=5,重试延迟是分布在以下范围内的随机值:[5_000-10_000, 10_000-20_000, 20_000-40_000, 40_000-80_000, 80_000-125_000] |
2 |
from datetime import datetime, timedelta, timezone

import pandas as pd
import reactivex as rx
from reactivex import operators as ops

from influxdb_client import InfluxDBClient, Point, WriteOptions

with InfluxDBClient(url="https://:8086", token="my-token", org="my-org") as _client:

    with _client.write_api(write_options=WriteOptions(batch_size=500,
                                                      flush_interval=10_000,
                                                      jitter_interval=2_000,
                                                      retry_interval=5_000,
                                                      max_retries=5,
                                                      max_retry_delay=30_000,
                                                      max_close_wait=300_000,
                                                      exponential_base=2)) as _write_client:

        """
        Write Line Protocol formatted as string
        """
        _write_client.write("my-bucket", "my-org", "h2o_feet,location=coyote_creek water_level=1.0 1")
        _write_client.write("my-bucket", "my-org", ["h2o_feet,location=coyote_creek water_level=2.0 2",
                                                    "h2o_feet,location=coyote_creek water_level=3.0 3"])

        """
        Write Line Protocol formatted as byte array
        """
        _write_client.write("my-bucket", "my-org", "h2o_feet,location=coyote_creek water_level=1.0 1".encode())
        _write_client.write("my-bucket", "my-org", ["h2o_feet,location=coyote_creek water_level=2.0 2".encode(),
                                                    "h2o_feet,location=coyote_creek water_level=3.0 3".encode()])

        """
        Write Dictionary-style object
        """
        _write_client.write("my-bucket", "my-org", {"measurement": "h2o_feet", "tags": {"location": "coyote_creek"},
                                                    "fields": {"water_level": 1.0}, "time": 1})
        _write_client.write("my-bucket", "my-org", [{"measurement": "h2o_feet", "tags": {"location": "coyote_creek"},
                                                     "fields": {"water_level": 2.0}, "time": 2},
                                                    {"measurement": "h2o_feet", "tags": {"location": "coyote_creek"},
                                                     "fields": {"water_level": 3.0}, "time": 3}])

        """
        Write Data Point
        """
        _write_client.write("my-bucket", "my-org",
                            Point("h2o_feet").tag("location", "coyote_creek").field("water_level", 4.0).time(4))
        _write_client.write("my-bucket", "my-org",
                            [Point("h2o_feet").tag("location", "coyote_creek").field("water_level", 5.0).time(5),
                             Point("h2o_feet").tag("location", "coyote_creek").field("water_level", 6.0).time(6)])

        """
        Write Observable stream
        """
        _data = rx \
            .range(7, 11) \
            .pipe(ops.map(lambda i: "h2o_feet,location=coyote_creek water_level={0}.0 {0}".format(i)))

        _write_client.write("my-bucket", "my-org", _data)

        """
        Write Pandas DataFrame
        """
        _now = datetime.now(tz=timezone.utc)
        _data_frame = pd.DataFrame(data=[["coyote_creek", 1.0], ["coyote_creek", 2.0]],
                                   index=[_now, _now + timedelta(hours=1)],
                                   columns=["location", "water_level"])

        _write_client.write("my-bucket", "my-org", record=_data_frame, data_frame_measurement_name='h2o_feet',
                            data_frame_tag_columns=['location'])
默认标签
有时将相同的信息存储在每个测量中很有用,例如hostname、location、customer。客户端可以使用静态值或环境属性作为标签值。
表达式
California Miner- 静态值${env.hostname}- 环境属性
通过API
point_settings = PointSettings()
point_settings.add_default_tag("id", "132-987-655")
point_settings.add_default_tag("customer", "California Miner")
point_settings.add_default_tag("data_center", "${env.data_center}")

self.write_client = self.client.write_api(write_options=SYNCHRONOUS, point_settings=point_settings)
self.write_client = self.client.write_api(write_options=SYNCHRONOUS,
                                              point_settings=PointSettings(**{"id": "132-987-655",
                                                                              "customer": "California Miner"}))
通过配置文件
在init配置文件中,您可以使用tags部分指定默认标签。
self.client = InfluxDBClient.from_config_file("config.ini")
[influx2]
url=https://:8086
org=my-org
token=my-token
timeout=6000

[tags]
id = 132-987-655
customer = California Miner
data_center = ${env.data_center}
通过环境属性
您可以使用前缀INFLUXDB_V2_TAG_的环境属性来指定默认标签。
示例
INFLUXDB_V2_TAG_IDINFLUXDB_V2_TAG_HOSTNAME
self.client = InfluxDBClient.from_env_properties()
同步客户端
数据以同步HTTP请求写入。
from influxdb_client import InfluxDBClient, Point
from influxdb_client .client.write_api import SYNCHRONOUS

client = InfluxDBClient(url="https://:8086", token="my-token", org="my-org")
write_api = client.write_api(write_options=SYNCHRONOUS)

_point1 = Point("my_measurement").tag("location", "Prague").field("temperature", 25.3)
_point2 = Point("my_measurement").tag("location", "New York").field("temperature", 24.3)

write_api.write(bucket="my-bucket", record=[_point1, _point2])

client.close()
查询
通过QueryApi检索的结果可以格式化为
- Flux数据结构:[FluxTable](https://github.com/influxdata/influxdb-client-python/blob/master/influxdb_client/client/flux_table.py#L5),[FluxColumn](https://github.com/influxdata/influxdb-client-python/blob/master/influxdb_client/client/flux_table.py#L22),[FluxRecord](https://github.com/influxdata/influxdb-client-python/blob/master/influxdb_client/client/flux_table.py#L31)
influxdb_client.client.flux_table.CSVIterator,它将遍历CSV行- 作为
str迭代器的原始未处理结果 - Pandas DataFrame
API还支持通过query_stream流式传输FluxRecord,请参见下面的示例
from influxdb_client import InfluxDBClient, Point, Dialect
from influxdb_client.client.write_api import SYNCHRONOUS

client = InfluxDBClient(url="https://:8086", token="my-token", org="my-org")

write_api = client.write_api(write_options=SYNCHRONOUS)
query_api = client.query_api()

"""
Prepare data
"""

_point1 = Point("my_measurement").tag("location", "Prague").field("temperature", 25.3)
_point2 = Point("my_measurement").tag("location", "New York").field("temperature", 24.3)

write_api.write(bucket="my-bucket", record=[_point1, _point2])

"""
Query: using Table structure
"""
tables = query_api.query('from(bucket:"my-bucket") |> range(start: -10m)')

for table in tables:
    print(table)
    for record in table.records:
        print(record.values)

print()
print()

"""
Query: using Bind parameters
"""

p = {"_start": datetime.timedelta(hours=-1),
     "_location": "Prague",
     "_desc": True,
     "_floatParam": 25.1,
     "_every": datetime.timedelta(minutes=5)
     }

tables = query_api.query('''
    from(bucket:"my-bucket") |> range(start: _start)
        |> filter(fn: (r) => r["_measurement"] == "my_measurement")
        |> filter(fn: (r) => r["_field"] == "temperature")
        |> filter(fn: (r) => r["location"] == _location and r["_value"] > _floatParam)
        |> aggregateWindow(every: _every, fn: mean, createEmpty: true)
        |> sort(columns: ["_time"], desc: _desc)
''', params=p)

for table in tables:
    print(table)
    for record in table.records:
        print(str(record["_time"]) + " - " + record["location"] + ": " + str(record["_value"]))

print()
print()

"""
Query: using Stream
"""
records = query_api.query_stream('from(bucket:"my-bucket") |> range(start: -10m)')

for record in records:
    print(f'Temperature in {record["location"]} is {record["_value"]}')

"""
Interrupt a stream after retrieve a required data
"""
large_stream = query_api.query_stream('from(bucket:"my-bucket") |> range(start: -100d)')
for record in large_stream:
    if record["location"] == "New York":
        print(f'New York temperature: {record["_value"]}')
        break

large_stream.close()

print()
print()

"""
Query: using csv library
"""
csv_result = query_api.query_csv('from(bucket:"my-bucket") |> range(start: -10m)',
                                 dialect=Dialect(header=False, delimiter=",", comment_prefix="#", annotations=[],
                                                 date_time_format="RFC3339"))
for csv_line in csv_result:
    if not len(csv_line) == 0:
        print(f'Temperature in {csv_line[9]} is {csv_line[6]}')

"""
Close client
"""
client.close()
Pandas DataFrame
:warning
对于DataFrame查询,您应通过
pip install 'influxdb-client[extra]'安装Pandas依赖项。
:warning
请注意,如果查询返回多个表,则客户端将为每个表生成一个
DataFrame。
client可以通过query_data_frame以Pandas DataFrame格式检索数据
from influxdb_client import InfluxDBClient, Point, Dialect
from influxdb_client.client.write_api import SYNCHRONOUS

client = InfluxDBClient(url="https://:8086", token="my-token", org="my-org")

write_api = client.write_api(write_options=SYNCHRONOUS)
query_api = client.query_api()

"""
Prepare data
"""

_point1 = Point("my_measurement").tag("location", "Prague").field("temperature", 25.3)
_point2 = Point("my_measurement").tag("location", "New York").field("temperature", 24.3)

write_api.write(bucket="my-bucket", record=[_point1, _point2])

"""
Query: using Pandas DataFrame
"""
data_frame = query_api.query_data_frame('from(bucket:"my-bucket") '
                                        '|> range(start: -10m) '
                                        '|> pivot(rowKey:["_time"], columnKey: ["_field"], valueColumn: "_value") '
                                        '|> keep(columns: ["location", "temperature"])')
print(data_frame.to_string())

"""
Close client
"""
client.close()
输出
result table  location  temperature
0  _result     0  New York         24.3
1  _result     1    Prague         25.3
示例
如何高效导入大数据集
以下示例显示了如何导入约十兆字节的数据集。如果您想导入数吉字节的数据,请使用我们的多进程示例:[import_data_set_multiprocessing.py](https://github.com/influxdata/influxdb-client-python/blob/master/examples/import_data_set_multiprocessing.py),以充分利用您的硬件。
- 来源 - import_data_set.py
"""
Import VIX - CBOE Volatility Index - from "vix-daily.csv" file into InfluxDB 2.0

https://datahub.io/core/finance-vix#data
"""

from collections import OrderedDict
from csv import DictReader

import reactivex as rx
from reactivex import operators as ops

from influxdb_client import InfluxDBClient, Point, WriteOptions

def parse_row(row: OrderedDict):
    """Parse row of CSV file into Point with structure:

        financial-analysis,type=ily close=18.47,high=19.82,low=18.28,open=19.82 1198195200000000000

    CSV format:
        Date,VIX Open,VIX High,VIX Low,VIX Close\n
        2004-01-02,17.96,18.68,17.54,18.22\n
        2004-01-05,18.45,18.49,17.44,17.49\n
        2004-01-06,17.66,17.67,16.19,16.73\n
        2004-01-07,16.72,16.75,15.5,15.5\n
        2004-01-08,15.42,15.68,15.32,15.61\n
        2004-01-09,16.15,16.88,15.57,16.75\n
        ...

    :param row: the row of CSV file
    :return: Parsed csv row to [Point]
    """

    """
     For better performance is sometimes useful directly create a LineProtocol to avoid unnecessary escaping overhead:
     """
     # from datetime import timezone
     # import ciso8601
     # from influxdb_client.client.write.point import EPOCH
     #
     # time = (ciso8601.parse_datetime(row["Date"]).replace(tzinfo=timezone.utc) - EPOCH).total_seconds() * 1e9
     # return f"financial-analysis,type=vix-daily" \
     #        f" close={float(row['VIX Close'])},high={float(row['VIX High'])},low={float(row['VIX Low'])},open={float(row['VIX Open'])} " \
     #        f" {int(time)}"

    return Point("financial-analysis") \
        .tag("type", "vix-daily") \
        .field("open", float(row['VIX Open'])) \
        .field("high", float(row['VIX High'])) \
        .field("low", float(row['VIX Low'])) \
        .field("close", float(row['VIX Close'])) \
        .time(row['Date'])


"""
Converts vix-daily.csv into sequence of datad point
"""
data = rx \
    .from_iterable(DictReader(open('vix-daily.csv', 'r'))) \
    .pipe(ops.map(lambda row: parse_row(row)))

client = InfluxDBClient(url="https://:8086", token="my-token", org="my-org", debug=True)

"""
Create client that writes data in batches with 50_000 items.
"""
write_api = client.write_api(write_options=WriteOptions(batch_size=50_000, flush_interval=10_000))

"""
Write data into InfluxDB
"""
write_api.write(bucket="my-bucket", record=data)
write_api.close()

"""
Querying max value of CBOE Volatility Index
"""
query = 'from(bucket:"my-bucket")' \
        ' |> range(start: 0, stop: now())' \
        ' |> filter(fn: (r) => r._measurement == "financial-analysis")' \
        ' |> max()'
result = client.query_api().query(query=query)

"""
Processing results
"""
print()
print("=== results ===")
print()
for table in result:
    for record in table.records:
        print('max {0:5} = {1}'.format(record.get_field(), record.get_value()))

"""
Close client
"""
client.close()
高效从IOT传感器写入数据
- 来源 - iot_sensor.py
"""
Efficiency write data from IOT sensor - write changed temperature every minute
"""
import atexit
import platform
from datetime import timedelta

import psutil as psutil
import reactivex as rx
from reactivex import operators as ops

from influxdb_client import InfluxDBClient, WriteApi, WriteOptions

def on_exit(db_client: InfluxDBClient, write_api: WriteApi):
    """Close clients after terminate a script.

    :param db_client: InfluxDB client
    :param write_api: WriteApi
    :return: nothing
    """
    write_api.close()
    db_client.close()


def sensor_temperature():
    """Read a CPU temperature. The [psutil] doesn't support MacOS so we use [sysctl].

    :return: actual CPU temperature
    """
    os_name = platform.system()
    if os_name == 'Darwin':
        from subprocess import check_output
        output = check_output(["sysctl", "machdep.xcpm.cpu_thermal_level"])
        import re
        return re.findall(r'\d+', str(output))[0]
    else:
        return psutil.sensors_temperatures()["coretemp"][0]


def line_protocol(temperature):
    """Create a InfluxDB line protocol with structure:

        iot_sensor,hostname=mine_sensor_12,type=temperature value=68

    :param temperature: the sensor temperature
    :return: Line protocol to write into InfluxDB
    """

    import socket
    return 'iot_sensor,hostname={},type=temperature value={}'.format(socket.gethostname(), temperature)


"""
Read temperature every minute; distinct_until_changed - produce only if temperature change
"""
data = rx\
    .interval(period=timedelta(seconds=60))\
    .pipe(ops.map(lambda t: sensor_temperature()),
          ops.distinct_until_changed(),
          ops.map(lambda temperature: line_protocol(temperature)))

_db_client = InfluxDBClient(url="https://:8086", token="my-token", org="my-org", debug=True)

"""
Create client that writes data into InfluxDB
"""
_write_api = _db_client.write_api(write_options=WriteOptions(batch_size=1))
_write_api.write(bucket="my-bucket", record=data)


"""
Call after terminate a script
"""
atexit.register(on_exit, _db_client, _write_api)

input()
连接到InfluxDB云
以下示例展示了如何以最简单的方式使用InfluxDB Cloud写入和查询数据。
首先,您应该创建一个认证令牌,具体步骤请参考此处。
之后,您应该在influx_cloud.py示例中配置属性:influx_cloud_url、influx_cloud_token、bucket和org。
最后一步是通过执行python3 influx_cloud.py来运行Python脚本。
- 来源 - influx_cloud.py
"""
Connect to InfluxDB 2.0 - write data and query them
"""

from datetime import datetime, timezone

from influxdb_client import Point, InfluxDBClient
from influxdb_client.client.write_api import SYNCHRONOUS

"""
Configure credentials
"""
influx_cloud_url = 'https://us-west-2-1.aws.cloud2.influxdata.com'
influx_cloud_token = '...'
bucket = '...'
org = '...'

client = InfluxDBClient(url=influx_cloud_url, token=influx_cloud_token)
try:
    kind = 'temperature'
    host = 'host1'
    device = 'opt-123'

    """
    Write data by Point structure
    """
    point = Point(kind).tag('host', host).tag('device', device).field('value', 25.3).time(time=datetime.now(tz=timezone.utc))

    print(f'Writing to InfluxDB cloud: {point.to_line_protocol()} ...')

    write_api = client.write_api(write_options=SYNCHRONOUS)
    write_api.write(bucket=bucket, org=org, record=point)

    print()
    print('success')
    print()
    print()

    """
    Query written data
    """
    query = f'from(bucket: "{bucket}") |> range(start: -1d) |> filter(fn: (r) => r._measurement == "{kind}")'
    print(f'Querying from InfluxDB cloud: "{query}" ...')
    print()

    query_api = client.query_api()
    tables = query_api.query(query=query, org=org)

    for table in tables:
        for row in table.records:
            print(f'{row.values["_time"]}: host={row.values["host"]},device={row.values["device"]} '
                  f'{row.values["_value"]} °C')

    print()
    print('success')

except Exception as e:
    print(e)
finally:
    client.close()
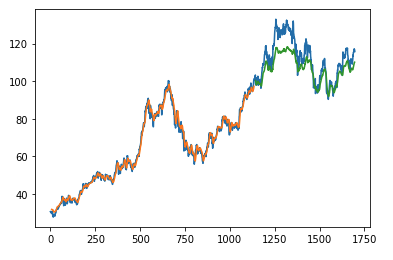
如何使用Jupyter + Pandas + InfluxDB 2
第一个示例展示了如何使用客户端功能通过Keras、TensorFlow、sklearn预测股票价格。
该示例来自Kaggle。

结果
第二个示例展示了如何使用客户端功能通过hvPlot、Streamz、RxPY进行实时可视化。
其他示例
您可以在GitHub上找到所有示例:influxdb-client-python/examples。
高级使用
Gzip支持
InfluxDBClient默认不启用gzip压缩的http请求。如果您想启用gzip以减小传输数据的大小,可以调用
from influxdb_client import InfluxDBClient

_db_client = InfluxDBClient(url="https://:8086", token="my-token", org="my-org", enable_gzip=True)
认证到InfluxDB
InfluxDBClient支持三种授权连接的方式
- 令牌
- 用户名 & 密码
- HTTP基本认证
令牌
使用token来认证到InfluxDB API。在您的API请求中,将发送一个Authorization头。头的值,提供单词Token后跟一个空格和一个InfluxDB API令牌。单词token是区分大小写的。
from influxdb_client import InfluxDBClient

with InfluxDBClient(url="https://:8086", token="my-token") as client
:warning
请注意,这是认证到InfluxDB API的首选方式。
用户名 & 密码
通过用户名和密码凭据进行认证。如果成功,将为用户创建一个新的会话。
from influxdb_client import InfluxDBClient

with InfluxDBClient(url="https://:8086", username="my-user", password="my-password") as client
:warning
username/password认证基于HTTP "Basic"认证。当达到生存时间(TTL)(默认60分钟)时,授权过期,客户端生成unauthorized exception。
HTTP基本认证
当与不使用auth-enabled但由使用基本认证的反向代理保护的InfluxDB 1.8.x进行交互时,请使用此方法启用基本认证。
from influxdb_client import InfluxDBClient

with InfluxDBClient(url="https://:8086", auth_basic=True, token="my-proxy-secret") as client
:warning
当直接与InfluxDB 2交互时,请勿使用此方法。
代理配置
您可以将客户端配置为通过HTTP代理隧道请求。以下代理选项受到支持
proxy- 设置此值以配置要使用的http代理,例如:https://:3128proxy_headers- 一个包含将发送到代理的头的字典。可用于代理认证。
from influxdb_client import InfluxDBClient

with InfluxDBClient(url="https://:8086",
                    token="my-token",
                    org="my-org",
                    proxy="https://:3128") as client:
如果您的代理通知客户端使用永久的重定向(HTTP 301)到不同的主机。客户端将删除Authorization头,因为否则Authorization的内容将被发送到第三方,这是安全漏洞。
您可以通过以下方式更改此行为
from urllib3 import Retry
Retry.DEFAULT_REMOVE_HEADERS_ON_REDIRECT = frozenset()
Retry.DEFAULT.remove_headers_on_redirect = Retry.DEFAULT_REMOVE_HEADERS_ON_REDIRECT
删除数据
delete_api.py支持从InfluxDB桶中删除点。
from influxdb_client import InfluxDBClient

client = InfluxDBClient(url="https://:8086", token="my-token")

delete_api = client.delete_api()

"""
Delete Data
"""
start = "1970-01-01T00:00:00Z"
stop = "2021-02-01T00:00:00Z"
delete_api.delete(start, stop, '_measurement="my_measurement"', bucket='my-bucket', org='my-org')

"""
Close client
"""
client.close()
InfluxDB 1.8 API兼容性
InfluxDB 1.8.0引入了与InfluxDB 2.0兼容的API,允许您轻松地从InfluxDB 1.x迁移到InfluxDB 2.0 Cloud或开源版本。
以下是与InfluxDB 2.0兼容的API
| API | 端点 | 描述 |
|---|---|---|
| query_api.py | /api/v2/query | 使用 InfluxDB 2.0 API 和 Flux 在 InfluxDB 1.8.0+ 中查询数据(端点应通过 flux-enabled 选项 启用) |
| write_api.py | /api/v2/write | 使用 InfluxDB 2.0 API 将数据写入 InfluxDB 1.8.0+ |
| ping() | /ping | 检查您的 InfluxDB 实例的状态 |
有关详细信息,请参阅 InfluxDB 1.8 示例。
错误处理
错误可能发生,因此您的代码必须准备好处理它们。所有客户端相关异常都由 InfluxDBError 提供。如果客户端无法恢复异常,则将其返回给应用程序。这些异常留由开发人员处理。
几乎所有 API 都直接返回不可恢复的异常以这种方式处理
from influxdb_client import InfluxDBClient
from influxdb_client.client.exceptions import InfluxDBError
from influxdb_client.client.write_api import SYNCHRONOUS

with InfluxDBClient(url="https://:8086", token="my-token", org="my-org") as client:
    try:
        client.write_api(write_options=SYNCHRONOUS).write("my-bucket", record="mem,tag=a value=86")
    except InfluxDBError as e:
        if e.response.status == 401:
            raise Exception(f"Insufficient write permissions to 'my-bucket'.") from e
        raise
唯一的例外是 批处理 WriteAPI(有关更多信息,请参阅 批处理),您需要注册自定义回调来处理批事件。这是因为此 API 在 后台 和 单独的 线程中运行,无法直接返回底层异常。
from influxdb_client import InfluxDBClient
from influxdb_client.client.exceptions import InfluxDBError


class BatchingCallback(object):

    def success(self, conf: (str, str, str), data: str):
        print(f"Written batch: {conf}, data: {data}")

    def error(self, conf: (str, str, str), data: str, exception: InfluxDBError):
        print(f"Cannot write batch: {conf}, data: {data} due: {exception}")

    def retry(self, conf: (str, str, str), data: str, exception: InfluxDBError):
        print(f"Retryable error occurs for batch: {conf}, data: {data} retry: {exception}")


with InfluxDBClient(url="https://:8086", token="my-token", org="my-org") as client:
    callback = BatchingCallback()
    with client.write_api(success_callback=callback.success,
                          error_callback=callback.error,
                          retry_callback=callback.retry) as write_api:
        pass
HTTP 重试策略
默认情况下,客户端仅对批处理写入使用重试策略(有关更多信息,请参阅 批处理)。对于其他 HTTP 请求没有统一的重试策略,但可以通过 InfluxDBClient 的 retries 参数进行配置。
有关配置 HTTP 重试的更多信息,请参阅 urllib3 文档。
from urllib3 import Retry

from influxdb_client import InfluxDBClient

retries = Retry(connect=5, read=2, redirect=5)
client = InfluxDBClient(url="https://:8086", token="my-token", org="my-org", retries=retries)
纳秒级精度
Python 的 datetime 不支持纳秒精度,因此库在写入和查询时忽略微秒之后的所有内容。
如果您想使用具有纳秒精度的 datetime,应使用 pandas.Timestamp,它是 python datetime.datetime 对象的替代品,并且您应将适当的 DateTimeHelper 设置为客户端。
from influxdb_client import Point, InfluxDBClient
from influxdb_client.client.util.date_utils_pandas import PandasDateTimeHelper
from influxdb_client.client.write_api import SYNCHRONOUS

"""
Set PandasDate helper which supports nanoseconds.
"""
import influxdb_client.client.util.date_utils as date_utils

date_utils.date_helper = PandasDateTimeHelper()

"""
Prepare client.
"""
client = InfluxDBClient(url="https://:8086", token="my-token", org="my-org")

write_api = client.write_api(write_options=SYNCHRONOUS)
query_api = client.query_api()

"""
Prepare data
"""

point = Point("h2o_feet") \
    .field("water_level", 10) \
    .tag("location", "pacific") \
    .time('1996-02-25T21:20:00.001001231Z')

print(f'Time serialized with nanosecond precision: {point.to_line_protocol()}')
print()

write_api.write(bucket="my-bucket", record=point)

"""
Query: using Stream
"""
query = '''
from(bucket:"my-bucket")
        |> range(start: 0, stop: now())
        |> filter(fn: (r) => r._measurement == "h2o_feet")
'''
records = query_api.query_stream(query)

for record in records:
    print(f'Temperature in {record["location"]} is {record["_value"]} at time: {record["_time"]}')

"""
Close client
"""
client.close()
如何使用 Asyncio
从版本 1.27.0 开始,对于 Python 3.7+,influxdb-client 包基于 asyncio、aiohttp 和 aiocsv 支持 async/await。您可以直接安装 aiohttp 和 aiocsv。
$ python -m pip install influxdb-client aiohttp aiocsv
或者使用 [async] 额外功能
$ python -m pip install influxdb-client[async]
:warning
InfluxDBClientAsync应在async coroutine内初始化,否则可能会有意外的行为。更多信息请参阅: 为什么在事件循环之外创建 ClientSession 是危险的?。
异步 API
所有异步 API 都可通过 influxdb_client.client.influxdb_client_async.InfluxDBClientAsync 提供。客户端的异步版本支持以下异步 API
influxdb_client.client.write_api_async.WriteApiAsyncinfluxdb_client.client.query_api_async.QueryApiAsyncinfluxdb_client.client.delete_api_async.DeleteApiAsync- 管理服务在
influxdb_client.service中支持异步操作
并且还可以通过 /ping 端点检查 InfluxDB 的就绪状态
import asyncio

from influxdb_client.client.influxdb_client_async import InfluxDBClientAsync


async def main():
    async with InfluxDBClientAsync(url="https://:8086", token="my-token", org="my-org") as client:
        ready = await client.ping()
        print(f"InfluxDB: {ready}")


if __name__ == "__main__":
    asyncio.run(main())
异步写入 API
influxdb_client.client.write_api_async.WriteApiAsync 支持以下方式摄取数据
string或bytes,格式化为 InfluxDB 的行协议- 数据点 结构
- 具有键:
measurement、tags、fields和time或自定义结构的字典样式映射 - 命名元组
- 数据类
- Pandas DataFrame
- 上述项的列表
import asyncio

from influxdb_client import Point
from influxdb_client.client.influxdb_client_async import InfluxDBClientAsync


async def main():
    async with InfluxDBClientAsync(url="https://:8086", token="my-token", org="my-org") as client:

        write_api = client.write_api()

        _point1 = Point("async_m").tag("location", "Prague").field("temperature", 25.3)
        _point2 = Point("async_m").tag("location", "New York").field("temperature", 24.3)

        successfully = await write_api.write(bucket="my-bucket", record=[_point1, _point2])

        print(f" > successfully: {successfully}")


if __name__ == "__main__":
    asyncio.run(main())
异步查询 API
influxdb_client.client.query_api_async.QueryApiAsync 支持以下方式检索数据
influxdb_client.client.flux_table.FluxTable列表- 通过
typing.AsyncGenerator的influxdb_client.client.flux_table.FluxRecord流 - Pandas DataFrame
- 通过
typing.AsyncGenerator的 Pandas DataFrame 流 - 原始
str输出
import asyncio

from influxdb_client.client.influxdb_client_async import InfluxDBClientAsync


async def main():
    async with InfluxDBClientAsync(url="https://:8086", token="my-token", org="my-org") as client:
        # Stream of FluxRecords
        query_api = client.query_api()
        records = await query_api.query_stream('from(bucket:"my-bucket") '
                                               '|> range(start: -10m) '
                                               '|> filter(fn: (r) => r["_measurement"] == "async_m")')
        async for record in records:
            print(record)


if __name__ == "__main__":
    asyncio.run(main())
异步删除 API
import asyncio
from datetime import datetime

from influxdb_client.client.influxdb_client_async import InfluxDBClientAsync


async def main():
    async with InfluxDBClientAsync(url="https://:8086", token="my-token", org="my-org") as client:
        start = datetime.fromtimestamp(0)
        stop = datetime.now()
        # Delete data with location = 'Prague'
        successfully = await client.delete_api().delete(start=start, stop=stop, bucket="my-bucket",
                                                        predicate="location = \"Prague\"")
        print(f" > successfully: {successfully}")


if __name__ == "__main__":
    asyncio.run(main())
管理 API
import asyncio

from influxdb_client import OrganizationsService
from influxdb_client.client.influxdb_client_async import InfluxDBClientAsync


async def main():
    async with InfluxDBClientAsync(url='https://:8086', token='my-token', org='my-org') as client:
        # Initialize async OrganizationsService
        organizations_service = OrganizationsService(api_client=client.api_client)

        # Find organization with name 'my-org'
        organizations = await organizations_service.get_orgs(org='my-org')
        for organization in organizations.orgs:
            print(f'name: {organization.name}, id: {organization.id}')


if __name__ == "__main__":
    asyncio.run(main())
代理和重定向
您可以将客户端配置为通过HTTP代理隧道请求。以下代理选项受到支持
proxy- 设置此值以配置要使用的http代理,例如:https://:3128proxy_headers- 一个包含将发送到代理的头的字典。可用于代理认证。
from influxdb_client.client.influxdb_client_async import InfluxDBClientAsync


async with InfluxDBClientAsync(url="https://:8086",
                               token="my-token",
                               org="my-org",
                               proxy="https://:3128") as client:
如果您的代理通知客户端使用永久的重定向(HTTP 301)到不同的主机。客户端将删除Authorization头,因为否则Authorization的内容将被发送到第三方,这是安全漏洞。
客户端自动遵循HTTP重定向。默认的重定向策略是遵循最多10次连续请求。可以通过以下方式配置重定向:
allow_redirects- 如果设置为False,则不遵循HTTP重定向。默认为True。max_redirects- 要遵循的HTTP重定向的最大次数。默认为10。
日志记录
客户端使用Python的日志记录功能来记录库活动。以下为公开的日志记录器类别:
influxdb_client.client.influxdb_clientinfluxdb_client.client.influxdb_client_asyncinfluxdb_client.client.write_apiinfluxdb_client.client.write_api_asyncinfluxdb_client.client.write.retryinfluxdb_client.client.write.dataframe_serializerinfluxdb_client.client.util.multiprocessing_helperinfluxdb_client.client.httpinfluxdb_client.client.exceptions
在没有配置日志记录器输出的情况下,默认的日志记录级别是warning。您可以使用标准日志记录器接口来更改日志级别和处理程序。
import logging
import sys

from influxdb_client import InfluxDBClient

with InfluxDBClient(url="https://:8086", token="my-token", org="my-org") as client:
    for _, logger in client.conf.loggers.items():
        logger.setLevel(logging.DEBUG)
        logger.addHandler(logging.StreamHandler(sys.stdout))
调试
出于调试目的,您可以通过以下方式启用HTTP请求的详细日志记录并将所有客户端日志记录器类别设置为debug级别:
client = InfluxDBClient(url="https://:8086", token="my-token", debug=True)
HTTP请求的头部和正文都将记录到标准输出。
本地测试
# start/restart InfluxDB2 on local machine using docker
./scripts/influxdb-restart.sh

# install requirements
pip install -e . --user
pip install -e .\[extra\] --user
pip install -e .\[test\] --user

# run unit & integration tests
pytest tests
贡献
欢迎在GitHub上提交错误报告和拉取请求,网址为https://github.com/influxdata/influxdb-client-python。
许可证
该软件包作为开源软件,根据MIT许可协议提供。


下载文件
下载适合您平台文件。如果您不确定选择哪个,请了解有关安装软件包的更多信息。


