一个针对临床预后自动设计预测建模流程的系统。


项目描述
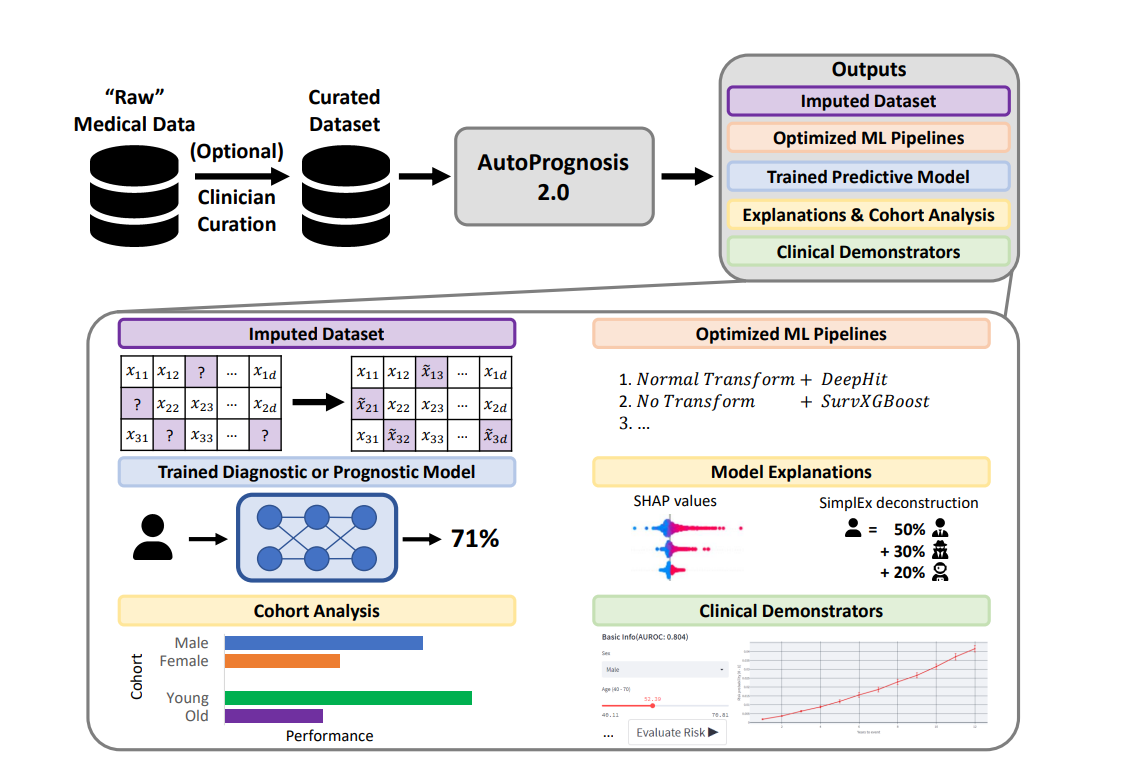
AutoPrognosis - 一个针对临床预后自动设计预测建模流程的系统。


:key: 特点
- :rocket: 自动学习用于分类、回归或生存分析任务的管道集成。
- :cyclone: 易于扩展的可插拔架构。
- :fire: 可解释性和不确定性量化工具。
- :adhesive_bandage: 使用HyperImpute进行数据插补。
- :zap: 使用Streamlit构建演示。
- :notebook: 提供Python和R教程。
- :book: 阅读文档
:rocket: 安装
使用pip
可以使用以下方式从PyPI安装库
$ pip install autoprognosis
或从源安装
$ pip install .
Redis(可选,但推荐)
AutoPrognosis可以使用Redis作为后端,以改进搜索的性能和质量。
为此,请按照官方网站上描述的步骤安装redis-server包。
环境变量
库可以通过一组环境变量进行配置。
| 变量 | 描述 |
|---|---|
N_OPT_JOBS |
用于超参数搜索的核心数。默认:1 |
N_LEARNER_JOBS |
个体学习器使用的核心数。默认:所有CPU |
REDIS_HOST |
Redis数据库的IP地址。默认:127.0.0.1 |
REDIS_PORT |
Redis端口。默认:6379 |
示例:将 export N_OPT_JOBS = 2 设置为使用2个核心进行超参数搜索。
:boom: 示例用法
高级Python教程可以在Python教程部分找到。
R示例可以在R教程部分找到。
列出可用的分类器
from autoprognosis.plugins.prediction.classifiers import Classifiers
print(Classifiers().list_available())
为分类器创建研究
from sklearn.datasets import load_breast_cancer

from autoprognosis.studies.classifiers import ClassifierStudy
from autoprognosis.utils.serialization import load_model_from_file
from autoprognosis.utils.tester import evaluate_estimator


X, Y = load_breast_cancer(return_X_y=True, as_frame=True)

df = X.copy()
df["target"] = Y

study_name = "example"

study = ClassifierStudy(
    study_name=study_name,
    dataset=df,  # pandas DataFrame
    target="target",  # the label column in the dataset
)
model = study.fit()

# Predict the probabilities of each class using the model
model.predict_proba(X)
(高级)自定义分类器研究
from pathlib import Path

from sklearn.datasets import load_breast_cancer

from autoprognosis.studies.classifiers import ClassifierStudy
from autoprognosis.utils.serialization import load_model_from_file
from autoprognosis.utils.tester import evaluate_estimator


X, Y = load_breast_cancer(return_X_y=True, as_frame=True)

df = X.copy()
df["target"] = Y

workspace = Path("workspace")
study_name = "example"

study = ClassifierStudy(
    study_name=study_name,
    dataset=df,  # pandas DataFrame
    target="target",  # the label column in the dataset
    num_iter=100,  # how many trials to do for each candidate
    timeout=60,  # seconds
    classifiers=["logistic_regression", "lda", "qda"],
    workspace=workspace,
)

study.run()

output = workspace / study_name / "model.p"
model = load_model_from_file(output)

# <model> contains the optimal architecture, but the model is not trained yet. You need to call fit() to use it.
# This way, we can further benchmark the selected model on the training set.
metrics = evaluate_estimator(model, X, Y)

print(f"model {model.name()} -> {metrics['str']}")

# Train the model
model.fit(X, Y)

# Predict the probabilities of each class using the model
model.predict_proba(X)
列出可用的回归器
from autoprognosis.plugins.prediction.regression import Regression
print(Regression().list_available())
创建回归研究
# third party
import pandas as pd

# autoprognosis absolute
from autoprognosis.utils.serialization import load_model_from_file
from autoprognosis.utils.tester import evaluate_regression
from autoprognosis.studies.regression import RegressionStudy

# Load dataset
df = pd.read_csv(
    "https://archive.ics.uci.edu/ml/machine-learning-databases/00291/airfoil_self_noise.dat",
    header=None,
    sep="\\t",
)
last_col = df.columns[-1]
y = df[last_col]
X = df.drop(columns=[last_col])

df = X.copy()
df["target"] = y

# Search the model
study_name="regression_example"
study = RegressionStudy(
    study_name=study_name,
    dataset=df,  # pandas DataFrame
    target="target",  # the label column in the dataset
)
model = study.fit()

# Predict using the model
model.predict(X)
高级自定义回归研究
# stdlib
from pathlib import Path

# third party
import pandas as pd

# autoprognosis absolute
from autoprognosis.utils.serialization import load_model_from_file
from autoprognosis.utils.tester import evaluate_regression
from autoprognosis.studies.regression import RegressionStudy

# Load dataset
df = pd.read_csv(
    "https://archive.ics.uci.edu/ml/machine-learning-databases/00291/airfoil_self_noise.dat",
    header=None,
    sep="\\t",
)
last_col = df.columns[-1]
y = df[last_col]
X = df.drop(columns=[last_col])

df = X.copy()
df["target"] = y

# Search the model
workspace = Path("workspace")
workspace.mkdir(parents=True, exist_ok=True)

study_name="regression_example"
study = RegressionStudy(
    study_name=study_name,
    dataset=df,  # pandas DataFrame
    target="target",  # the label column in the dataset
    num_iter=10,  # how many trials to do for each candidate. Default: 50
    num_study_iter=2,  # how many outer iterations to do. Default: 5
    timeout=50,  # timeout for optimization for each classfier. Default: 600 seconds
    regressors=["linear_regression", "xgboost_regressor"],
    workspace=workspace,
)

study.run()

# Test the model
output = workspace / study_name / "model.p"

model = load_model_from_file(output)
# <model> contains the optimal architecture, but the model is not trained yet. You need to call fit() to use it.
# This way, we can further benchmark the selected model on the training set.

metrics = evaluate_regression(model, X, y)

print(f"Model {model.name()} score: {metrics['str']}")

# Train the model
model.fit(X, y)


# Predict using the model
model.predict(X)
列出可用的生存分析估计器
from autoprognosis.plugins.prediction.risk_estimation import RiskEstimation
print(RiskEstimation().list_available())
创建生存分析研究
# third party
import numpy as np
from pycox import datasets

# autoprognosis absolute
from autoprognosis.studies.risk_estimation import RiskEstimationStudy
from autoprognosis.utils.serialization import load_model_from_file
from autoprognosis.utils.tester import evaluate_survival_estimator

df = datasets.gbsg.read_df()
df = df[df["duration"] > 0]

X = df.drop(columns = ["duration"])
T = df["duration"]
Y = df["event"]

eval_time_horizons = np.linspace(T.min(), T.max(), 5)[1:-1]

study_name = "example_risks"

study = RiskEstimationStudy(
    study_name=study_name,
    dataset=df,
    target="event",
    time_to_event="duration",
    time_horizons=eval_time_horizons,
)

model = study.fit()

# Predict using the model
model.predict(X, eval_time_horizons)
高级自定义生存分析研究
# stdlib
import os
from pathlib import Path

# third party
import numpy as np
from pycox import datasets

# autoprognosis absolute
from autoprognosis.studies.risk_estimation import RiskEstimationStudy
from autoprognosis.utils.serialization import load_model_from_file
from autoprognosis.utils.tester import evaluate_survival_estimator

df = datasets.gbsg.read_df()
df = df[df["duration"] > 0]

X = df.drop(columns = ["duration"])
T = df["duration"]
Y = df["event"]

eval_time_horizons = np.linspace(T.min(), T.max(), 5)[1:-1]

workspace = Path("workspace")
study_name = "example_risks"

study = RiskEstimationStudy(
    study_name=study_name,
    dataset=df,
    target="event",
    time_to_event="duration",
    time_horizons=eval_time_horizons,
    num_iter=10,
    num_study_iter=1,
    timeout=10,
    risk_estimators=["cox_ph", "survival_xgboost"],
    score_threshold=0.5,
    workspace=workspace,
)

study.run()

output = workspace / study_name / "model.p"

model = load_model_from_file(output)
# <model> contains the optimal architecture, but the model is not trained yet. You need to call fit() to use it.
# This way, we can further benchmark the selected model on the training set.

metrics = evaluate_survival_estimator(model, X, T, Y, eval_time_horizons)

print(f"Model {model.name()} score: {metrics['str']}")

# Train the model
model.fit(X, T, Y)

# Predict using the model
model.predict(X, eval_time_horizons)
:high_brightness: 教程
插件

AutoML
构建演示器
:zap: 插件
插补方法
from autoprognosis.plugins.imputers import  Imputers

imputer = Imputers().get(<NAME>)
| 名称 | 描述 |
|---|---|
| hyperimpute | 基于线性模型、树、XGBoost、CatBoost和神经网络,同时使用回归和分类方法的迭代插补器 |
| mean | 使用 SimpleImputer 沿每一列使用均值替换缺失值 |
| median | 使用 SimpleImputer 沿每一列使用中值替换缺失值 |
| most_frequent | 使用 SimpleImputer 沿每一列使用最频繁的值替换缺失值 |
| missforest | 基于 IterativeImputer 和 ExtraTreesRegressor 的随机森林迭代插补方法 |
| ice | 基于正则化线性回归的迭代插补方法,使用 IterativeImputer 和 BayesianRidge |
| mice | 基于ICE的多个插补,使用 IterativeImputer 和 BayesianRidge |
| softimpute | 通过核范数正则化进行低秩矩阵逼近 |
| EM | 迭代过程,使用其他变量来估计一个值(期望),然后检查该值是否最有可能(最大化) - EM插补算法 |
| gain | GAIN:使用生成对抗网络进行缺失数据插补 |
预处理方法
from autoprognosis.plugins.preprocessors import Preprocessors

preprocessor = Preprocessors().get(<NAME>)
| 名称 | 描述 |
|---|---|
| maxabs_scaler | 按每项的最大绝对值缩放每个特征。 - MaxAbsScaler |
| scaler | 通过去除均值并缩放到单位方差来标准化特征。 - StandardScaler |
| feature_normalizer | 单独将样本归一化到单位范数。 Normalizer |
| normal_transform | 使用分位数信息转换特征。QuantileTransformer |
| uniform_transform | 使用分位数信息转换特征。QuantileTransformer |
| minmax_scaler | 通过将每个特征缩放到给定范围来转换特征。MinMaxScaler |
分类
from autoprognosis.plugins.prediction.classifiers import Classifiers

classifier = Classifiers().get(<NAME>)
| 名称 | 描述 |
|---|---|
| neural_nets | 基于PyTorch的神经网络分类器。 |
| logistic_regression | LogisticRegression |
| catboost | 决策树上的梯度提升 - CatBoost |
| random_forest | 随机森林分类器。 RandomForestClassifier |
| tabnet | TabNet : 注意力可解释的表格学习 |
| xgboost | XGBoostClassifier |
生存分析
from autoprognosis.plugins.prediction.risk_estimation import RiskEstimation

predictor = RiskEstimation().get(<NAME>)
| 名称 | 描述 |
|---|---|
| survival_xgboost | XGBoost 生存嵌入 |
| loglogistic_aft | 对数-Logistic AFT 模型 |
| deephit | DeepHit:一种用于竞争风险的生存分析的深度学习方法 |
| cox_ph | Cox 的比例风险模型 |
| weibull_aft | 威布尔 AFT 模型。 |
| lognormal_aft | 对数-正态 AFT 模型 |
| coxnet | CoxNet 是一个 Cox 比例风险模型,也称为 DeepSurv |
回归
from autoprognosis.plugins.prediction.regression import Regression

regressor = Regression().get(<NAME>)
| 名称 | 描述 |
|---|---|
| tabnet_regressor | TabNet : 注意力可解释的表格学习 |
| catboost_regressor | 决策树上的梯度提升 - CatBoost |
| random_forest_regressor | RandomForestRegressor |
| xgboost_regressor | XGBoostClassifier |
| neural_nets_regression | 基于PyTorch的神经网络回归器。 |
| linear_regression | LinearRegression |
解释器
from autoprognosis.plugins.explainers import Explainers

explainer = Explainers().get(<NAME>)
| 名称 | 描述 |
|---|---|
| risk_effect_size | 使用概率之间的Cohen距离来计算特征重要性 |
| lime | Lime:解释任何机器学习分类器的预测 |
| symbolic_pursuit | [Symbolic Pursuit](在黑盒外学习:追求可解释模型) |
| shap_permutation_sampler | SHAP 重新排列采样器 |
| kernel_shap | SHAP KernelExplainer |
| invase | INVASE:实例变量选择 |
不确定性
from autoprognosis.plugins.uncertainty import UncertaintyQuantification
model = UncertaintyQuantification().get(<NAME>)
| 名称 | 描述 |
|---|---|
| cohort_explainer | |
| conformal_prediction | |
| jackknife |
:hammer: 测试
安装库后,可以使用 pytest 执行测试
$ pip install .[testing]
$ pytest -vxs -m "not slow"
引用
如果您使用此代码,请引用相关论文
@misc{https://doi.org/10.48550/arxiv.2210.12090,
  doi = {10.48550/ARXIV.2210.12090},
  url = {https://arxiv.org/abs/2210.12090},
  author = {Imrie, Fergus and Cebere, Bogdan and McKinney, Eoin F. and van der Schaar, Mihaela},
  keywords = {Machine Learning (cs.LG), Artificial Intelligence (cs.AI), FOS: Computer and information sciences, FOS: Computer and information sciences},
  title = {AutoPrognosis 2.0: Democratizing Diagnostic and Prognostic Modeling in Healthcare with Automated Machine Learning},
  publisher = {arXiv},
  year = {2022},
  copyright = {Creative Commons Attribution 4.0 International}
}
参考文献


下载文件
下载适合您平台的文件。如果您不确定选择哪个,请了解更多关于 安装包 的信息。
源分布
此版本没有可用的源分布文件。请参阅有关 生成分布存档 的教程。
构建分布
autoprognosis-0.1.21-py2.py3-none-any.whl (284.5 kB 查看哈希值)
关闭
哈希值 for autoprognosis-0.1.21-py2.py3-none-macosx_10_14_x86_64.whl
| 算法 | 哈希摘要 | |
|---|---|---|
| SHA256 | 1c08651bfc2ca83d8c19b874d1216d985b6d7a0ba72d20d6ad927f39ecb4a66c |
|
| MD5 | 037f54961ec6352d9f7805594cde04be |
|
| BLAKE2b-256 | f1c4ab1f11e673b34aa4ab1021b529626405f39932774a0bf796eec35f856073 |


